The Alarm.com Remote Temperature Sensor is a Z-Wave Remote Temperature Sensor (RTS) designed for use with the Alarm.com Smart Thermostat. When not paired with a Smart Thermostat, it can be used to provide a temperature reading from a location other than the thermostat, which is visible from the Alarm.com Website and app.
When an RTS is paired with a Smart Thermostat, the RTS can use its own temperature readings to dictate the heating and cooling provided by an HVAC system. It can even take the average temperature between other Remote Temperature Sensors or Smart Thermostats to dictate control of the HVAC system.
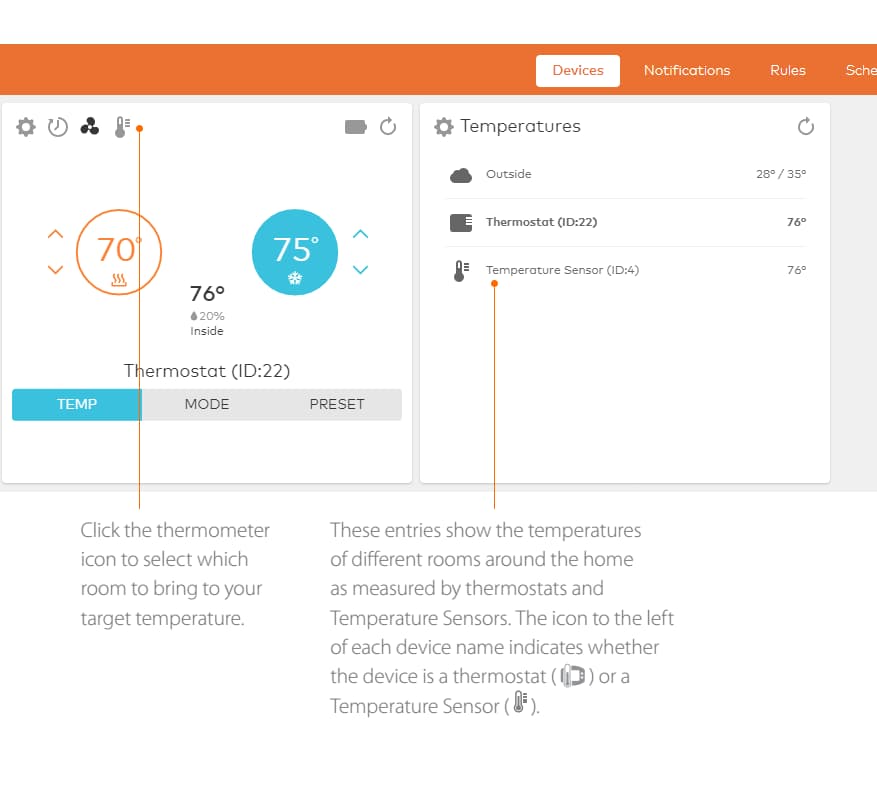
By default, the HVAC system keeps the thermostat’s internal thermometer at a selected target temperature. With Temperature Sensors placed in different rooms around the home, the system is also able to detect the temperature in these other areas, such as an upstairs bedroom or downstairs den.
Note : If the thermostat is in Off mode, the Thermometer Icon (noted in the above image) does not display.
Direct Control: Using Temperature Sensors without thermostat schedules
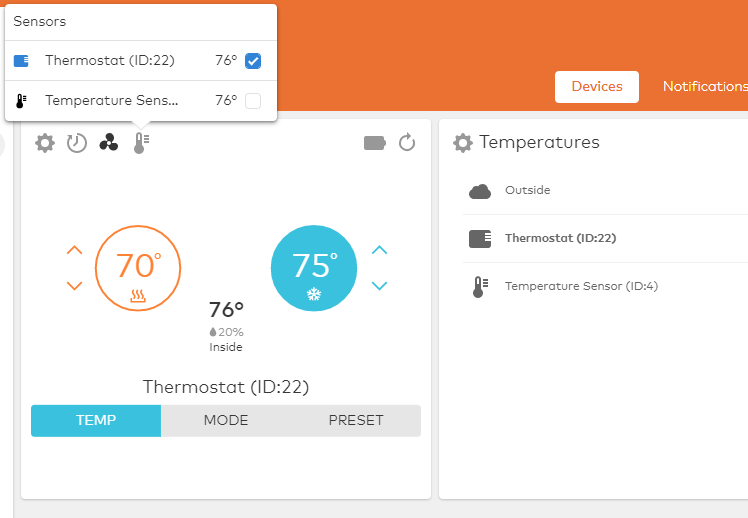
Select one or more Temperature Sensors to directly control your HVAC system when there’s no thermostat schedule set.
When clicking Thermometer Icon, a window appears. From here, one or more Temperature Sensors can be selected. The HVAC system monitors the average temperature reported by the selected sensors and keep the average steady at the target temperature. For example, if the nighttime target temperature is 70 degrees, and all bedroom Temperature Sensors are selected, then the average of temperature across the bedrooms are maintained at 70 degrees.
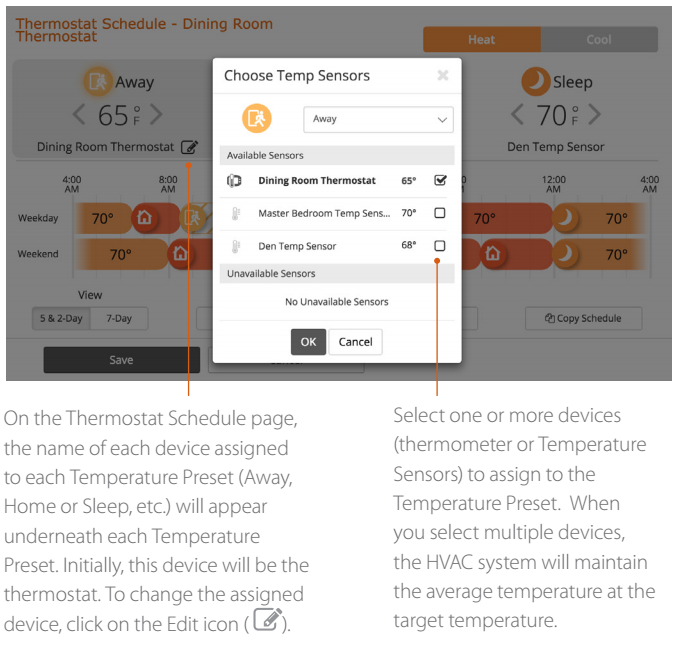
Adding Temperature Sensors to thermostat schedules
Make thermostat schedules even more precise by assigning one or more Temperature Sensors to the Temperature Presets. For example, match the bedroom Temperature Sensor to the Sleep Preset, or the family room Temperature Sensor to the Home Preset. That way, the system is able to cool the right rooms in the house to the target temperature at the times they are in use.
To get started, click > Icon on the Thermostat card and then click Schedules . Schedules can then be edited from this page.
What notifications are available with the Alarm.com Temperature Sensor?
Temperature Sensors and wakeup devices
The Temperature Sensor is a wake-up device, which means it communicates less frequently than other Z-Wave devices in order to conserve battery power and increase longevity.
This means that:
Temperature Sensors won’t respond to any polling. Alarm.com only knows the temperature if the sensor tells us. The Temperature Sensor is programmed to let Alarm.com know if the temperature changes by a full degree, and initiates and checks in with the panel at least once every four hours.
Alarm.com can hold pending commands for the Temperature Sensor until it wakes up and is able to receive information. That means commands like battery level checks and Link Quality Indicator tests can be stored by the module until such time when the Temperature Sensor is able to receive and carry out the commands.
Since the Temperature Sensor is dormant most of the time, it does not generally take part in Network Rediscoveries. That’s why it’s important to install all of your devices and run a Rediscovery before adding the Temperature Sensor. This way, it can determine the best path for transmitting signals to the module when during enrollment.
Can the Temperature Sensors be used in auto mode?
Yes. The Temperature Sensors have built-in safeguards to prevent the system from running too frequently or trying to switch back and forth between Heat and Cool too rapidly. However, it’s a good idea to verify that users have their Heat and Cool schedules configured to ensure a safe gap between Heat and Cool target temperatures at any given time. There should be at least a four-degree difference between the Heat and Cool target temperatures at all times to ensure the system is not cycling too frequently between them.
Note: When in Auto Mode, the Temperature Sensor settings follow those specified on the Heat Mode schedule.
Why does the Temperature Sensor show a malfunction?
If the Temperature Sensor doesn’t communicate with the Alarm.com module for 24 hours, it displays a Malfunction. It can be woken up manually by pressing the Pairing button on the side. If it still doesn’t respond:
Repeaters may need to be added to the network.
The Temperature Sensor may need to be deleted/re-added.
A more favorable location for mounting the Temperature Sensor may be needed.
Can multiple Temperature Sensors be used with a multi-thermostat system?
Yes, but things can get complicated quickly with multiple Temperature Sensors and multiple thermostats. The user experience is designed to be as simple and easy as possible, but when working with three thermostats and five Temperature Sensors placed around a house, managing all of them while trying to maximize the HVAC system’s energy efficiency can be challenging. Safeguards have been added to prevent Temperature Sensors from being used for multiple devices at the same time and to prevent systems from contradicting each other (and running Heat and Cool simultaneously, for instance). In general, it is recommended to start simple and build out as the user gets more experienced.
Why is N/A showing on the Temperatures card?
Until Alarm.com has received a temperature report from a Temperature Sensor, the Alarm.com Website won’t have anything to show on that card. To prompt a temperature report, change the temperature of the Temperature Sensor by a degree or press the button on the side of the Temperature Sensor. Shortly after that’s done, a temperature displays on the Alarm.com Website.
Can a Remote Temperature Sensor be used with any Z-Wave thermostat or is the Alarm.com Smart Thermostat required?
Without the Alarm.com Smart Thermostat, it is still possible to see the current temperature in your Temperature Sensor’s location and use that to inform your decision when selecting a target temperature. However, for full functionality, including pairing Temperature Sensors for direct control, temperature averaging, and scheduled automation, an Alarm.com Smart Thermostat is required.
How can discomfort or high energy costs incurred as a result of a failed or unresponsive Temperature Sensor be prevented?
The Temperature Sensor was carefully developed to build in multiple fail-safes to prevent that from happening. These include close sensor supervision and checks for the thermostat’s observed temperature differing by too much from that of the Temperature Sensor.
How many Temperature Sensors can be used on one system?
A maximum of 10 Temperature Sensors can be used on one system. Each Temperature Sensor can only be used to control one thermostat at a time.
What is the battery life of the Temperature Sensor, and what type of battery does it use?
The battery life is up to three years and it uses a 3-volt Lithium CR123A series battery.
What is the recommended operating temperature for the Temperature Sensor?
The Temperature Sensor is designed for indoor use, and it is recommended that it not be used in environments likely to be outside the range of 32-95°F (0-35°C).
Why doesn’t the Remote Temperature Sensor remain selected to control the HVAC system?
If a schedule is enabled for the thermostat, the settings for that interval will be used when the next scheduled interval occurs. See here: