How to Install an Alarm.com Compatible SkyBell Video Doorbell

Use this guide to assist with the installation of your Alarm.com compatible SkyBell video doorbell.

The following SkyBell Doorbell Cameras are fully compatible with Alarm.com:

  • Slim Line I Wi-Fi Doorbell Camera (ADC-VDB105/106)
  • Slim Line II W-Fi Doorbell Camera (ADC-VDB105x/106x)
  • SkyBell HD Wi-Fi Doorbell Camera (ADC-VDB101/102)

Important

Slim Line incompatible with SkyBell and other platforms

The Slim Line Wi-Fi Doorbell Cameras are not compatible with other platforms and apps, such as the SkyBell platform.

SkyBell HD cameras

Certain SkyBell HD Wi-Fi Doorbell Cameras, not purchased through Alarm.com, may not be compatible with the Alarm.com platform.

SkyBell V1 and V2 not compatible

SkyBell V1 and V2 cameras are not compatible with Alarm.com.

SkyBell Trim, Trim Pro are not Compatible

Requirements

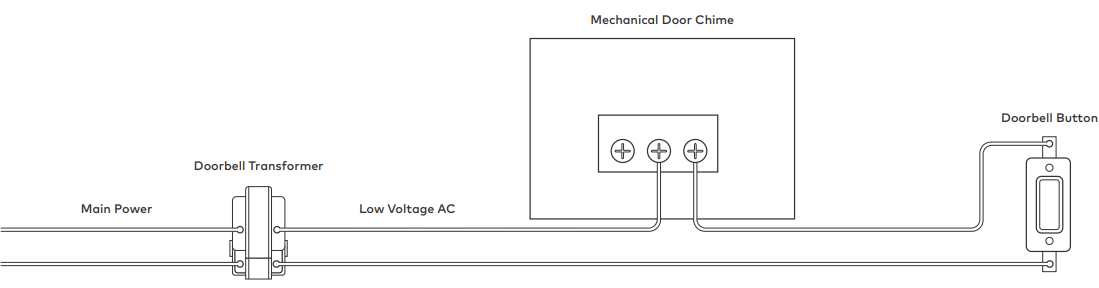
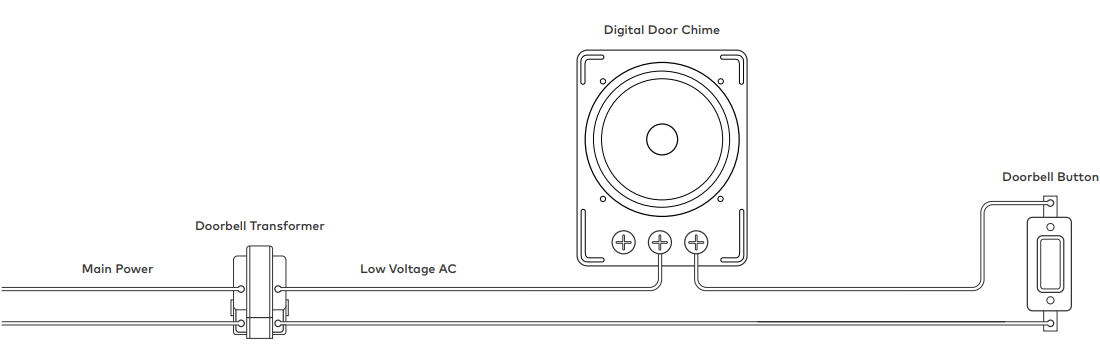
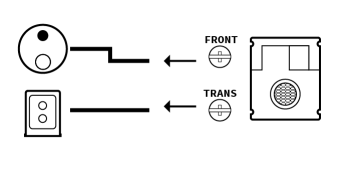
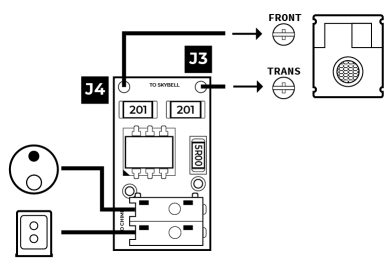
Power and chime type

10-36 VAC (16-24 VAC is recommended), 10 VA or 12 VDC, 0.5 to 1.0 A wired to an in-home mechanical or digital doorbell chime.

Important considerations
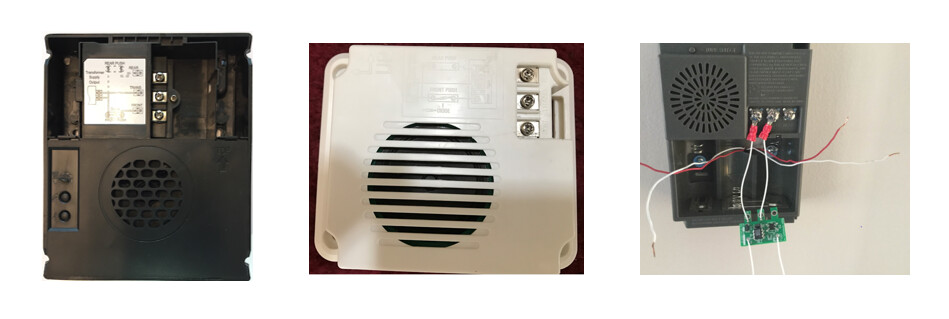
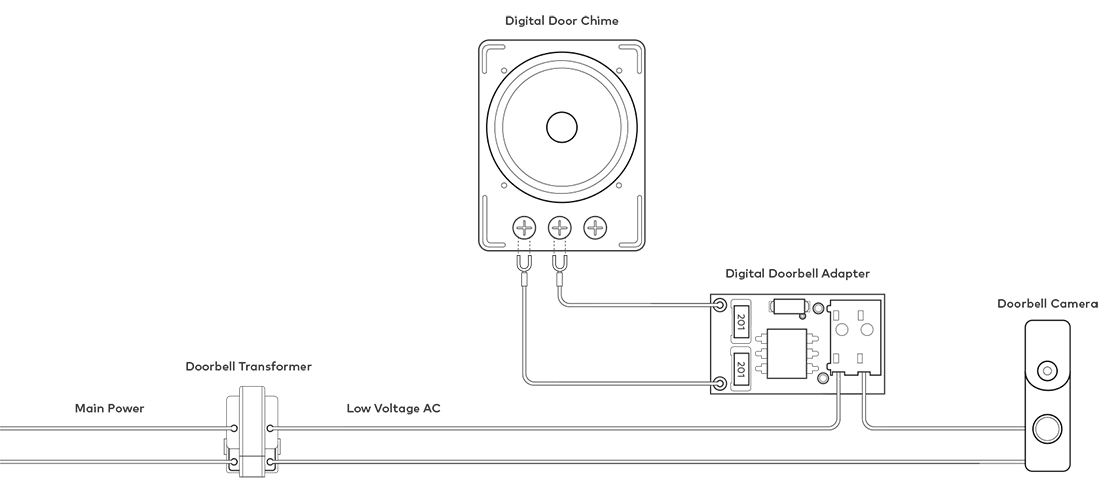
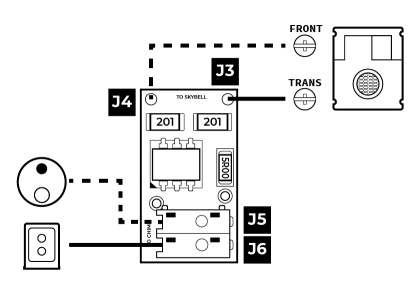
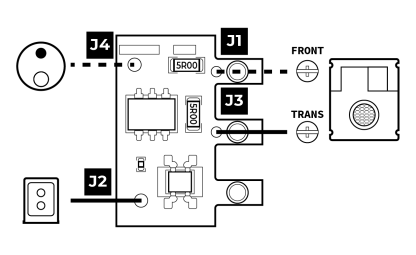
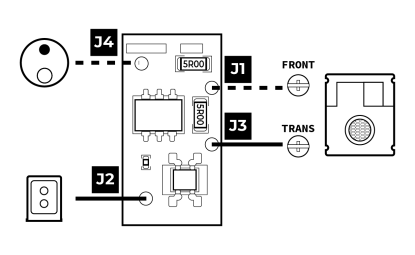
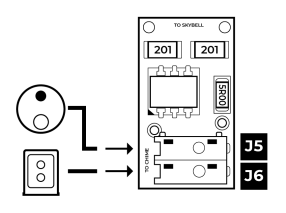
  • A SkyBell Digital Doorbell Adapter must be installed if a digital doorbell chime is present.
  • Do not install more than two doorbell cameras on a single transformer. A power rating of 10 VA per doorbell is required.

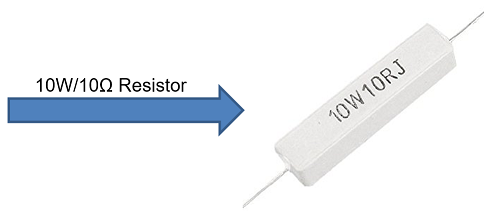
Caution: An in-line resistor (10 Ohm, 10 Watt) is required when installing the doorbell camera without a wired, in-home doorbell chime. This is typically done when testing the doorbell or giving a demonstration. Failure to install a resistor when a chime is not present may result in damage to the doorbell camera.

Wi-Fi

Upload speed of 2 Mbps is required. Compatible with Wi-Fi 802.11b/g/n, 2.4 GHz or 5 GHz for the Slim Line II (on the 20 MHz bandwidth channel) up to 150 Mbps

Pre-installation checklist

Working doorbell check

A wired doorbell circuit is required to provide power to the SkyBell Doorbell Camera. First, verify the existing wired doorbell is working and that it is wired properly. There is a power issue if the existing doorbell does not ring the indoor chime when the button is pressed. This issue must be addressed before beginning the SkyBell Doorbell Camera installation process.

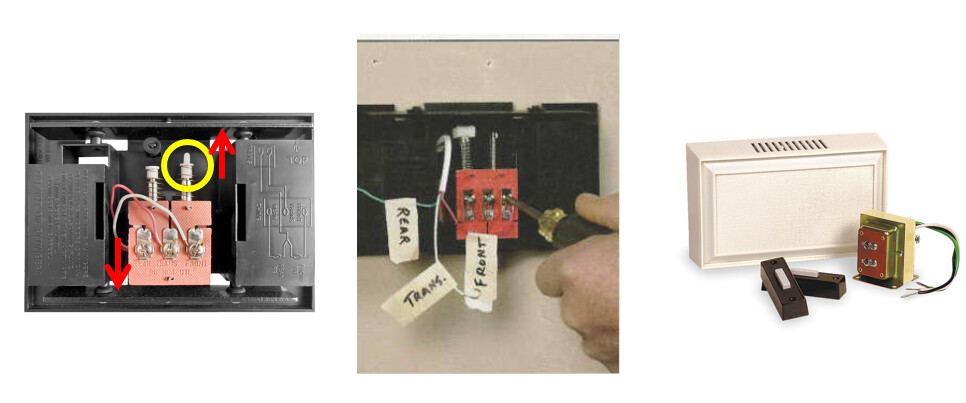
Wired doorbell check

Verify the existing doorbell is wired by visually inspecting the doorbell button for wires. If necessary, the doorbell can be removed from the wall to check for wiring. You can also inspect the chime inside the home – a chime plugged into a power outlet might indicate an incompatible wireless doorbell system is in place.

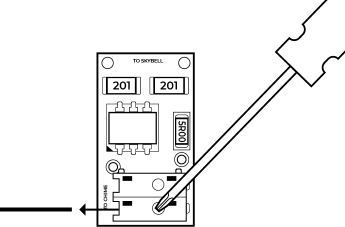
Doorbell chime type check

Locate the chime inside the home and remove the faceplate. Identify the chime as one of the following types:

  • Mechanical chime

    • If the chime has metal bars and a striker pin, it is mechanical and will work without additional hardware.
  • Digital chime

    • If the chime has a speaker that plays a tone when pressed, it is digital and will require the installation of the SkyBell Digital Doorbell Adapter and the enabling of the digital doorbell setting in the app to function properly.

Incompatible Chime Types

  • Tube chime
  • Intercom system

Hardware installation

Remove existing doorbell button

Take care to prevent the existing doorbell wires from slipping into the wall.

1. Attach the doorbell mounting bracket to the wall

Feed the existing doorbell wires through the hole in the center of the bracket. Affix the bracket firmly to the wall by driving the provided wall screws through the top and bottom holes in the bracket. Failure to make the bracket flush on the wall could cause a poor power connection between the bracket and the SkyBell Doorbell Camera.

2. Connect power wires to the mounting bracket

Loosen the terminal screws and insert the wires beneath the screws. Do not short (touch together) the wires during this process. Tighten the screws. The wires must be of approximately equal thickness, and the screws should be tightened approximately the same amount so that the screwheads are flush. See various Power Configuration diagrams below.

If the wires are thick, splice short lengths of additional thinner wire. The splice joints can be hidden inside the wall, and the thinner wire can be used to connect to the mounting bracket.

3. Attach the SkyBell Doorbell Camera to the mounting bracket

Slide the top of the SkyBell Doorbell Camera down on to the mounting bracket and push the front of the SkyBell Doorbell Camera toward the wall. Tighten the set screw located on the bottom of the camera, being careful not to damage it (power tools should not be used with the set screw). The camera’s LED should begin to illuminate.

4. Connect the Digital Doorbell Adapter

Important: If the home has a mechanical chime, you may skip this section. If the home has a digital chime, a Digital Doorbell Adapter is required.

Remove the cover from the digital chime and locate the wire terminals. Completely remove the screws from the terminals and temporarily move the wires out of the way.

Important: Some chimes come installed with a diode in place, which are almost always digital chimes. In these circumstances, the diode must be removed prior to installing the Digital Doorbell Adapter. If the diode remains in, it may cause the DDA to fail, leading to issues such as constant ringing.

Connect the Digital Doorbell Adapter wires to the chime:

  • J4 → Front Terminal on the Digital Doorbell
  • J3 → Trans Terminal on the Digital Doorbell

Connect the J5 wire to a wire from the wall, and connect the J6 wire to a wire from the wall. Reassemble and reinstall the digital chime in its original location.

Note: The adapter may display TO SKYBELL on the side. Please disregard.

DDA_diagram

Mechanical chimes - Identification and Wiring Diagram

Mechanical chimes typically have:

  • Standard Front/Trans/Rear leads
  • A physical striker pin
  • A cover that usually has to be removed to identify the striker pins

With mechanical chimes, the SkyBell Doorbell Camera just takes the place of the doorbell button. There is no additional equipment required for mechanical chime installations. This is the most common install. Polarity does not matter when wiring to the back of the SkyBell Doorbell Camera.

Mechanical chime – Before installation

Mechanical chime - With SkyBell Doorbell Camera

Digital chimes - Identification, Wiring Diagram, and Digital Doorbell Adaptor

Digital chimes

Digital chimes typically have:

  • Standard Front/Trans/Rear leads
  • A speaker in the chime instead of physical striker pins

Important: Digital chimes require a digital doorbell adapter (DDA) is installed with the SkyBell Doorbell Camera to regulate power to the speaker.

Digital chime – Before installation

Digital chime – With SkyBell Doorbell Camera

A digital doorbell adapter (DDA) is required for all digital chimes to work with the SkyBell Doorbell Camera. The primary function of a DDA is to regulate the power going to the digital speaker throughout the duration of the chime.

The DDA is installed in the middle of the chime’s circuit. Connect the DDA to the chime prior to installing the Doorbell Camera. The SKU for the DDA is ADC-VACC-DB-A.

There are different variations of DDAs, but they all perform the same function

Match up the DDA that you have to the below diagram for proper wiring.

DDA1

  • Connect wires J3/J4 to the Trans/Front terminals on the digital door chime.
  • Connect the transformer/SkyBell Doorbell Camera wires to terminals J5/J6.

Note: Polarity does not matter.

DDA2

  • Connect J1 to the Front terminal on the digital chime.
  • Connect J2 to the transformer wire.
  • Connect J3 to the Trans terminal on the digital chime.
  • Connect J4 to the SkyBell Doorbell Camera wire.

DDA3

  • Connect J1 to the Front terminal on the digital chime.
  • Connect J2 to the transformer wire.
  • Connect J3 to the Trans terminal on the digital chime.
  • Connect J4 to the SkyBell Doorbell Camera wire.

To wire the digital doorbell adapter to an existing chime:

  1. Take the chime cover off of the chime.
  2. Remove the two wires connected to Front and Trans on the chime. If there are any diodes in the circuit, remove them too.

Disconnect_wires_chime

3.Insert the wires into the white connectors. Polarity does not matter.

Wire_transformer_and_doorbell_to_DDA

Note: The adapter may display TO CHIME on the side. Please disregard.

  1. Connect the DDA wires to Front and Trans. Polarity does not matter

Wire_chime_to_DDA

  1. Reattach the chime cover to the chime.
To remove a wire
  • Press the silver hole with a screwdriver to release the wire.

Remove_wires_DDA

Can the SkyBell Doorbell Camera be used without a chime?

Yes. However, the power requirements are different when installing a SkyBell Doorbell Camera without a chime. The SkyBell Doorbell Camera will either require a 10 Ohm 10 Watt resistor with 5% tolerance on the existing AC transformer’s circuit or a DC adapter rated at 12 VDC 0.5–1.0 Amps.

Installing a SkyBell Doorbell Camera without a chime is typically done for testing or demonstration. It is recommended to install the SkyBell Doorbell Camera in an existing doorbell circuit (i.e., a circuit with a doorbell button, chime, and transformer) to make installation easier and to provide the most usability.

Connect the SkyBell Doorbell Camera to an AC transformer

The transformer should be rated 16–24 VAC, 10 VA for a single SkyBell Doorbell Camera. A 10 Ohm 10 Watt resistor with 5% tolerance must be used to replace the chime. The SkyBell Doorbell Camera must function as part of a complete circuit, meaning it requires direct power on one side and a wired doorbell or the resistor on the other.

Caution: Failure to install a 10 Ohm 10 Watt resistor with 5% tolerance when using an AC transformer with no chime may result in damage to the SkyBell Doorbell Camera.

SkyBell Doorbell Camera power diagram

Recommended hardware

For all setups with a standalone AC transformer and no chime, use a 10 Watt 10 Ohm resistor.

10_ohm_10_watt_Resistor-nochime

  • If connecting one SkyBell Doorbell Camera to an AC transformer, use a transformer rated at 16 VAC 10 VA. The maximum is 15 VA per SkyBell Doorbell Camera; any higher could damage the device.
  • If connecting two SkyBell Doorbell Cameras to one AC transformer, use a transformer rated at 16 VAC 20 VA. The maximum is 30 VA so that each SkyBell Doorbell Camera is within the range of 10-15 VA.

Connect the SkyBell Doorbell Camera to a DC adapter

Verify the adapter is exactly 12 VDC 0.5–1.0 Amps. No additional hardware is required since this is the exact power draw needed for the SkyBell Doorbell Camera. A 12 VDC adapter is only used in no-chime setups.

Caution: If the DC Power adapter has an amperage above 1, add a 10 Ohm 10 Watt resistor with 5% tolerance to the circuit — the power draw will be too significant for the device to manage otherwise.

To attach the DC adapter to the SkyBell Doorbell Camera:
  1. Cut off the barrel plug.
  2. Strip the wires just enough to let them make good contact with the SkyBell Doorbell Camera’s terminals.
  3. Attach the wires to the SkyBell Doorbell Camera terminals — polarity does not matter.