Installation - Install the new thermostat
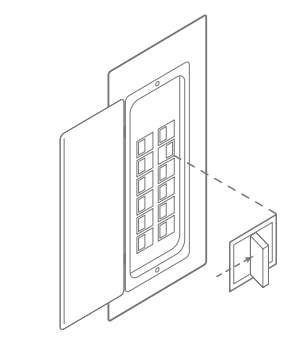
Install the back plate
Use the bubble level provided on the back plate as a guide. Mark where the screws will go with a pencil through the screw holes on the back plate. Verify the top of the back plate is facing up.
Note: If necessary, use the trim plate to cover up any marks or holes left from the old thermostat. Attach the trim plate before securing the back plate to the wall. Drill holes with 3/16” drill bit to tap in the drywall anchors for added support.
Wire the new thermostat
Reconnect the wires to the new thermostat and indicate the connected wires with a pencil in the image below. This information will be needed when configuring the thermostat.
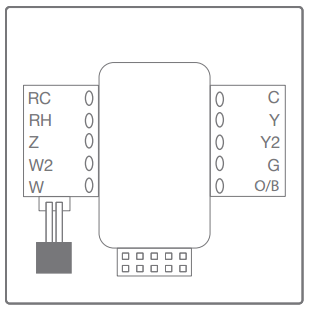
Caution : If there are extra wires, do not install them in the new thermostat. Please contact a local HVAC professional for additional assistance.
- If there is an R wire, connect it to RH.
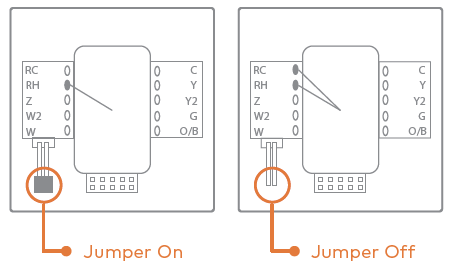
- If there are both RH and RC wires, remove the black jumper in the lower left corner of the backplate terminal board with needlenose pliers, and attach wires to both RH and RC terminals.
- Z can be used for W3, H, DH, O/B Zoning, or Ventilation.
Terminal designations
Conventional system
| Terminal | Description |
|---|---|
| RC | Cooling power |
| RH | Heating power |
| Z | Configurable W3, H, DH, O/B Zoning, or Ventilation |
| W | Heat stage 1 |
| W2 | Heat stage 2 |
| W3 | Heat stage 3 |
| C | Common wire from secondary side of heating transformer (if 2 transformers) |
| Y | Cool stage 1 |
| Y2 | Cool stage 2 |
| G | Fan |
| H | Whole home humidifier |
| DH | Whole home dehumidifier |
| O/B | Energized in cool mode |
Heat pump
| Terminal | Description |
|---|---|
| RC | Cooling power |
| RH | Heating power |
| Z | Configurable W3, H, DH, O/B Zoning, or Ventilation |
| W | Aux stage 1 |
| W2 | Aux stage 2 |
| W3 | Aux stage 3 |
| C | Common wire from secondary side of cooling transformer |
| Y | Pump stage 1 |
| Y2 | Pump stage 2 |
| G | Fan relay |
| H | Whole home humidifier |
| DH | Whole home dehumidifier |
| O/B | Reversing valve |
Insert batteries into the thermostat
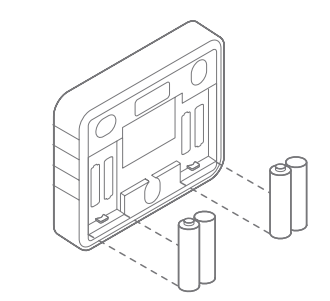
The thermostat can be powered by battery and/or 24 VAC. Even when powered by 24 VAC, it is still recommended to insert batteries as a backup in case the C wire fails. This also prevents low battery trouble conditions.
Note: If a wall transformer is used to power the thermostat, connect between C and RH. The system must be either heat-only or cool-only when using a wall transformer, as the transformer would wire into one of the R terminals (Rc or Rh depending on what is open) and the C terminal with the jumper removed.
Ensure the batteries are installed following the specified polarity markings on the thermostat.
Caution: Special Battery Warning
- Always replace the batteries as soon as they have low battery levels, indicated by “LOW” then “BATT” flashing on the display. If the batteries drain, the thermostat could leave the HVAC system on or off, overheating or freezing the home.
- Always replace the batteries at least once a year. This will protect the thermostat from damage and corrosion by leaking batteries.
- If the home is unoccupied for a month or more, such as vacation homes, replace the batteries as a preventive measure against battery failure while away.
- Always use new batteries as replacements.
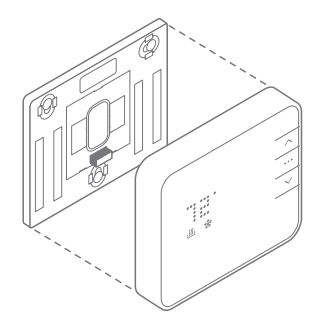
Attach the body and back plate
Verify that any excess wire is tucked back into the wall to allow room for the thermostat to sit flush against the back plate.
Press the thermostat body firmly into the back plate mounted to the wall. Ensure that the pins on the body are correctly aligned with the header attached to the terminal board on the back plate. Failure to do so could cause damage to the thermostat.
Turn the power on
Restore power to all the heating and cooling systems. This can be done at the circuit breaker.