Smart Humidity Control Set Up Guide

This quick start guide describes how to control humidity with a Smart Thermostat and a connected humidifier or dehumidifier.

Preparation

Pre-installation checklist

Before proceeding with the installation, the following are required:

  • One of the following compatible thermostats:
    • Smart Thermostat (ADC-T40K-HD)
    • Smart Thermostat (ADC-T3000)
    • Smart Thermostat (ADC-T2000) with firmware version 1.50+. For information about how to find the thermostat firmware, see here.
  • Confirm panel compatibility. For a list of compatible panels, see here.
  • Humidifier or dehumidifier.
    • Users without a humidifier or dehumidifier can still benefit from turning on the Smart Humidity Control feature. When the feature is enabled, these customers can lower their humidity using their air conditioner and view humidity levels
  • Screwdriver.
  • Wire cutters.

Humidity control

Humidity is the amount of water vapor, or moisture, present in the air. Typically, humidity is measured as a percentage referred to as relative humidity. Humidity percentage is the water vapor to dry air ratio in a specific area at a specific temperature. Essentially, the hotter the air is, the more water the air can contain.

The humidity percentage is the measure that Alarm.com uses to display and control from the Thermostat card on both the Customer Website and Customer app. It cannot be viewed locally at the Smart Thermostat.

0% relative humidity means that no moisture or a negligible amount of moisture exists in the air, and 100% humidity means that there is so much moisture in the air that water droplets may form. Humidity over 70% greatly increases the risk of mold growth, which can cause significant property damage if left unnoticed or untreated.

With a humidifier or dehumidifier

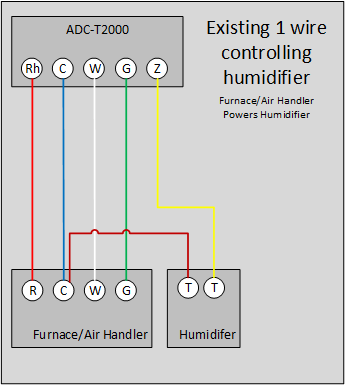
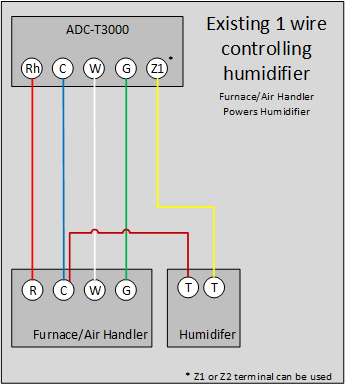
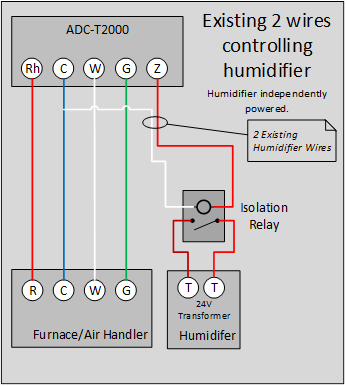
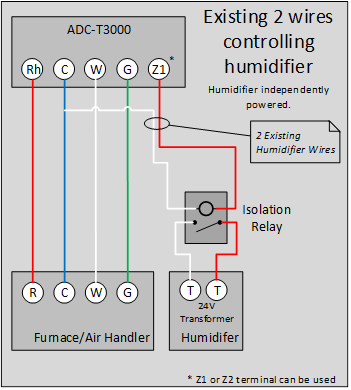
Controlling humidity by use of a humidifier or dehumidifier with the Smart Thermostat requires that the humidifier or dehumidifier is wired to the HVAC system or air handler. These types of humidifiers or dehumidifiers may be controlled by a separate humidistat (digital or analog dial format) or to the customer’s thermostat. The humidifier or dehumidifier is wired to the configurable Z terminal on the ADC-T2000 or either Z1 or Z2 terminals on the ADC-T40K-HD or ADC-T3000.

  • For humidifiers, the user sets a minimum humidity setpoint (relative humidity percentage).
    • Whenever the relative humidity level of the air drops below the minimum setpoint, the humidifier is activated, and the moistened air is circulated through the ventilation system by way of the air handler until the humidity setpoint is reached.
  • For dehumidifiers, the user sets a maximum humidity setpoint (relative humidity percentage).
    • Whenever the relative humidity level of the air goes above that setpoint, the dehumidifier is activated. Moist air is cycled through the dehumidifier where the moisture is removed, and the drier air is circulated through the ventilation system by way of the air handler until the humidity setpoint is reached.

When the Smart Thermostat calls for the Humidifier/Dehumidifier, it sends 24 VAC from the RH terminal to the Z terminal to engage the Humidifier or Dehumidifier. 24 VAC is sent to the G Terminal as well to engage the Fan.

A humidifier may be used in conjunction with the customer’s air conditioner/cooling unit controlled by the Smart Thermostat to keep the humidity of the environment between a maximum and minimum setpoint.

Note: Only the ADC-T40K-HD and ADC-T3000 can control both a humidifier and dehumidifier. The ADC-T2000, with only 1 Z terminal, must use the air conditioner/cooling unit to dehumidify.

With an air conditioner

Controlling humidity by use of air conditioning requires that the customer has at least one cooling unit or stage (e.g., air conditioner or heat pump) installed and configured on the Y terminal of the Smart Thermostat. The user sets a maximum humidity setpoint (relative humidity percentage), and whenever the relative humidity level of the air goes above that setpoint, the air conditioner is activated. Air conditioners reduce humidity through standard operation.

Humidity control through air conditioning may be used in conjunction with a humidifier controlled by the Smart Thermostat to keep the humidity of the environment between a maximum and minimum setpoint.

Humidifier or dehumidifier installation

The ADC-T2000 can control either a humidifier or dehumidifier. The Smart Thermostat cannot control both devices at the same time. The ADC-T40K-HD and ADC-T3000 have two Z terminals, therefore can be wired to control both a humidifier and dehumidifier.

Important : If any uncertainties around the existing wiring, it is always best to contact an HVAC professional to investigate the type of humidifier configuration.

To install the humidifier or dehumidifier:

  1. Determine the wiring configuration for the user’s humidifier
  2. Disconnect power from the humidifier or dehumidifier. This can be done at the circuit breaker. Refer to any installation instructions that accompany the humidifier or dehumidifier.
  3. Wire the humidifier based on the appropriate configuration type.
  4. Finish installing and mounting the thermostat. For more information about installing and mounting the thermostat, see here.
  5. Add the thermostat to the Z-Wave network (if not already completed).
  6. Configure the Z terminal to control humidity and setup humidity settings.

Humidity control system configuration types

Humidity control systems can have a two different configuration types. One where the humidifier is powered by the HVAC system (1-wire control), and the second is where the humidifier has its own 24V power source (2-wire). Find the configuration that matches the user’s situation. As with any thermostat wiring, the breaker for the HVAC system and humidifier or dehumidifier should be off during the wiring process.

Note: Ventilation is only supported on the ADC-T3000.

1-wire control: Humidifier is powered by HVAC system

This is a common configuration. Typically, these systems are already wired into the existing thermostat, likely connected to an H, DH, or X terminal. In these cases, wire this directly to the Z terminal on the Smart Thermostat (ADC-T2000) or the Z1 or Z2 terminals on the Smart Thermostats (ADC-T40K-HD or ADC-T3000).

clipboard_e2165b6a5d4269296737fc60ee6735a5d clipboard_e2858afd852494b1a9d8e51598ed7786c

2-wire control: Humidifier is powered by its own 24V power source

This configuration is more common for new humidity control system installations or for systems wired directly to a humidistat or an independent switch in the existing thermostat. With these types of systems, a 24V relay must be used to separate the 24V from the HVAC system and the 24V from the Humidifier.

Instead of the thermostat controlling the humidifier directly, the thermostat will close the 24V relay allowing the Humidifier to be powered from its own 24V power source.

To wire the ADC-T2000, ADC-T40K-HD, or ADC-T3000 to this type of system, connect one wire to the Z terminal on the ADC-T2000, or Z1/Z2 terminal on the ADC-T40K-HD or ADC-T3000, and connect the other wire to the common wire at the thermostat.

Important: The ADC-T2000, ADC-T40K-HD, and ADC-T3000 terminals can only fit one 18 AWG wire. Use a wire nut to connect to the C wire behind the thermostat to ensure the terminals are not damaged by trying to fit two wires into the terminal.

Caution: With 2-wire systems, it is best to test voltage using a multimeter on the wires to determine if there is 24 V present before continuing with the installation. If a wire does carry 24 V, it can damage the thermostat if connected to the Z terminal.

clipboard_ea0f91841ee3db08f41e61ed0254ab04cclipboard_e051b7b928e648bb84f360bb6c2ade9a6

To install the humidifier or dehumidifier:

  1. Disconnect power from the humidifier or dehumidifier. This can be done at the circuit breaker. Refer to any installation instructions that accompany the humidifier or dehumidifier.
  2. Connect one of the control wires to the configurable Z-terminal of the Alarm.com Smart Thermostat.
  3. Connect the other wire to the common terminal at the furnace control board.
  4. Finish installing and mounting the thermostat.
  5. Add the thermostat to the Z-Wave network (if not already completed).

Configure the humidity settings

After the thermostat is installed and connected to the user’s Z-Wave network, the Z terminal controlling the humidifier must be configured to the Humidifier setting

Enable humidity control

Customers can set humidity setpoints using the Customer Website or Customer app. For more information about creating or editing Smart Humidity Control thermostat rules, see here