Installing the IQ Hardwire PowerG
If you are using the Qolsys IQ Panel 4, or IQ Panel 4 Hub, this guide covers how to use the IQ Hardwire PowerG to convert wired sensors into wireless. During the installation process, refer to the Installation Manual Here.
Before you start:
- Put Monitoring account on Test Mode to avoid false dispatch
- Check to ensure all devices currently connected to the hardwired panel function before switching to the IQ Hardwire PowerG.
Needed:
- Sharpie and tape to label wires
- Or any writing tool
- Precision Screw Driver
- Drill / Bits
- List of your zones
- Take a picture of your current panel incase you need to go back to it for reference
- Power Strip if needed (if using additional keypads).
Overview:
- Label/Remove Panel
- Install and Program IQ Hardwire PowerG takeover module
- Connect Wires to panel
- Add Zone Expanders if needed
- Add Keypads if needed
- Make additional programming changes
Step 1: Label/Remove Panel
- Label all the wires to their proper zone number / Keypad location / Siren / Smoke Detector / Extras
- Unplug hardwired panel transformer from the wall and disconnect the wire as this will need to be replaced the transformer included with the IQ Hardwire PowerG.
- Disconnect the hardwired panel backup battery
The panel should now be powered down
- Remove all wires from the panel and zone expanders
- Remove the screws to remove the panel from the wall and take down panel
Step 2: Install and Program takeover module
-
Before mounting panel, verify which keypad wires will need to go to power(IQ 4 Panel, IQR-PG) Remove a knockout to have an exit route for these wires as these keypads require their own transformer. Sometimes a power strip is needed when using multiple IQR-PG.
-
Mounting the panel:
The panel will be a different size and will require new anchors and screws. Mark your spots, install the anchors, mount the anchors and then mount the panel. Install the new power adaptor provided with the panel. -
Power up the takeover module:
Wire in the power to the panel and then add the transformer and plug it in.
Learning in to IQ 4 panel:
-
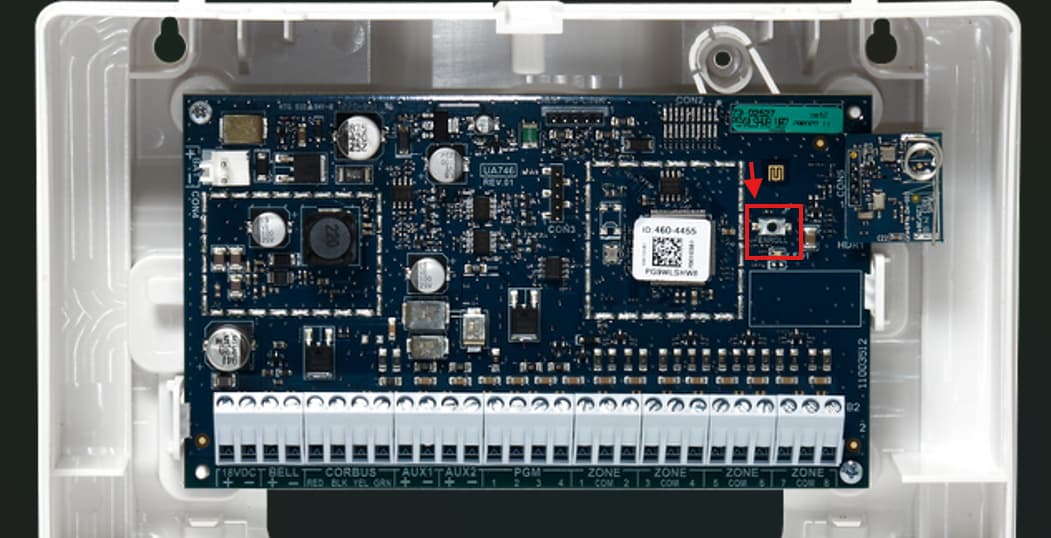
Default takeover module:
Always factory default takeover module before installation to avoid issues after enrolling to panel. You can do this by pressing and holding the enroll button until a red light flashes three times. -
Enroll Mode:
Enter programing on your IQ4 by swiping down from the top on the main screen > Settings > Advanced Settings > Installer/Dealer Code > Installation > Devices > Security Sensors > Auto Enroll. -
Learn and program:
Then press and hold the learn button on the takeover module until it turns orange. Release immediately after. It will pop up on your keypad. Verify the serial number is correct. Change any options you have and press save. This will automatically enroll the 8 zones on the module.
Step 3: Wiring Takeover Module
- 18V DC Terminals will go to your 18 V DC transformer provided.
- Bell terminals will either need a siren connected or a 1 kΩ resistor across the BELL+ and BELL- terminals or a bell trouble will appear on your panel.
- Corebus is where your keypad, zone expanders, and power supplies will be connected to.
- PGM outputs - PGM2 is used for 2-Wire smokes and 4-Wire smokes.
- Zones - Every two zones will share the center common
For more Information on PGM outputs see here:
Step 4: Add Zone Expanders if needed
POWER DOWN SYSTEM BEFORE WIRING IN ZONE EXPANDERS
-
Wiring in zone expanders: Use 22 Gauge 4 Conductor wiring for wiring between the main panel and the zone expanders. Red to Red, Black to Black, Green to Green, Yellow to Yellow. You will also need to add a short wire from the first terminal labeled “Tamper” to the terminal labeled Black on the zone expander or else your keypad will display a trouble.
-
Learning in Zone Expander:
To add zone expanders, power up system and wait till takeover module is synced with panel and return to the auto enroll section. Zone expanders take the next available zone followed by the 8 zones on the zone expander
Step 5: Add Keypads if needed
The takeover module can either use Hardwired DSC Neo Keypads going directly to the takeover module or the IQ Panel Keypads which have their own transformer and get power from a wall outlet.
-
NEO Keypads:
- Remove existing keypad and install new Neo Keypad. Neo keypads require 22 gauge 4 conductor wire.
Note: POWER DOWN SYSTEM BEFORE WIRING KEYPADS These do get power and data from the takeover module. Wiring is simple red to red, black to black, yellow to yellow, green to green. - Programming:
To learn in keypads, power up system and wait till takeover module is synced with panel and return to the auto enroll section. Keypads will auto enroll. Each keypad takes a zone panel.
- Remove existing keypad and install new Neo Keypad. Neo keypads require 22 gauge 4 conductor wire.
-
IQ 4 Panel/IQR-PG:
DO NOT MIX IQ 4 PANEL AND IQR-PG TRANSFOMERS - While they might look the same, the IQ 4 uses 7V DC transformer while the IQ Remote uses a 12V DC transformer.- These keypads do not get power from the takeover module, they get power from their own transformer.
- You can program these before installation to make it easier
- You can find instructions to enroll the IQR-PG here
Step 6: Make additional programming changes
- All zones are learned in by default as type 10 - Entry/Exit Delay zone.
- To edit your zones, from your main screen, swipe down from the top > Settings > Advanced Settings > Installer/Dealer Code > Installation > Devices > Security Sensors > Edit Sensor > Pencil next to zone you want to edit and change the sensor type, sensor group, and sensor name. Below are the most common sensor groups/types.
| Sensor Type | Group | Name | Uses | Scenerio |
|---|---|---|---|---|
| Door/Window, Tilt | 10 | Entry-Exit- Normal Delay | Entry Doors like Front Door and Garage Entry Door | Gives a period of time to exit the home or to disarm the panel when returning before sounding the alarm |
| Door/Window, Tilt | 12 | Entry-Exit- Long Delay | Garage Overhead Doors | Gives a period of time to exit the home or to disarm the panel when returning before sounding the alarm. This can be separate delay from the “norma delay” |
| Door/Window, Wireless Translator, Glass Break, Shock Sensor | 13 | Instant Perimeter | Takeover Module, Perimeter doors and windows not needing an entry delay | Door or window that triggers an alarm instantly when system is armed |
| Motion, Glassbreak, Shock Sensor | 17 | Away- Instant Motion | Motion Detectors | Active only when armed to “Night” or “Away”, and trips instantly when motion is detected. Does not trip if an entry/exit sensor is tripped first |
| Door/Window, Motion | 25 | Local Safety Sensor | Gates, medicine cabinets, storage, etc. | This sensor does not report or trigger an alarm. This is a chime only sensor when “Activity Monitoring” is active, regardless of panel status. |
| Smoke/Heat | 26 | Smoke-Heat | Smokes and Heats | Triggers an alarm when sensor detects smoke/rapid rise in heat |
| CO Detector | 34 | CO | Carbon Monoxides | Triggers an alarm when sensor detects Carbon Monoxide |
Hardwired Smoke Detectors
-
2 wire smokes:
- Wiring:
2 wire smokes is positive wire goes to Aux+ and Negative wire goes to PGM2 - Programming:
2 wire smokes are learned in by swipe down from the top in the main page > Settings > Advanced Settings > Installer/Dealer Code > Installation > Devices > Security Sensors > PGM Programming > Add PGM2 > Select Smoke and save
- Wiring:
-
4 wire smokes:
- Wiring:
4 wire smokes will have the positive wire goes to Aux+ and Negative wire goes to PGM2. The green and yellow wires will go on the common and zone terminals. - Programming:
When you edit a zone from the takeover module, PGM2 automatically activates power for smoke detectors
- Wiring: