Qolsys IQ Panel 2 and 4 camera images uploads for local disarms and alarms can be configured using the Alarm.com Website. Captured images are saved in the Images event gallery on the ADC Website or mobile app.
When the Qolsys IQ Panel camera alarm image uploads are enabled, a panel camera image is captured whenever the panel goes into alarm. This is different from the Image Sensor, since the Alarm.com Image Sensor only captures alarm images when the Image Sensor detects motion.
Note : Qolsys IQ Panel panels can capture both images and videos for alarms but only the images can be uploaded to Alarm.com.
Requirements
To upload panel images to the Customer Website and Customer app:
- The panel must be connected to Wi-Fi
- The account must be configured for Dual-Path communication
- For alarm and disarm image captures, the account must have Images - Limited or Images - Plus
- For only alarm image captures, the account must have Images - Alarms on the service package
- For more information about service packages, see this page here.
Note : Qolsys IQ Panel Camera image uploads for alarms and local disarms count towards the customer’s monthly upload limit.
- Qolsys IQ Panel 2 firmware version 2.5.3+
Note : The Qolsys IQ Remote secondary keypad does not support sending images to Alarm.com.
To configure panel camera images:
- Log into the Alarm.com Website.
- Click Automation .
- Click Rules , if not selected already.
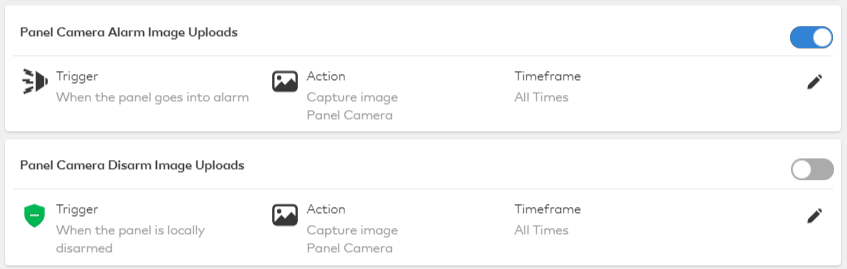
- To enable/disable panel camera disarm and/or alarm images, click the toggle switch for the Panel Camera Alarm Image Uploads and/or Panel Camera Disarm Image Uploads automation rules.
Note : If this option does not display on the ADC Website, verify Disarm Photos and Alarm Photos are enabled in the panel’s programming. Using the panel, navigate to Installation and then Camera Settings .
In the following example, alarm image uploads are enabled and disarm image uploads are disabled:
- To configure recipient notifications:
a. Click Edit Pencil Icon
b. In Recipients , click Add .
c. Select any recipients to be notified from the Address Book dropdown. If the intended recipient is not listed, click New to add a new recipient address.
d. Once desired recipients are selected, click Close .
e. Click Save .