Warning: IQ Mate is no longer being actively developed due to limitations we ran into with the IQ Panel integration method. We’re exploring a new approach for viability and will update the this post if it becomes active again.
IQ Mate (Qolsys IQ Panel Integration & Automation Tool)
IQ Mate is a tool to help serious home automation folks make the most of their Qolsys IQ Panel. Use it to create advanced automations that can’t be done in Alarm.com, and to integrate your IQ Panel with devices outside of the Qolsys & Alarm.com ecosystem.
Automations are programmed in Node-RED, a visual flow-based automation editor that makes it easy to program complex automations.
IQ Mate interacts with the IQ Panel in 2 ways:
-
It uses the Qolsys Gateway integration from Home Assistant to interact with the IQ Panel Control4 integration, which gives IQ Mate real-time sensor status and lets it arm and disarm the IQ Panel.
-
It uses Z-Wave Relays, Programmable (PGM) Outputs, and Sensor Inputs to send and receive on/off signals back and forth with the IQ Panel & Alarm.com.
Using these integration methods:
- IQ Mate can perform advanced automations based on IQ Panel sensor activity and arming state that aren’t possible in Alarm.com.
- IQ Mate automations can be triggered from Alarm.com by activating Z-Wave relays that IQ Mate senses as inputs.
- IQ Mate can trigger Alarm.com automations by activating sensors on the IQ Panel that trigger Alarm.com automations.
- IQ Mate can integrate with and automate things that Alarm.com can’t, basically anything in the Node-RED library.
IQ Mate is an open source project and a work in progress. It has not been thoroughly tested and is more a proof-of-concept right now. Use it at your own risk.
The purpose of IQ Mate is to be a simple, light-weight tool to do more advanced integration and automation with your IQ Panel & Alarm.com. If you want a heavy-weight and complete open source home automation system that can also integrate with the IQ Panel then consider using Home Assistant instead of IQ Mate.
Installation
Follow these instructions to enable the Control4 integration on your IQ Panel and get your secure token. After your IQ Panel reboots, you have 10 minutes to run IQ Mate and connect to the IQ Panel. If you don’t connect within 10 minutes then the IQ Panel will automatically disable the Control4 integration and you’ll have to start over.
Enable the Control4 integration on your IQ Panel right before you run IQ Mate.
Docker Installation
The easiest way to install is to use the IQ Mate Docker Image.
- Install Docker Desktop.
- Run the IQ Mate launch script.
Windows Launch Script
Use these commands on Windows to download and run the launch script.
> curl -O https://raw.githubusercontent.com/suretyhome/iqmate/refs/heads/main/do/iqmate.cmd
> .\iqmate.cmd <IQ Panel Host> <IQ Panel Secure Token>
OSX & Linux Launch Script
Use these commands on OSX & Linux to download and run the launch script.
% curl -O https://raw.githubusercontent.com/suretyhome/iqmate/refs/heads/main/do/iqmate.sh
% chmod +x iqmate.sh
% ./iqmate.sh <IQ Panel Host> <IQ Panel Secure Token>
Replace these items in the iqmate command with the appropriate values for your IQ Panel.
<IQ Panel Host>The host name or IP address of your IQ Panel<IQ Panel Secure Token>The Control4 secure token generated by your IQ Panel
When the container starts you will get a bash shell. Use it if you want, or just leave it alone. If you exit that shell then IQ Mate will shut down.
Resetting To Factory Defaults
If you want to wipe everything clean and start over from scratch, exit the docker container and run IQ Mate again with the --reset option.
Resetting to factory defaults deletes everything. Make sure to back up your work before doing this!
/iqmate# exit # shuts down IQ Mate
% ./iqmate.sh <IQ Panel Host> <IQ Panel Secure Token> --reset
Raspberry Pi Installation
If this project generates enough interest then we plan to also create a Raspberry Pi image that doesn’t require Docker. Sorry, it does’t exist yet. ![]()
Development Installation
If you want to help develop or modify IQ Mate, clone the repository, build the docker image yourself, and run it. There are scripts in the do/ directory to help build and run the image.
Using IQ Mate
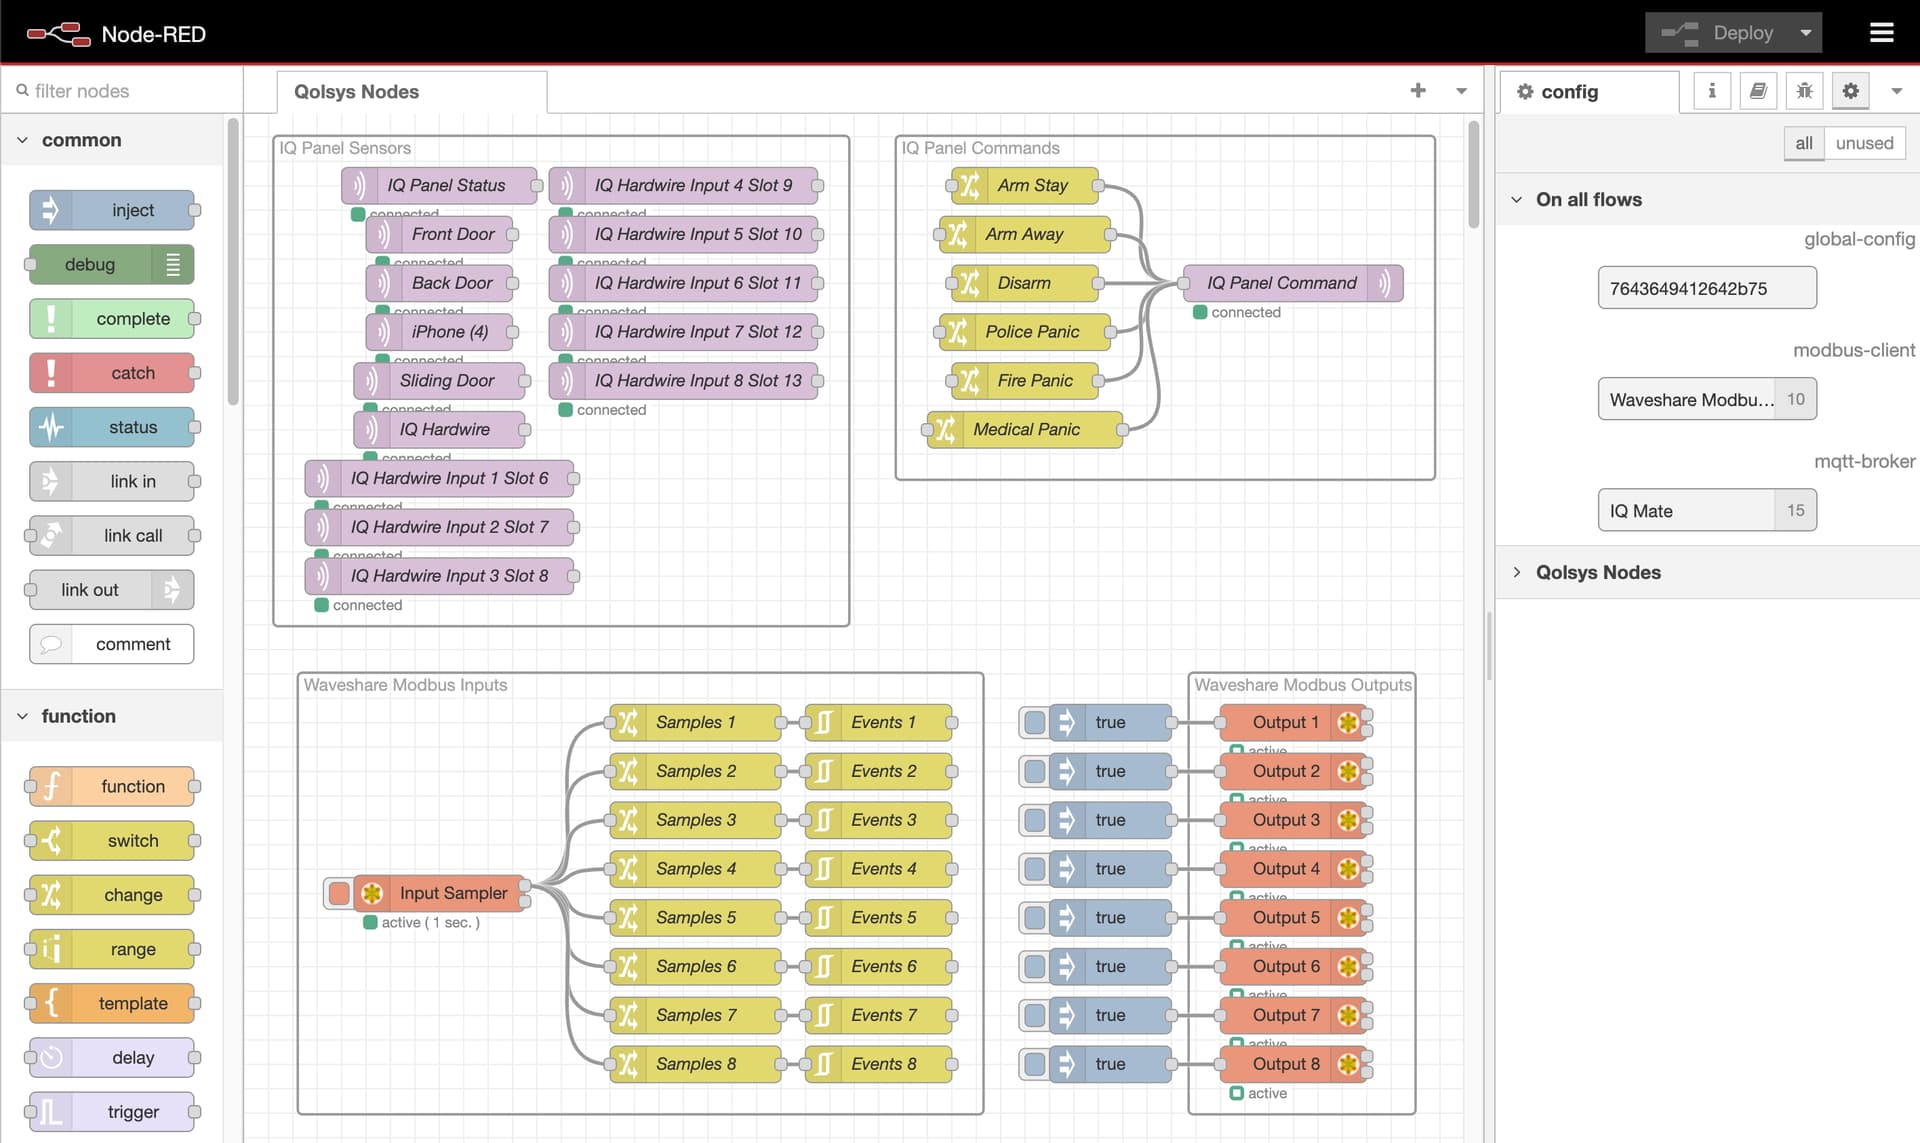
After startup, go to localhost:1880 in a web browser to use Node-RED.
The first time you run IQ Mate, it automatically discovers the sensors on your IQ Panel and provides a tab called Qolsys Nodes in Node-RED.
Some of the panel commands, such as Disarm, require a user code. The first thing to do after installation is to set a panel user code. In Node RED, go to Settings > Environment and enter user code for IQ Panel User Code.
This demo video shows a simple example monitoring the status of the panel and a door sensor in the debug panel, arming and disarming the IQ Panel.

See the Node-RED Documentation to learn more about what you can do with Node-RED.
If you want to connect external devices to MQTT, the MQTT broker is available on port 1883. The username is iqmate and the password is your IQ Panel’s Control4 integration secure token.
Rediscovering Qolsys Nodes
Qolsys nodes are automatically discovered the first time you run IQ Mate. If you want to rediscover them because something went wrong the first time or something changed in your system, run the iqmate-discover command in the docker container.
/iqmate# iqmate-discover
It will place a new Node-RED import file in your local node library that you can import into Node-RED.
Digital IO Hardware
In order to send signals back and forth with the IQ Panel & Alarm.com, you need hardware that can interact with the IQ Panel. It has sensor inputs and on/off switch outputs so you need a device that works with Node-RED, can detect when a switch is turned on/off, and can activate IQ Panel sensors inputs.
Digital IO is not required to use IQ Mate. It’s needed if you want to trigger IQ Mate automations from Alarm.com or if you want to trigger Alarm.com automations from IQ Mate. If you only want to monitor IQ Panel sensors and automate things directly from Node-RED then you don’t need additional hardware.
Waveshare Digital IO Module
While there are many options, a good low-cost digital IO module is the Waveshare Modbus POE ETH Relay (B).
https://www.waveshare.com/modbus-poe-eth-relay-b.htm.htm
It has 8 digital inputs (sensors) and 8 relay outputs (switches). You can wire its digital inputs to Z-Wave relays and PGM outputs that are controlled by your IQ Panel. You can wire its relay outputs to sensors on your IQ Panel.
Optionally get the 12V Power Supply but this device can be powered by the IQ Hardwire PowerG auxiliary power. It draws a max of 3.5W (0.29A @ 12V).
A direct ethernet link from your host computer to the Waveshare module is recommended because it uses insecure Modbus to communicate. If you put the Waveshare module on your network then you need to secure it with a VLAN or by limiting access your network. An easy way to make a direct link is with an Ethernet crossover cable. You can buy one or build your own.
Alternatively, the RS-422 version of the Waveshare digital IO module can be used instead of Ethernet. You would need an RS-422 adapter for your host computer. This document assumes you’re using the Ethernet version.
IQ Hardwire PowerG
The IQ Hardwire PowerG is a convenient and cost-effective way to get 8 wired sensor inputs and 4 PGM outputs on your IQ Panel.
Alarm.com does not (yet) allow PGM outputs to be activated by automations. You can control them from the Alarm.com app as switches but if you want Alarm.com automations to trigger IQ Mate then you’ll need to use Z-Wave relays.
Conveniently, the auxiliary power on the IQ Hardwire PowerG can power the Waveshare IO module and the Zooz ZEN16 MultiRelay, providing battery backup for both.
Z-Wave Relay Module
Any Z-Wave relay that works with the IQ Panel & Alarm.com should be fine but the Zooz ZEN16 MultiRelay provides 3 independent relays for a great price.
The Zooz ZEN16 MultiRelay can be powered by the IQ Hardwire PowerG auxiliary power. It draws a max of 1W (0.09A @ 12V).
Another 3-relay module is the Shelly Wave Pro 3. It’s a little more expensive but still a good value for 3 relays, and it appears to have higher quality terminal connectors. We haven’t tested the Shelly Wave Pro 3 with Alarm.com yet.
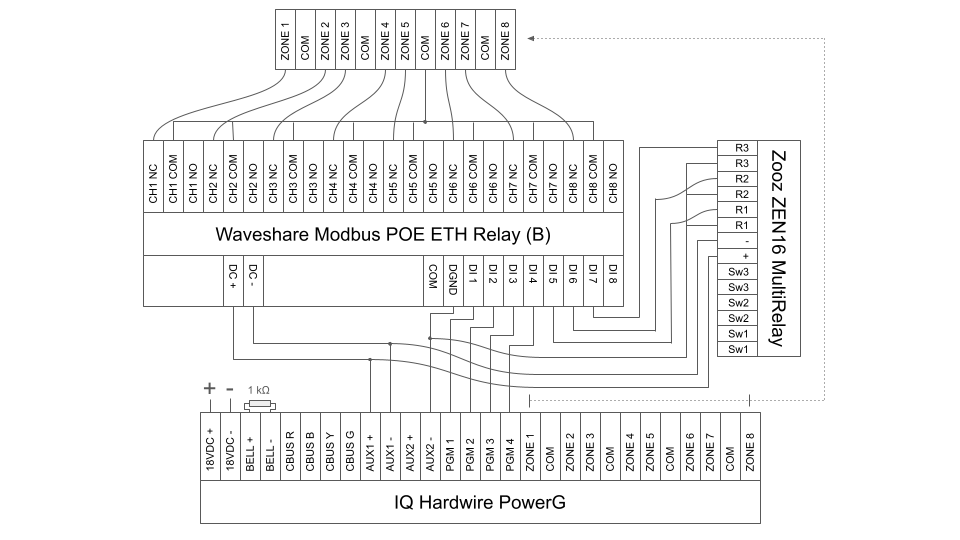
Wiring
How you wire it all together will depend on which hardware you use. If you’re using the Waveshare IO Module, IQ Hardwire PowerG, and a Zooz ZEN16 MultiRelay then you can wire it up like this.
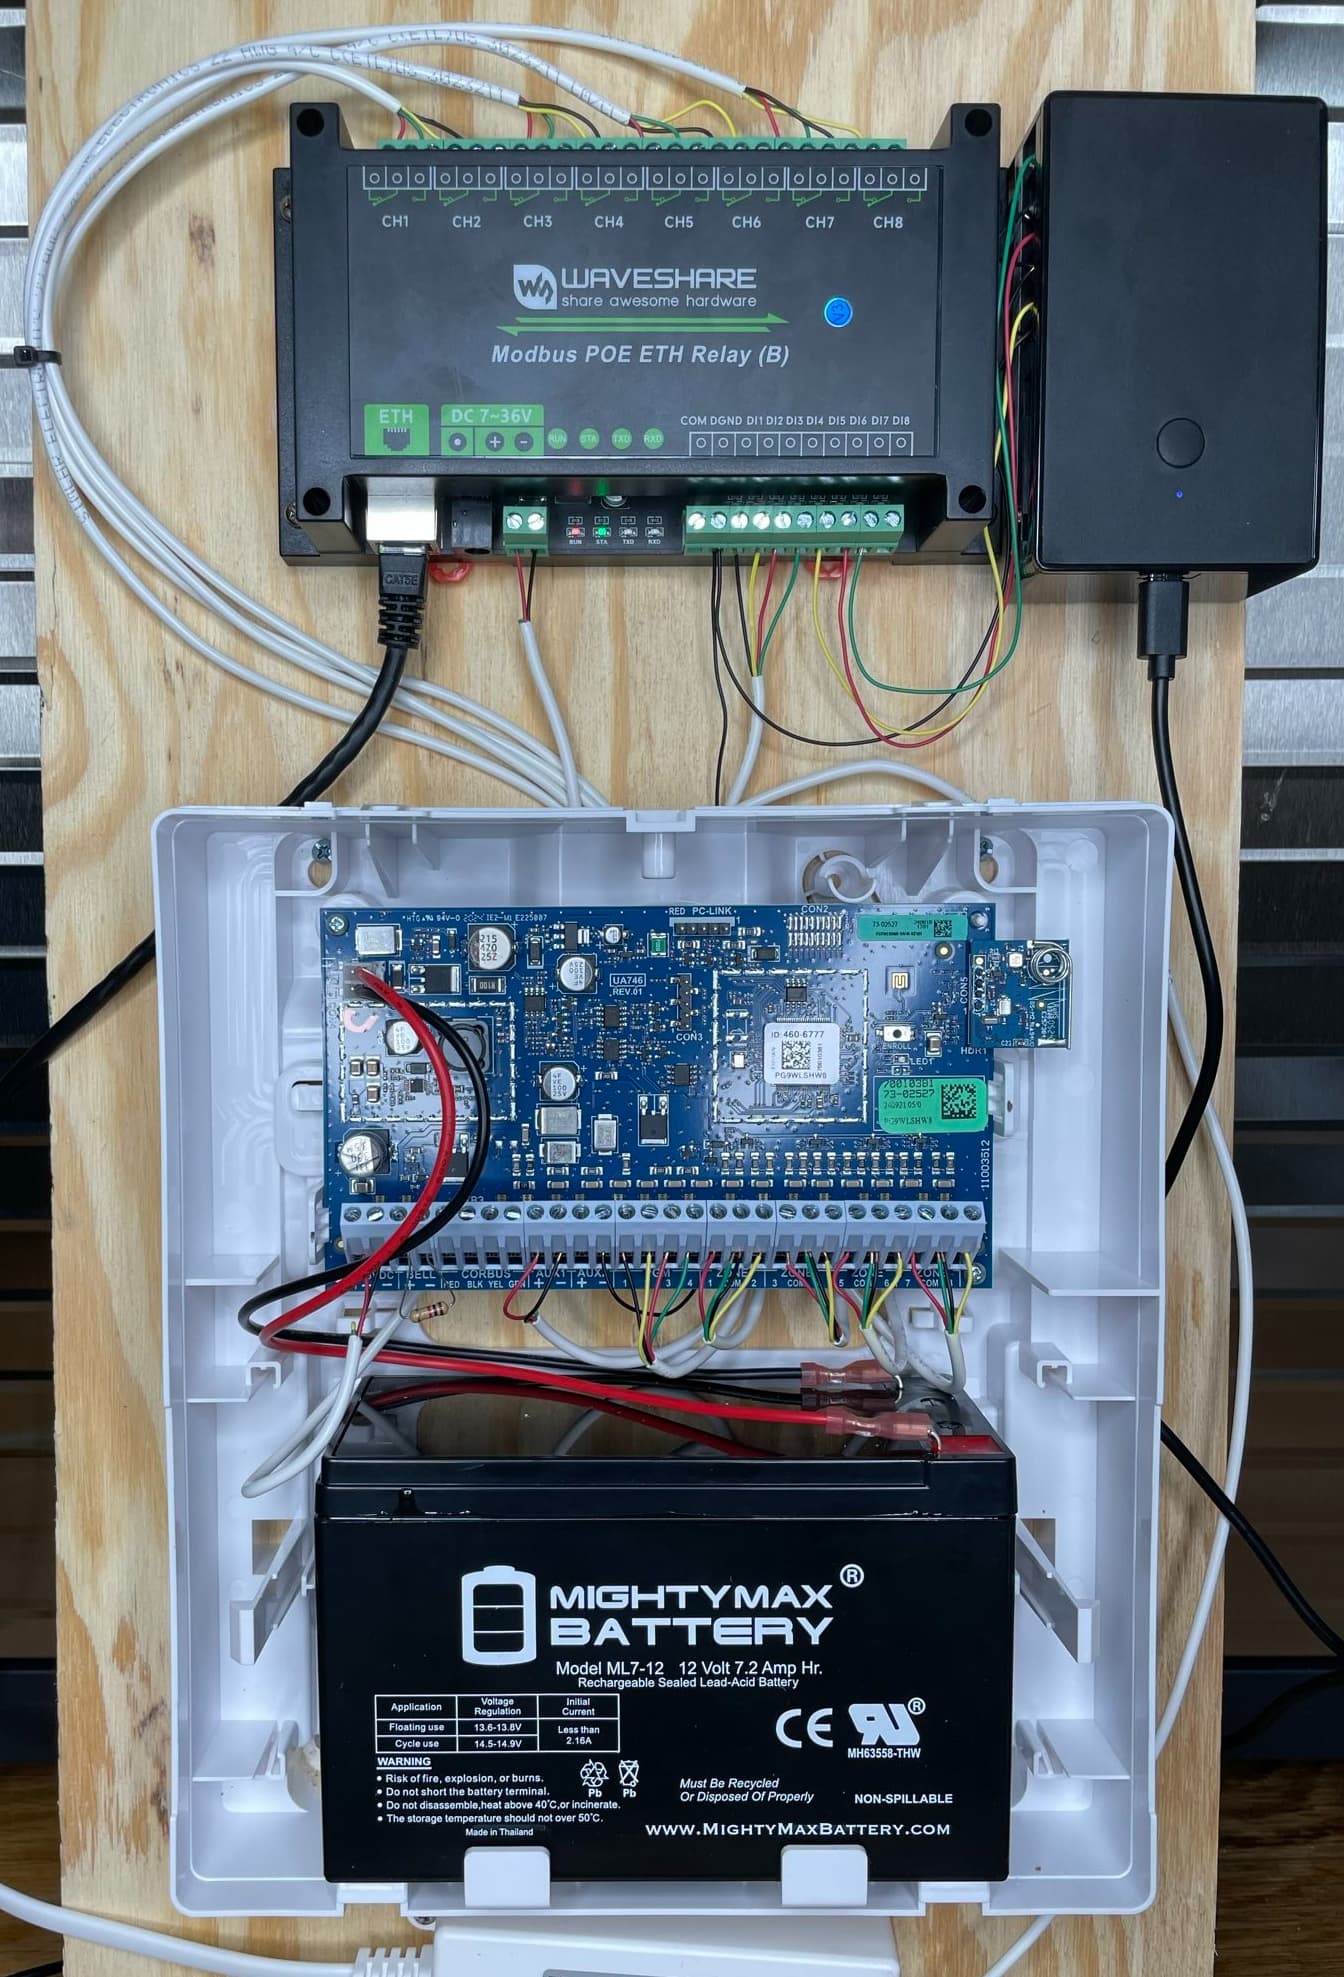
In the end it would look something like this.
Waveshare IO Module Setup
The Waveshare Modbus POE ETH Relay (B) defaults to having the static IP address 192.168.1.200. Configure the Ethernet adapter on your host computer to have an address on the 192.168.1.xxx subnet. Then go to 192.168.1.200 and login with the default password Password.
Under Multi-Host Settings, change the Protocol from None to Modbus TCP to RTU. You can edit the IP settings if you need to but the defaults should work fine if you’re using a direct link to your host computer. Then click Submit to save the settings.

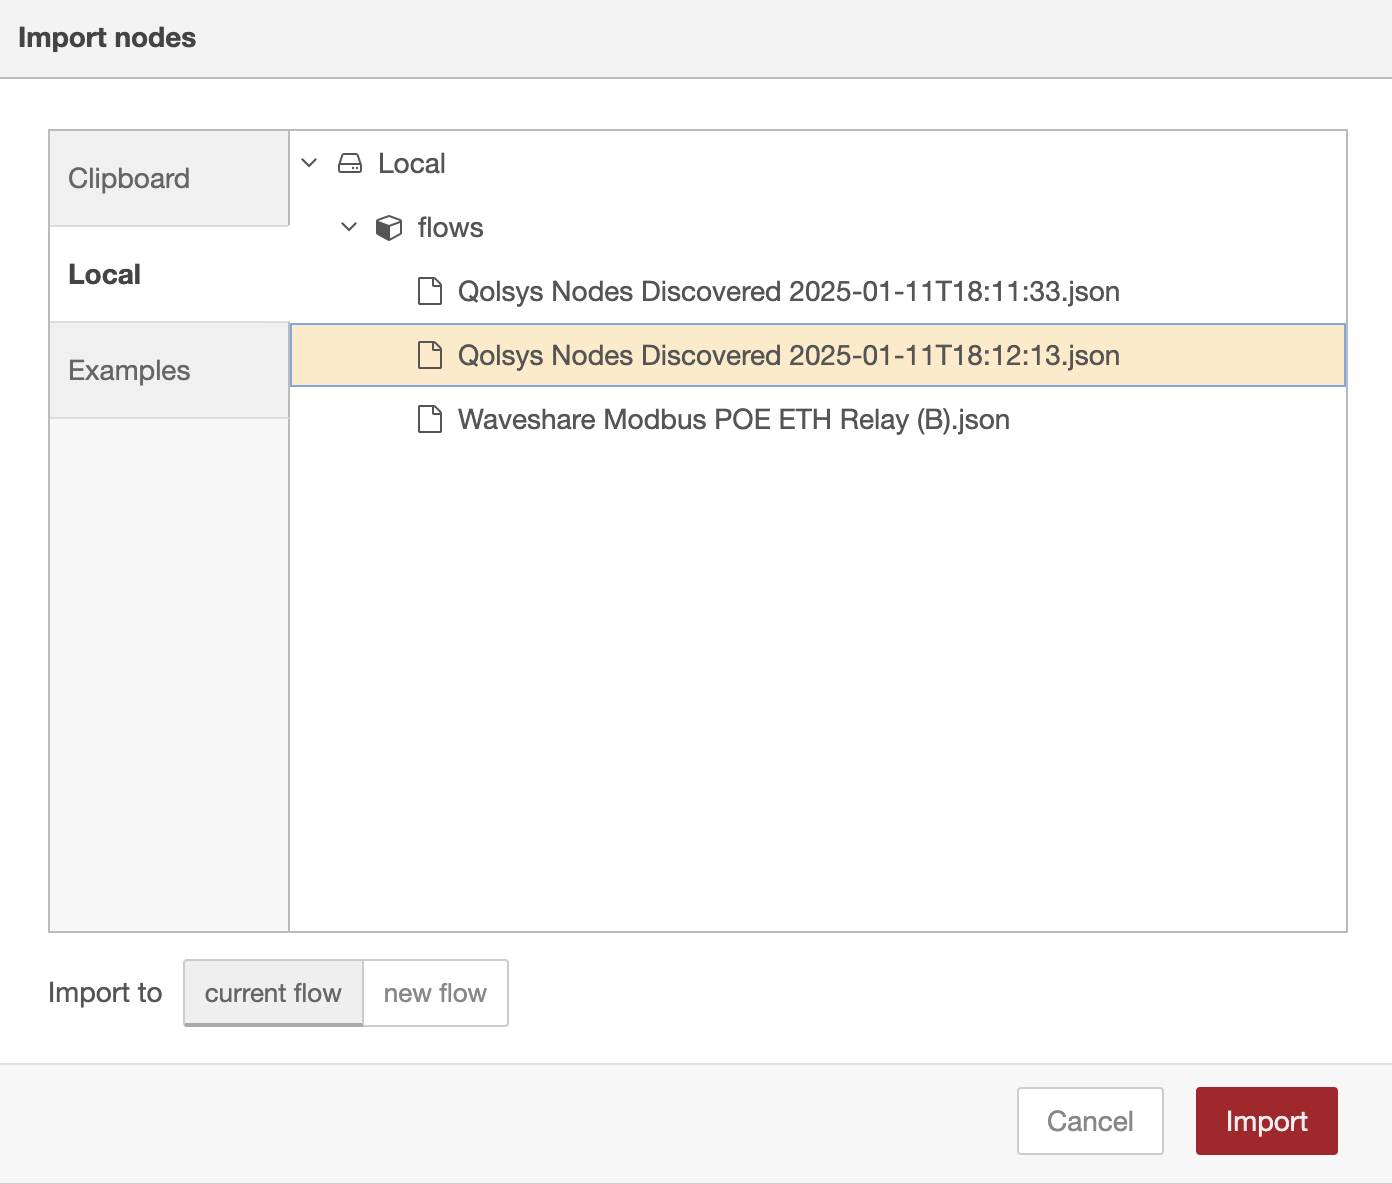
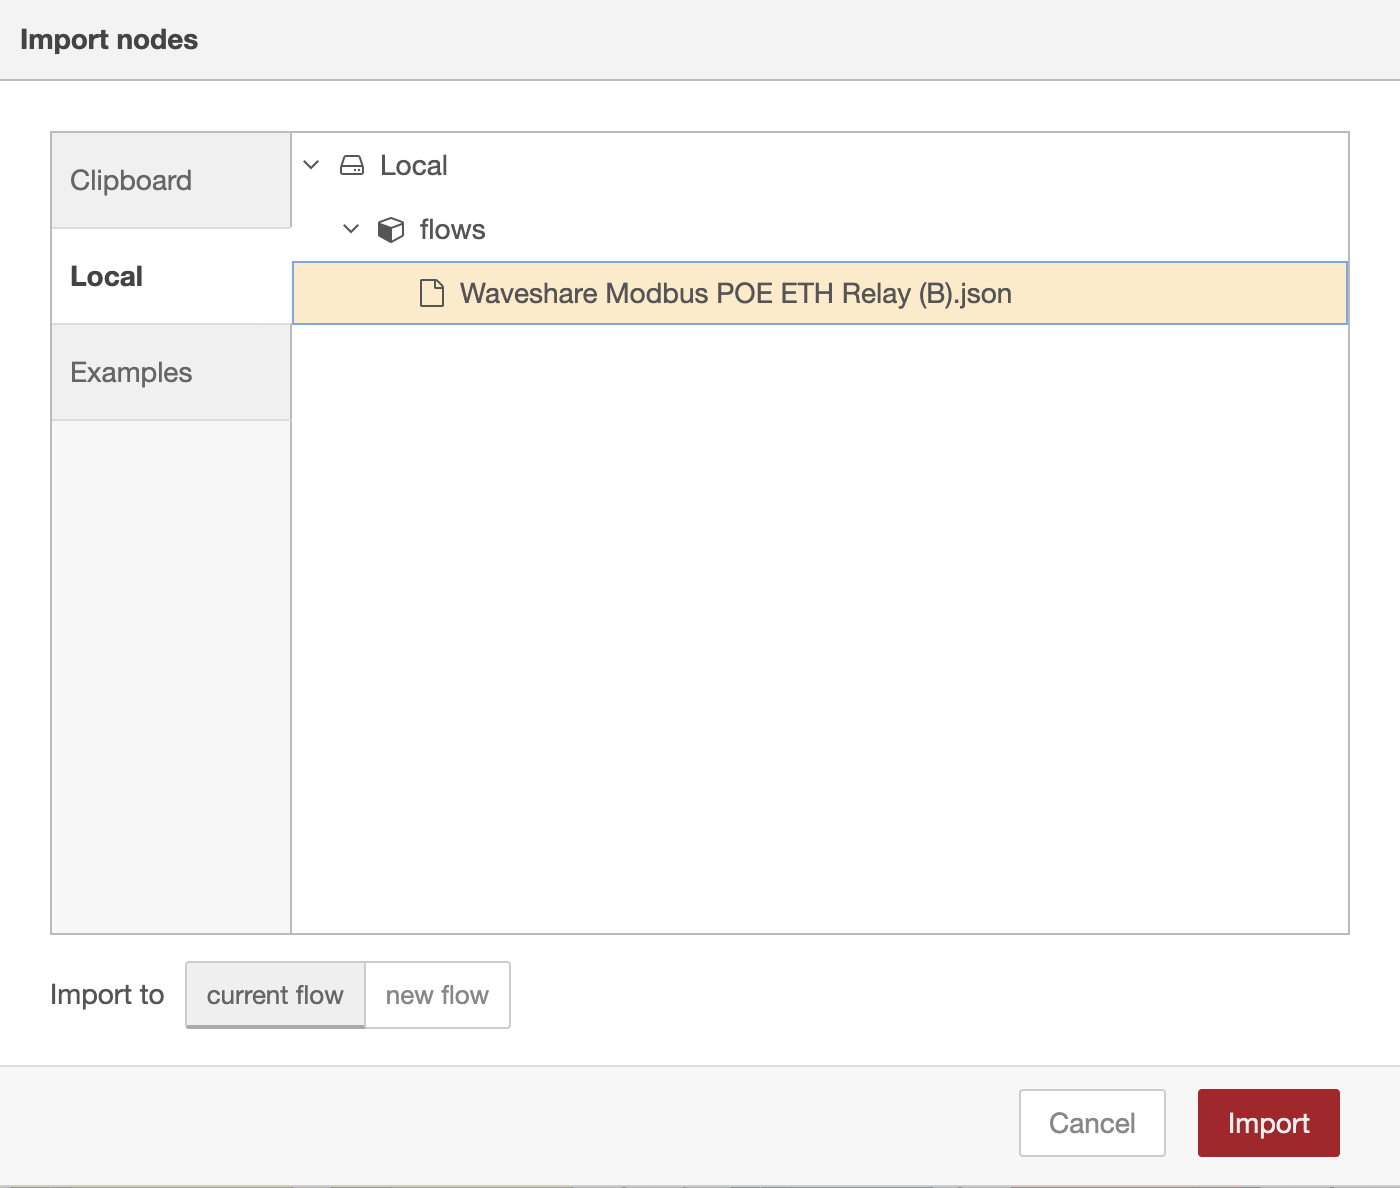
Now you can import the Waveshare module in Node RED. In the menu, choose Import > Local and choose Waveshare Modbus POE ETH Relay (B).json.
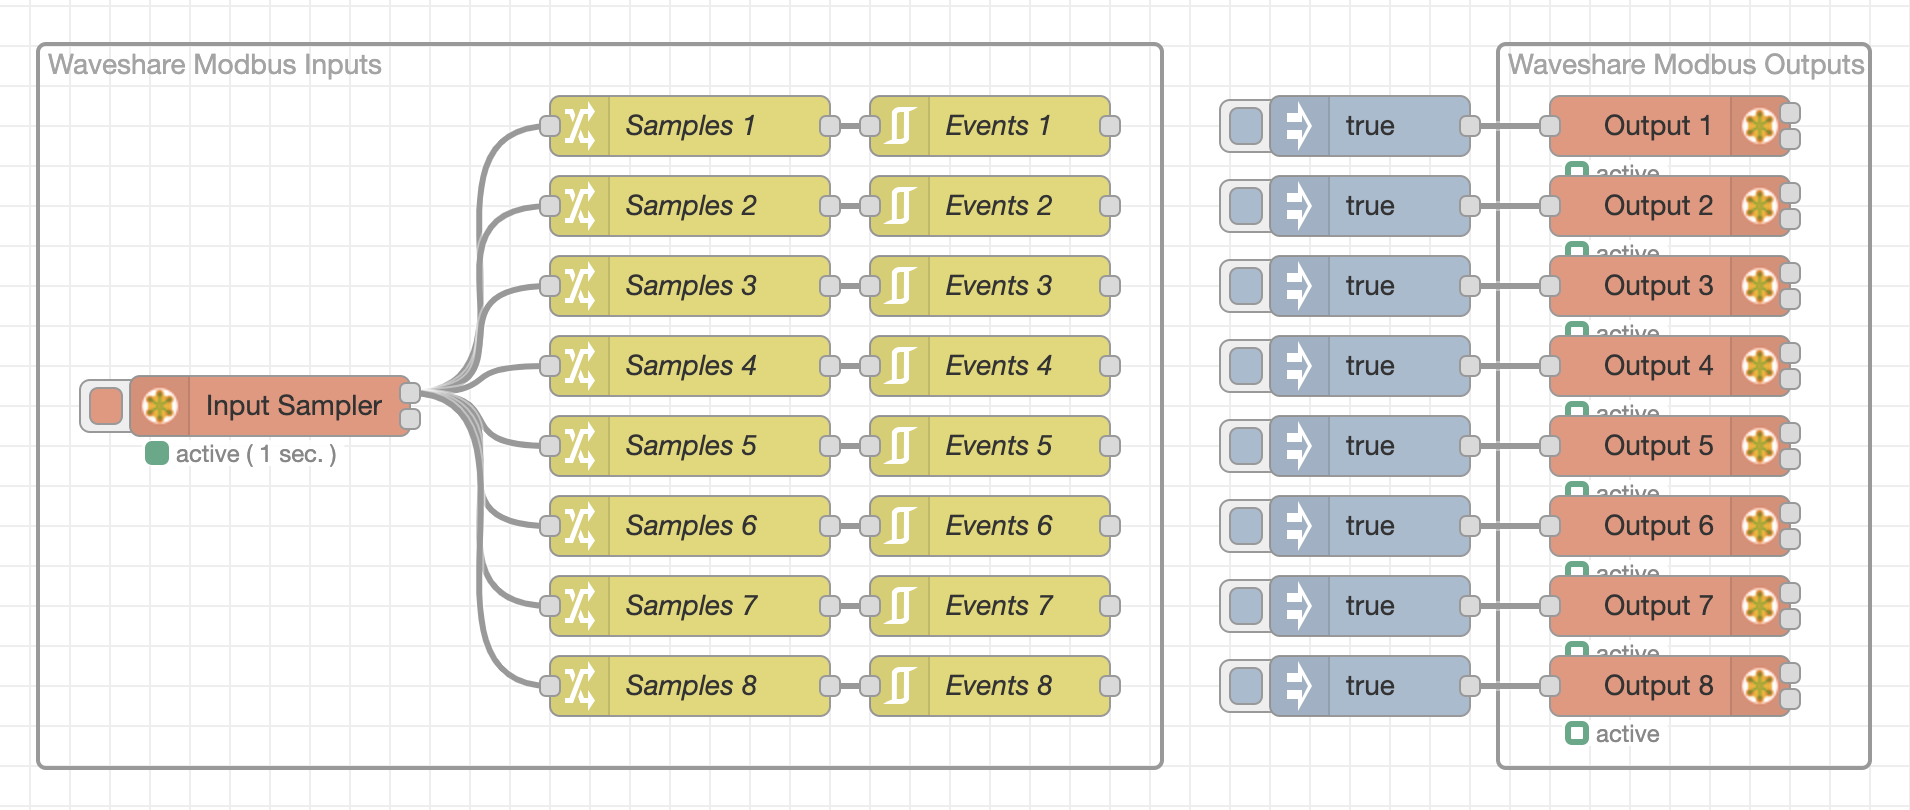
After importing, you’ll need to deploy for the nodes to connect to the Waveshare module. If it connects successfully, you’ll see active with a green light under the Input Sampler node.
If you need to change modbus connection settings, such as the IP address, go to Configuration Nodes and edit the node called Waveshare Modbus POE ETH Relay (B). You’ll need to re-deploy after any change.
The module has a few different working modes. We want it to be in Normal Mode but it might default to another mode out of the box. In Node RED, press the button on the left of the Waveshare Set Up node group to set the working mode to normal mode.

That’s it, now you’re ready to automate your IQ Panel using the Waveshare IO module.
IQ Mate Questions & Issues
Have general questions? Discuss here. Problems or issues? Get help here.