I received the replacement module. Your instructions say "power down the panel - power supply first, then the internal battery. How do I power down the internal battery? What is my panel’s access code to allow me to go into the toolkit?
The swap process and battery removal can be seen in the video below

We cannot view your current installer code, installer codes are maintained by users.
The default installer code is 1561. It would still be this code if you or a prior installer did not previously change it.
If your panel is communicating with Alarm.com you can reset your installer code remotely using our system manager here.
I swapped the module successfully but I have not been able to run a radio test. My panel does not have this option. The only thing close is “telephone test”. Any suggestions?
Thanks,
Jeff
You need to run the cell phone test.
If you don’t have the option to run a cell phone test then the following threads might be helpful:
https://support.suretyhome.com/t/new-cell-module-but-no-test-button-in-cp/1611/28
https://support.suretyhome.com/t/no-cell-test-on-menu-screen/9819
It says “POTS Dialing is disabled. Result: The phone test failed”.
Any other suggestions?
See the threads the other poster linked. POTS dialing refers to hardwired phone line communication, which is not in use.
If you do not see the option to run a Cellphone test that almost always means that either the panel firmware version is not updated to a version supporting the module or the panel was still powered up when the module was physically swapped.
Firmware needs to be 1.19.3.1. If you are certain your firmware version is sufficient, power cycle the panel. Any change?
My firmware version is v1.9.6. Is this out of date?
Thank you,
Jeff Cooper
It is. 1.9 < 1.10 < 1.12 < 1.19 etc.
Some of the newest modules released by 2GIG actually require 1.19.4 which can be downloaded here:
Apply 1.19.4 with the firmware update cable.
I downloaded and unzipped the updater and connected my USB cable. I am watching the video and I’m stuck at the part where I am supposed to create shortcuts. My folder does not include the file names you are showing. See image below for what I have. I have no idea what to do now.
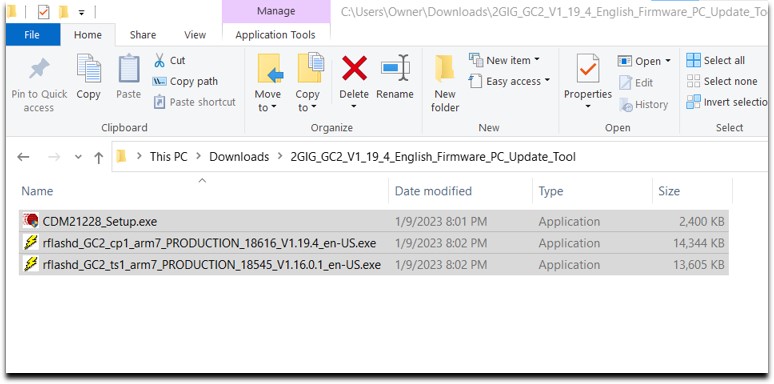
The video is older so the file names may be different. The file names in the image submitted reference the newest firmware files (1.19.4 for the main panel and 1.16 for the TS1 secondary panel).
There are only 3 files. Do I still need to create shortcuts? If yes, for all 3?
You would create shortcuts for the firmware files you are going to use.
The 1.19.4 file is for the main panel firmware and the 1.16.01 file is for the TS1 secondary panel. If a TS1 is not in use, then you do not need to create a shortcut for it.
I have the update file ready to install and the panel is plugged in to the usb cable I purchased from you but how do I power up the panel when it is disconnected it from the power supply?
I have the update file ready to install and the panel is plugged in to the USB cable I purchased from you but how do I power up the panel when it is disconnected it from the power supply?
Follow the steps in the below video:

From the above video at the 1:10 mark, you power down the panel fully, insert the usb cable, run the program, then power on the panel.
Power Down the panel fully:
- Disarm the panel
- Unplug the power supply from the wall outlet.
- Open the panel and disconnect the internal battery
- Connect the USB Update Cable into panel
- Execute Control Panel Shortcut that you edited
- Power Up the panel
- Follow prompt in firmware update on PC.