How To Install the Alarm.com Smart Chime (ADC-W115C)

Pre-installation checklist

  • ADC-W115C Alarm.com Smart Chime (included)
  • Standard non-switched electrical outlet
  • Broadband Internet connection (cable, DSL, or fiber optic), with a Wi-Fi router
  • A computer, tablet, or smartphone with Internet access is required
  • An Alarm.com Wi-Fi connected device
  • Alarm.com account with a service package that supports video

Overview

Designed to work seamlessly with the Alarm.com platform, the ADC-W115C serves as a Wi-Fi extender (2.4GHz) and customizable wireless doorbell chime. Simply plug the ADC-W115C into a wall outlet, pair with the existing router, add to an account, add a doorbell camera, and enjoy boosted network signals that provide instantaneous chime notifications.
Note : The ADC-W115C can only be used as a Wi-Fi extender for Alarm.com video devices.
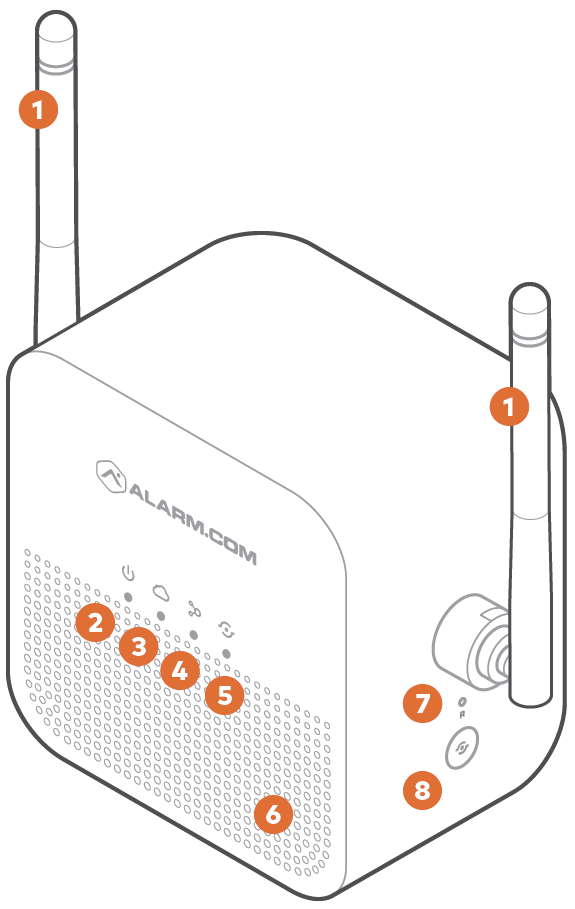
  1. Antennas
  2. Power LED
  3. Router LED
  4. Devices LED
  5. WPS LED
  6. Speaker
  7. Reset button
  8. WPS button

Connect the Alarm.com Smart Chime to your Wi-Fi network

Alarm.com Mobile App

  1. Log in to the Alarm.com mobile app.
  2. Tap Add Device.
  3. Tap Video Camera.
  4. Tap Enter MAC Address (If you do not see the Add Device option, please use the AP Mode or WPS Mode instructions below
  5. Follow the on-screen instructions to finish adding the chime.

Alarm.com Website

  1. Log into the Alarm.com Website.
  2. Click Video.
  3. Click Settings.
  4. Click Add Video Device.
  5. Click to select Smart Chime (ADC-W115C) from the Installation Tutorials list.
  6. Follow the on-screen instructions to finish adding the chime.
    Note: You will be instructed to hold the WPS button for 10+ seconds until the Cloud LED begins blinking. Failure to do so will prevent the installation from completing.

WPS mode

To ensure sufficient Wi-Fi signal, complete these steps with the chime in close proximity to your router.

  1. Plug the Alarm.com Smart Chime into a non-switched electrical outlet. Wait for the Power LED to change from blinking to solid.
  2. Press and hold the WPS button for approximately five seconds or until the LED changes from blinking rapidly to blinking slowly.
  3. Activate WPS mode on your router. Consult your router’s user guide for more information. The Alarm.com Smart Chime will begin to connect to the Wi-Fi network. The Smart Chime’s Router LED will begin blinking when a connection is established and will become solid when an internet connection is successfully established.
  4. Add the device to the account by using a web browser and entering the following URL: www.alarm.com/addcamera.
  5. Begin the installation by entering the Alarm.com Smart Chime’s MAC address, located on the back of the chime, on the packaging, or on the sticker that is included in the packaging.
  6. Follow the on-screen instructions to finish adding the chime.
    7.Note*: You will be instructed to hold the WPS button for 10+ seconds until the Cloud LED begins blinking. Failure to do so will prevent the installation from completing.
    You can now unplug the chime and install it in its final location.

AP Mode

To ensure sufficient Wi-Fi signal, complete these steps with the chime in close proximity to your router.

  1. Plug the Alarm.com Smart Chime into a non-switched electrical outlet. Wait for the Power LED to change from blinking to solid.
  2. On an Internet-enabled device, connect to the Wi-Fi network Chime Config (XX:XX:XX) where XX:XX:XX is the last six characters of the Alarm.com Smart Chime’s MAC address, located on the back of the chime or on the packaging. To connect, use the Wi-Fi password located on the back of the chime, on the packaging, or on the sticker that is included in the packaging.

Note*: This configuration network will only be available when the device is not connected to the home’s Wi-Fi network. To switch to a different Wi-Fi network, while actively connected to the original network, use the Alarm.com Smart Chime’s Wireless Network Settings Page on the Alarm.com Website.

  1. On the same device, open a web browser and enter: http://connect.alarm.com or http://192.168.173.1/ in the URL field. Follow the on-screen instructions to add the Alarm.com Smart Chime to the Wi-Fi network. The Router LED will begin blinking when a connection is established and will remain illuminated when an internet connection is successfully established.
  2. Add the device to the account by using a web browser and entering the following URL: www.alarm.com/addcamera.
  3. Begin the installation by entering the Alarm.com Smart Chime’s MAC address, located on the back of the chime, on the packaging, or on the sticker that is included in the packaging.
  4. Follow the on-screen instructions to finish adding the chime.
    Note: You will be instructed to hold the WPS button for 10+ seconds until the Cloud LED begins blinking. Failure to do so will prevent the installation from completing.

You can now unplug the chime and install it in its final location.

Connecting an Alarm.com Wi-Fi device to the Alarm.com Smart Chime

  1. Unplug the Alarm.com Smart Chime and move it to a non-switched electrical outlet between your home router and your Alarm.com Wi-Fi devices. Wait for the Power LED to change from blinking to solid.
  2. If the Router LED begins blinking, wait for the LED to change from blinking to solid.
  3. If the Router LED does not begin blinking, your Alarm.com Smart Chime is too far from your home router. Identify a non-switched electrical outlet closer to your home router and return to step 1.
  4. Once the Router LED is solid, you can assess the strength of the signal being received on the Alarm.com Smart Chime’s Wireless Network Settings Page.

Wi-Fi Protected Setup (WPS) mode

  1. Be sure to add the Alarm.com Smart Chime to an Alarm.com account before using WPS mode to add video cameras or other Wi-Fi devices to the Wi-Fi network.
  2. To enter WPS mode, press and release the WPS button on the Smart Chime.
  3. The WPS LED will rapidly flash to indicate that the device is in WPS mode.
  4. Press the WPS button on the device you want to add to the Smart Chime’s Wi-Fi network.
  5. The Devices LED will flash three times and will become solid upon a successful pairing.

Accessing the Alarm.com Smart Chime’s wireless network or chime settings page

  1. Log in to the Alarm.com Website.
  2. Click Settings.
  3. Click Manage Devices.
  4. Find your Alarm.com Smart Chime and press the Options […] button.
  5. Click Device Settings.
  6. Select either the Wireless Network Settings or Chime Settings tab.

Troubleshooting

If you are still having issues using the Alarm.com Smart Chime, try the following troubleshooting options:

Verify your Alarm.com Smart Chime is connected to your router’s Wi-Fi network

Check your Alarm.com Smart Chime’s Router LED:

Router LED is off

  1. If the LED is not illuminated, the connection to the router has been lost. Check your router to ensure that it is on.
  2. Try moving your Alarm.com Smart Chime closer to the router to confirm it is in range. If the connection is not re-established, try connecting your device to your Wi-Fi network using WPS mode.

Router LED is blinking

If the Router LED is blinking, there is a local connection to the router but no internet connection. If you cannot access the Internet using your router, please contact your Internet Service Provider to restore Internet access.

Verify the Devices LED

If your devices are connected to the Alarm.com Smart Chime, the Devices LED will be solid. If you have multiple devices that are connected to the Alarm.com Smart Chime, you can view the currently connected devices on the Alarm.com Smart Chime’s Wireless Network Settings page on the Alarm.com website. If the device experiencing connectivity issues is not listed or the Devices LED is off, try reconnecting the device via WPS. If this does not solve the problem, try resetting the disconnected device and reconnecting it using WPS mode.

Power cycle

Unplug the device from power for 10 seconds and plug it back in. Wait for the Power and Router LEDs to become solid before trying to use the device again.

Performing a communication test

Press the WPS button for 10 to 15 seconds. The WPS LED will stop blinking and the Router LED will blink five times. If the Router LED turns solid, the test was successful. Please wait two minutes before trying to use the device again.

Factory reset

Press and hold the Reset button (pinhole) for 15 to 20 seconds (use a paper clip or tool if necessary). All LEDs will blink simultaneously to indicate that the device will reset.
Caution : This will restore factory-default settings to the device. All network configurations will be deleted and all connected devices will need to be reconnected using WPS mode.

LED Reference

Power

LED pattern Description
Off Device powered off
Solid Blue Device powered on
Blinking Blue Device booting up

Router

LED pattern Description
Off No local or Internet connection
Solid Blue Connected to Internet
Blinking Blue Local connection, no Internet
Blinking Blue (five quick blinks) Communication test initiated

Devices

LED pattern Description
Off No device connected to chime
Solid Blue Device connected to chime
Blinking Blue (three quick blinks) New device connected to chime

WPS

LED pattern Description
Off WPS mode not enabled
Blinking Blue (slowly) WPS mode enabled to connect to router
Blinking Blue (rapidly) WPS mode enabled to connect to client device

Additional states

LED pattern Description
All LEDs blinking (escalating) Firmware upgrade in progress
All LEDs blinking (simultaneously) Reset in progress