Pre-installation checklist
- ADC-V622 camera (included)
- AC power adapter (included, required for non-PoE connections)
- Broadband (Cable, DSL, or Fiber Optic) Internet connection
- A computer, tablet, or smartphone with Wi-Fi is required if the router does not have the Wi-Fi Protected Setup (WPS) feature
Add the camera to an Alarm.com account
To add a camera, connect the camera to the customer’s wireless network and then enroll the camera to the Alarm.com account. There are three local options for connecting the ADC-V622 to the network: Ethernet Mode, Wi-Fi Protected Setup (WPS) Mode, and Access Point (AP) Mode.
Important: When the camera is powered up, always allow at least 2 minutes before pressing any camera buttons. The first time a new video camera is powered up, it automatically goes into AP mode (flashing white) after 2 minutes.
AP mode
To ensure sufficient Wi-Fi signal, complete these steps with the camera near its final location prior to mounting.
- Connect the camera’s AC power adapter and plug it into a non-switched outlet. Allow at least 2 minutes before pressing any camera buttons.
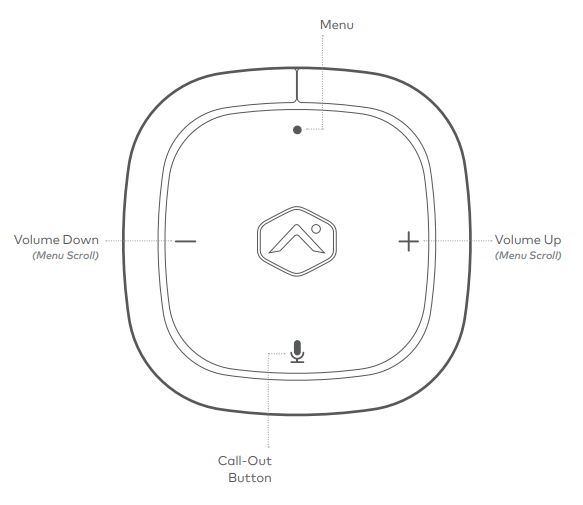
- Press the Menu button and use the Volume buttons to scroll to Access Point mode (follow the audio prompts or look for a flashing white LED).
- Press the Menu button to activate Access Point Mode. The LED flashes white.
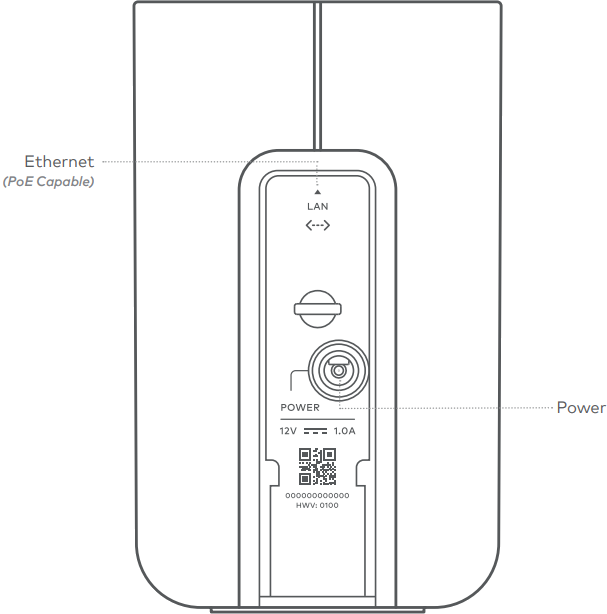
- On an Internet-enabled device, connect to the Wi-Fi network ADC-V622 (XX:XX:XX) where XX:XX:XX is the last six digits of the ADC-V622’s MAC address, which is located on the back of the device near the power cord.
- On the same device, open a web browser and enter http://v622install or 192.168.1.1 in the web address field. Follow the on-screen instructions to add the ADC-V622 to the Wi-Fi network.
- Follow the on-screen instructions to connect the ADC-V622 to the wireless network.
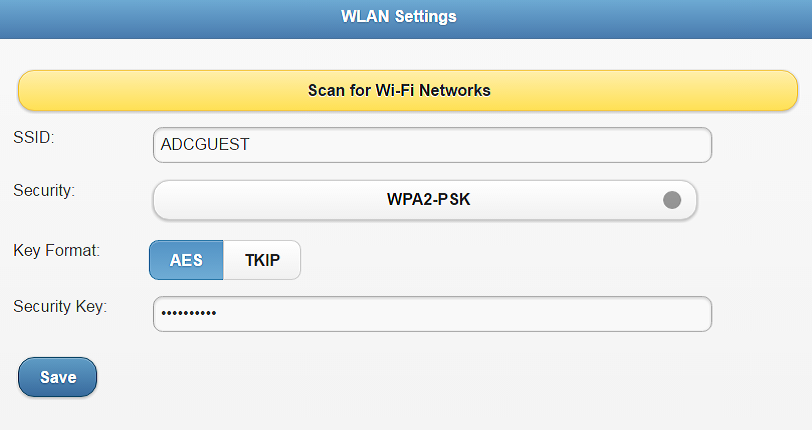
a. Select a language for the instructions.
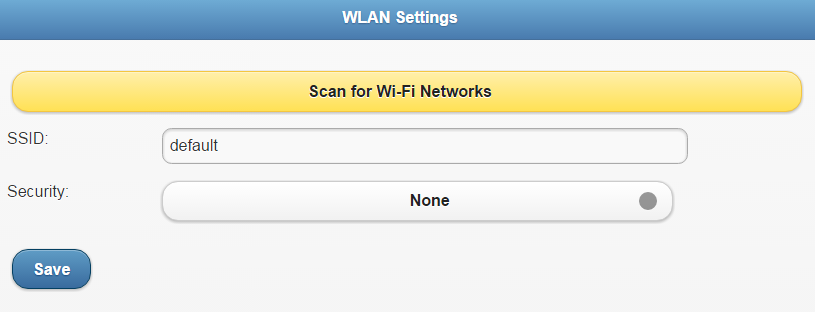
b. Click Scan for Wi-Fi Networks .
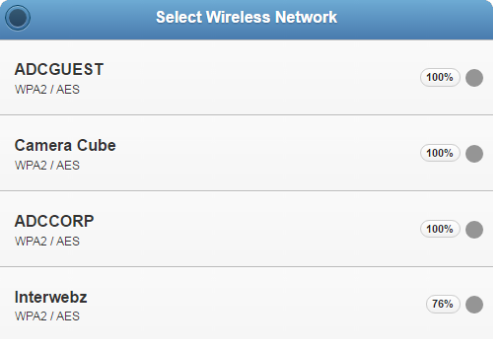
c. Click to select the customer’s Wi-Fi network.
d. In the Security Key , enter the password of the Wi-Fi network. This is case-sensitive.
e. Click Save.
f. Click OK in the pop-up window that appears asking to refer to the website.- If this does not work, verify that the device is still connected to the ADC-V622 (XX:XX:XX) network.
- When the LED is solid green, the wireless connection is complete.
- If the LED is not solid green after a few minutes, retry AP mode or try using a different mode (i.e., Ethernet or WPS mode).
- Add the device to the account by using the Mobile app Video Installation Wizard, or by using a web browser and entering the following web address: www.alarm.com/addcamera (you will need the user name and password if using the Alarm.com Website or app).
- Follow the on-screen instructions to add and set up the video device.
- Once the camera is enrolled on the account, power down the camera and install it in its final location using the included hardware.

WPS mode
To ensure sufficient Wi-Fi signal, complete these steps with the camera near its final location prior to mounting.
- Connect the camera’s AC power adapter and plug it into a non-switched outlet. Allow at least 2 minutes before pressing any camera buttons.
- Press the Menu button and use the Volume buttons to scroll to the WPS menu option (follow the audio prompts or look for a flashing blue LED).
- Press the Menu button to activate WPS Mode. The LED flashes blue.
- Activate the WPS Mode on the router. The ADC-V622 begins to connect to the Wi-Fi network.
- When the LED is solid green, the wireless connection is complete.
- If the LED is not solid green after a few minutes, retry WPS mode or try using a different mode (i.e., Ethernet or AP mode).
- Add the device to the account by using the Alarm.com website or app Video Installation Wizard, or by using a web browser and entering the following web address: www.alarm.com/addcamera (you will need the customer’s user name and password if using the Customer Website or app).
- Follow the on-screen instructions to add and set up the video device.
- Once the camera is enrolled on the account, power down the camera and install it in its final location using the included hardware.
Ethernet mode
Complete these steps prior to installing the camera in its final location.
- Using an Ethernet cable, connect the camera to the network.
- If the Ethernet connection does not provide power (non-PoE connection), connect the camera’s AC power adapter and plug it into a non-switched outlet.
- Wait a few minutes for the camera to connect to the Internet. When the LED is solid green, the wireless connection is complete.
- If the LED is not solid green after a few minutes:
- Power cycle the camera.
- Try a different Ethernet port on the router.
- Try to connect using a different mode (i.e., WPS or AP mode).
- Add the device to the account b using the Alarm.com app Video Installation Wizard, or by using a web browser and entering the following web address: www.alarm.com/addcamera (you will need the user name and password if using the Customer Website or app).
- Follow the on-screen instructions to add and set up the video device.
Important: If the video device is going to be connected wirelessly, set up the wireless network once the camera is added to the account.
- Once the camera is enrolled on the account, power down the camera and install it in its final location using the included hardware.


