Installation and programming for the IQ Keypad-PG IQKP-915 and IQKP-PRX-915
Qolsys IQ Keypad-PG User Manual
Installation
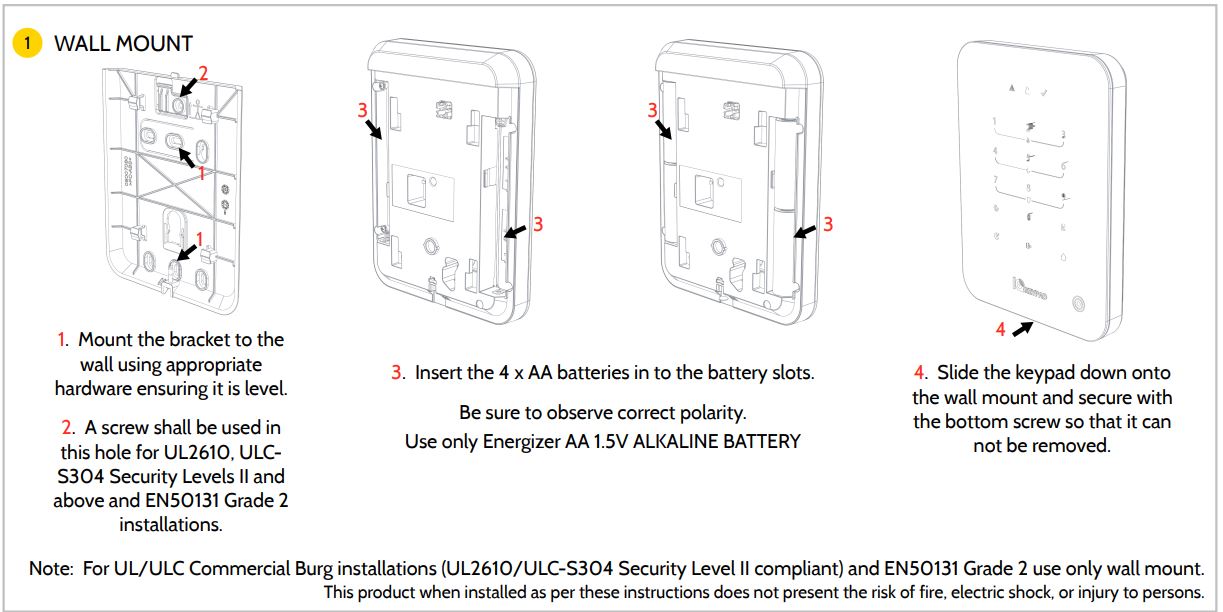
- Mount the bracket to the wall using appropriate hardware ensuring it is level.
- A screw shall be used in the top hole for UL2610, ULCS304 Security Levels II and above and EN50131 Grade 2 installations.
- Calibrate the IQ Keypad by placing a cloth or non-conductive barrier on a flat surface and set the keypad face down.
- Note: Placing the keypad face directly on a table or desk can impact calibration.
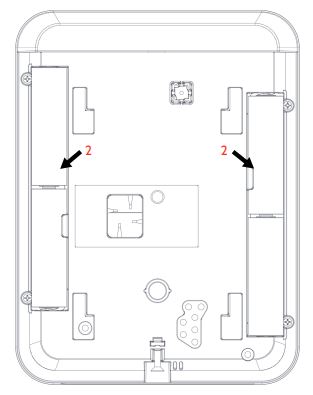
- Insert the 4 x AA batteries in to the battery slots. Be sure to observe correct polarity and be careful not to touch any part of the keypad face to anything conductive.
- Use only Energizer AA 1.5V ALKALINE BATTERY
- Wait 1 minute for calibration to complete before proceeding with installation and pairing.
- Slide the keypad down onto the wall mount and secure with the bottom screw so that it can not be removed.
Enrollment
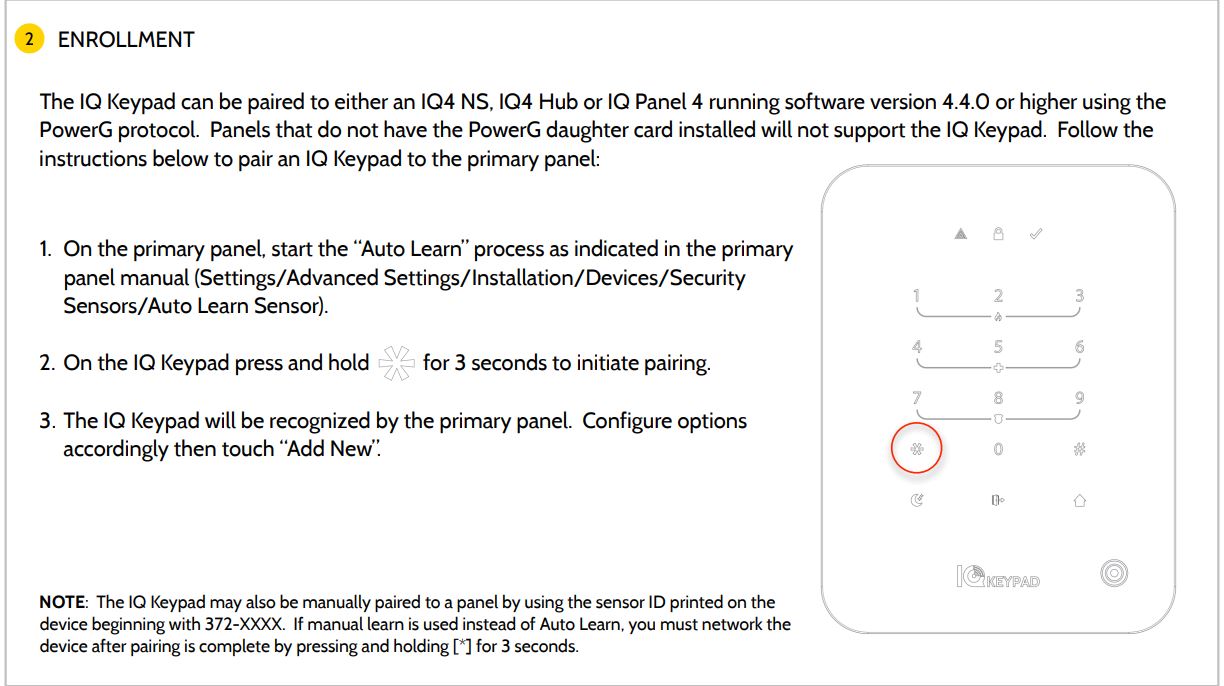
The IQ Keypad can be paired to either an IQ4 NS, IQ4 Hub or IQ Panel 4 running software version 4.4.0 or higher using the PowerG protocol. Panels that do not have the PowerG daughter card installed will not support the IQ Keypad. Follow the instructions below to pair an IQ Keypad to the primary panel:
- On the primary panel, start the “Auto Learn” process as indicated in the primary
panel manual (Settings/Advanced Settings/Installation/Devices/Security
Sensors/Auto Learn Sensor). - On the IQ Keypad press and hold [*] for 3 seconds to initiate pairing. When pairing you may need to start out with the panel powered off with no batteries inserted. Then when entering Auto-Learn Mode, insert the batteries first.
- The IQ Keypad will be recognized by the primary panel. Configure options
accordingly then touch “Add New".
Programming Choices
| Sensor DL ID: | XXX-XXXX |
| Partition Name: | Select Partition 1 through 4 |
| Sensor Type: | Keypad |
| Sensor Group: | 0-Fixed Intrusion, 1- Mobile Intrusion, 3- Mobile Silent, 4-Fixed Auxiliary, or 5-Fixed Silent Auxiliary |
| Tamper: | Enabled or Disabled |
| Sensor Name: | As Desired |
| Chime Type: | As Desired |
| Voice Prompts: | As Desired |
| Bypass: | Enabled or Disabled |
| Sensor Chimes: | On or Off |
| Buzzer Level: | 1 through 15 |
| Keypress Beeps: | On or Off |
| Source: | PowerG |
Adding Prox Tags
If you have the prox tag version of the IQ Keypad, you need to add prox tags and associate them with users from the main Qolsys panel.
For the Qolsys IQ Panel 4 and IQ 4 Hub:
- At the Qolsys panel, navigate to SETTINGS > ADVANCED SETTINGS > USER MANAGEMENT.
- Touch ADD PROX TAG.
- Hold the prox tag up to the reader on the IQ Keypad. You may need to wake up the IQ Keypad first. Then touch OK.
- Give the prox tag a name and choose which user it will be associated with. Then touch ADD.
For the IQ Pro, NS
- Open the IQ Installer App
- Navigate to Config > User Management
- From there associate the Prox Tag with the User.
Using the IQ Keypad
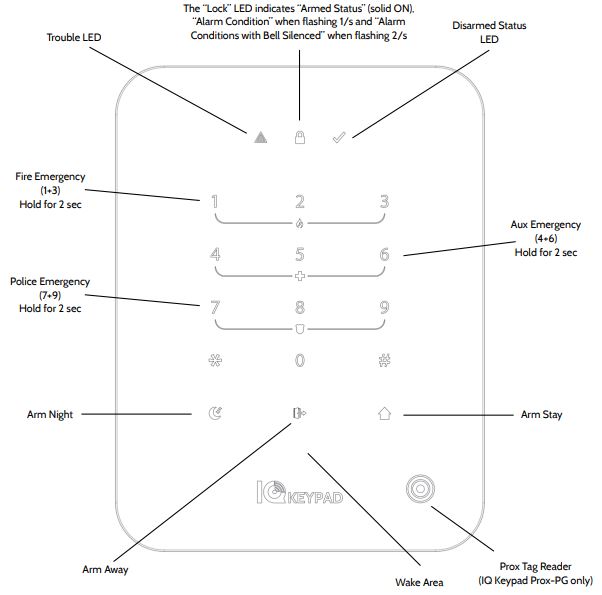
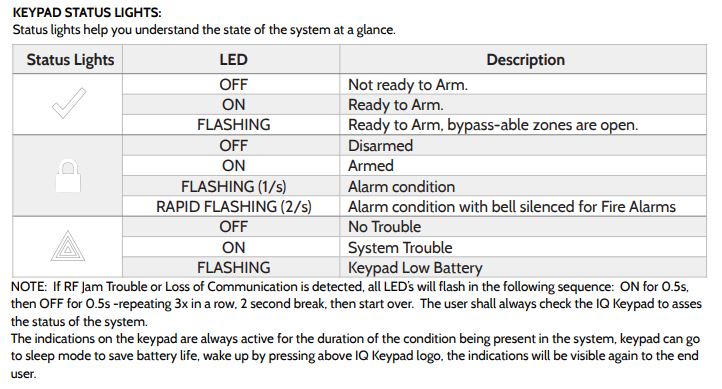
Status Lights
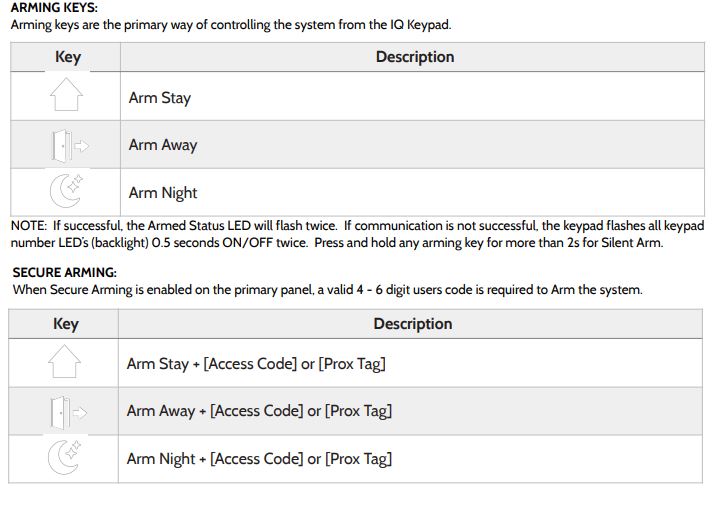
Arming Keys
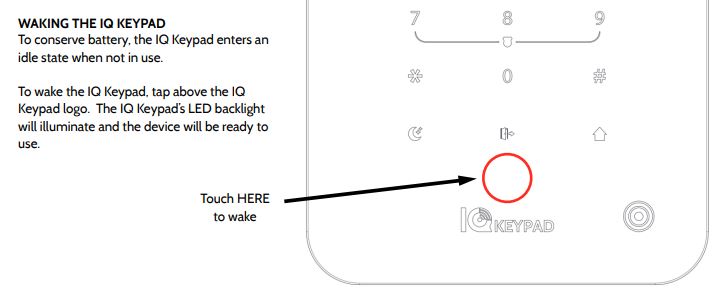
Waking the Keypad
To conserve battery, the IQ Keypad enters an idle state when not in use. To wake the IQ Keypad, tap above the IQ Keypad logo. The IQ Keypad’s LED backlight will illuminate and the device will be ready to use.
Disarming Keys
Disarming from the IQ Keypad is easy. Simply enter a valid 4 - 6 digit code into the
keypad and the system will disarm. : If successful, the Armed Status LED will flash twice. If communication is not successful, the keypad flashes all keypad number LED’s (backlight) 0.5 seconds ON/OFF twice.
Prox Tag Support
For “IQ Keypad Prox-PG” models that support Prox Tags, you may Arm with a Prox Tag in place of a 4 - 6 digit code if Secure Arming is enabled and by pressing the Arming icon of choice, followed by presenting your tag in front of the bullseye icon on the lower right hand side of the keypad. If the system is armed, presenting a valid Prox Tag will disarm it.
- You will need to enable Keyfob Disarming at the main panel for the prox tags to disarm.
- To do so, navigate to Settings > Advanced Settings > Enter Dealer or Installer Code > Installation > Security and Arming and enable the option keyfob disarming.
- When using prox tag to disarm, make sure you wake up the keypad first and then put the prox tag on the bulls eye.
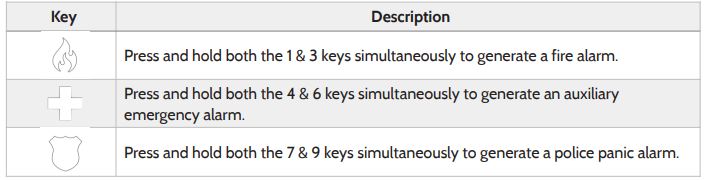
Emergency Keys
Emergency keys allow you to trigger an emergency panic directly from the IQ Keypad. To use, press and hold for 2 seconds.
Star Menu [*]
The Star Menu on the IQ Keypad allows access to more advanced functionality such as silent arming, bypassing zones, turning on/off the chime, buzzer and more. See table below for a list of functions
| Press | Action |
|---|---|
| [*][0] | Starts keypad cleaning mode and lasts for 30 seconds. Alarms, entry and exit delay will cancel screen cleaning |
| [*][1] + [Access Code] | Bypass all open Zones |
| [*][2] + [Access Code] | Silences Troubles |
| [*][4] + [Access Code] | Toggle Chime On/Off |
| [*][6] + [Access Code] | Toggle Keypress Buzzer On/Off |
| [*][7] + [Output #] + [Access Code] | Toggle Command Output (for future use) |
| [*][8] + [Access Code] | Turn on Installer Programming Access (EN Grade 2 only) |
| [*][9] + [Access Code] | Arm System with No Entry Delay |
All * menus will follow secure arming option whether an access code is needed or not
Partition Arming [#]
The Hash Menu on the IQ Keypad allows access to Partition Arming functionality. It may also act as a “Home” button to back out of any button press activity and start over. See table below for a list of functions.
| Press | Action |
|---|---|
| [#][1] + [Arm Stay] + [Access Code] or [Prox] | Arm Partition 1 to Stay |
| [#][2] + [Arm Stay] + [Access Code] or [Prox] | Arm Partition 2 to Stay |
| [#][3] + [Arm Stay] + [Access Code] or [Prox] | Arm Partition 3 to Stay |
| [#][4] + [Arm Stay] + [Access Code] or [Prox] | Arm Partition 4 to Stay |
| [#][1] + [Access Code] or [Prox] | Disarm Partition 1 |
| Hold [#] for 2 Seconds | Erases any current button presses |
When a Fire Alarm occurs (Temporal three pattern), the Bell sounding can be silenced by entering the valid user code. The “LOCK” indicator will start flashing rapidly (2/s) indicating that a fire alarm condition with bell silenced exists in the
system. The Fire alarm will be reset only when the fire initiating device has been restored.
The same functionality will also be for Carbon Monoxide alarms (Temporal four pattern).
For Fire Alarms and CO Alarm always follow the evacuation plan as suggested in your alarm system manual.
When a Burglary Alarm occurs (continuous pattern), the alarm can be reset by entering a valid user code
Maintenance
Battery Replacement
Use only Energizer AA 1.5V ALKALINE BATTERY
- Remove Keypad from Backplate: Unscrew the bottom screw on
the bottom of the keypad and then slide up to remove the keypad
from the wall mount. - Remove Batteries: Remove the 4 x AA batteries from the back of
the keypad. Do NOT use a screwdriver or anything sharp that
could puncture the battery. - Install New Batteries: Insert new 4 x AA batteries into the battery
slots. Be sure to observe polarity. - Reinstall Keypad on Backplate: Slide the keypad down onto the
wall mount and secure with the bottom screw so that it can not
be removed. Test and verify functionality with the primary panel.