The ADC-W110 makes it easy to install any Alarm.com Power over Ethernet (PoE) camera, eliminating the need to run cable wiring throughout a home or business.
Simply plug the device into a wall outlet to provide a PoE camera with both electrical power and secure, reliable Wi-Fi connectivity.
The ADC-W110 integrates with Alarm.com, providing easy post-installation troubleshooting and enhanced security.
Features
Simple plug-in installation
Secure, reliable Wi-Fi connectivity
Eliminate the need for wires
Requirements
Power
Standard electrical outlet
Network
Broadband Internet connection with router
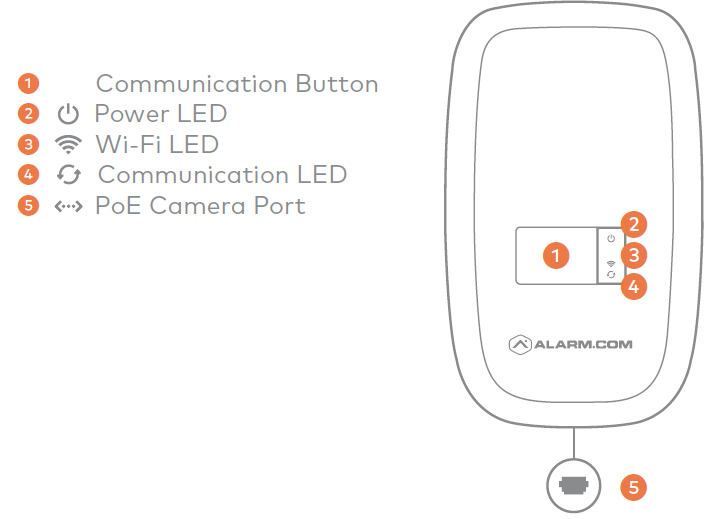
Setup
Access Point (AP) mode or Wi-Fi Protect Setup (WPS) mode
There are two local options for connecting the ADC-W110 to the wireless network: Wi-Fi Protected Setup (WPS) Mode or Access Point (AP) Mode.
Use WPS mode if you have easy access to the customer’s router, and the router has the WPS feature enabled. Note that some Internet Service Providers disable the WPS feature on customer routers. AP mode is the most reliable method for installing this device.
Pre-installation checklist
ADC-W110 PoE to Wi-Fi Bridge (included)
Standard non-switched electrical outlet
Broadband (Cable, DSL, or Fiber Optic) Internet connection with the router
A computer, tablet, or smartphone with Internet access is required if the router does not have the Wi-Fi Protected Setup (WPS) feature
An Alarm.com Power over Ethernet video camera with Ethernet cable
Connect the ADC-W110 to the wireless network using AP mode
Complete these steps to connect the ADC-W110 to the wireless network using AP Mode.
Plug the ADC-W110 into an electrical outlet that is within close range of the customer’s Wi-Fi network/router. Wait for the Wi-Fi LED to begin blinking white.
On an Internet-enabled device, connect to the wireless network W110 (XX:XX:XX) where XX:XX:XX is the last six characters of the ADC-W110’s MAC address, which is located on the back of the ADC-W110 or on the packaging.
On the same device, open a web browser and enter http://W110install in the URL field. Follow the on-screen instructions to add the ADC-W110 to the wireless network.
Allow a few minutes for the ADC-W110 to connect. The Wi-Fi LED will turn solid white, and the Communication LED will turn solid green when a successful connection is made.
Connect the PoE camera to the port at the bottom of the ADC-W110 using an Ethernet cable.
Follow the installation instructions included with the camera to add it to an account
Connect the ADC-W110 to the wireless network using WPS mode
Complete these steps to connect the ADC-W110 to the wireless network using WPS Mode.
Plug the ADC-W110 into a non-switched electrical outlet that is within close range of the customer’s Wi-Fi network/router. Wait for the Wi-Fi LED to begin blinking white.
Hold down the Communication button until the Wi-Fi LED turns off and the Communication LED begins blinking green (approximately 2 to 6 seconds).
Activate the WPS Mode on the router. The ADC-W110 begins to connect to the wireless network.
Allow a few minutes for the ADC-W110 to connect. The Wi-Fi LED will turn solid white and the Communication LED will turn solid green when a successful connection is made.
Connect the PoE camera to the Camera port at the bottom of the ADC-W110 using an Ethernet cable.
Follow the installation instructions included with the camera to add it to an account.
Automatic account association
After connecting a camera to the ADC-W110 and installing the camera onto your Alarm.com account, the ADC-W110 will automatically add itself to the same account. If the camera is ever deleted off the ADC account, the ADC-W110 deletes itself as well. The ADC-W110 will always be on the correct account even if a new camera is plugged into the device without notice.
The ADC-W110 never needs to be manually added to or removed from an account.
If the ADC-W110 has already been added to a wireless network (indicated by the ADC-W110 not entering AP mode after powering on) and you want to change networks:
To enter WPS mode, press and hold the communication button until the Communication LED begins blinking green (approximately 2 to 6 seconds). Follow the WPS mode instructions above.
To enter AP mode, press and hold the communication button until the Wi-Fi LED begins blinking white (approximately 7 to 11 seconds). Follow the AP mode instructions above.
If you have issues connecting the ADC-W110 to the wireless network, power cycle the device and try again. Verify that the wireless network is working properly and that you typed in the correct network password (SSID).
If the issues persist, try resetting the ADC-W110 to factory defaults by holding down the communication button for 12 seconds or until the Wi-Fi and Communication LEDs begin blinking red. Try the installation instructions again.
Caution : This will restore factory-default settings to the device. Any associated Wi-Fi networks will be removed.

 |
| |Local network connection only, connecting to internet|
 |Off|AP mode|
 |Off|No network found|