If an Alarm.com camera keeps dropping offline, this guide walks through the full diagnostic in order. Start at the top, stop when it works.
You can reach out to Surety Support at any point in this process. You are not expected to work through every step on your own first. If you would rather have a technician walk through it with you, or you get stuck anywhere below, ask on the support site or email us and we will pick it up from wherever you are. We are here to help, 7 days a week.
Before You Start: Is It Actually Offline?
An Alarm.com camera is “offline” when the cloud has not heard from it for a sustained period. In the Alarm.com app, an offline camera usually shows a broken-image thumbnail, a stale timestamp, and a “Camera Unreachable” message on Live View. Alarm.com gives you two built-in signals that tell you how bad it is:
-
After about 5 minutes of no contact, the Video Troubleshooting Wizard becomes available in the Alarm.com mobile app and website’s Video page.
-
After 8 to 16 hours of continuous unreachability, Alarm.com posts a Video Device Not Responding trouble condition on your account. Short outages do not trigger it, so the absence of this flag does not mean the camera is fine.
If the camera just came back on its own after a few minutes, log the timestamp and move to the Signal Strength check below. Intermittent drops almost always trace to signal or bandwidth.
Diagnose With Alarm.com’s Built-in Tools (In Order)
Before you touch any hardware, use the diagnostics the Alarm.com app and website already gives you.
1. Run the Video Troubleshooting Wizard
In the Alarm.com app, open Video. If a camera has been offline for at least 5 minutes, a Troubleshoot option appears next to it. The same wizard is available on the Alarm.com website. The wizard detects the camera model, walks you through a reconnection attempt, and gives model-specific advice. It can resolve most transient problems without any other action.

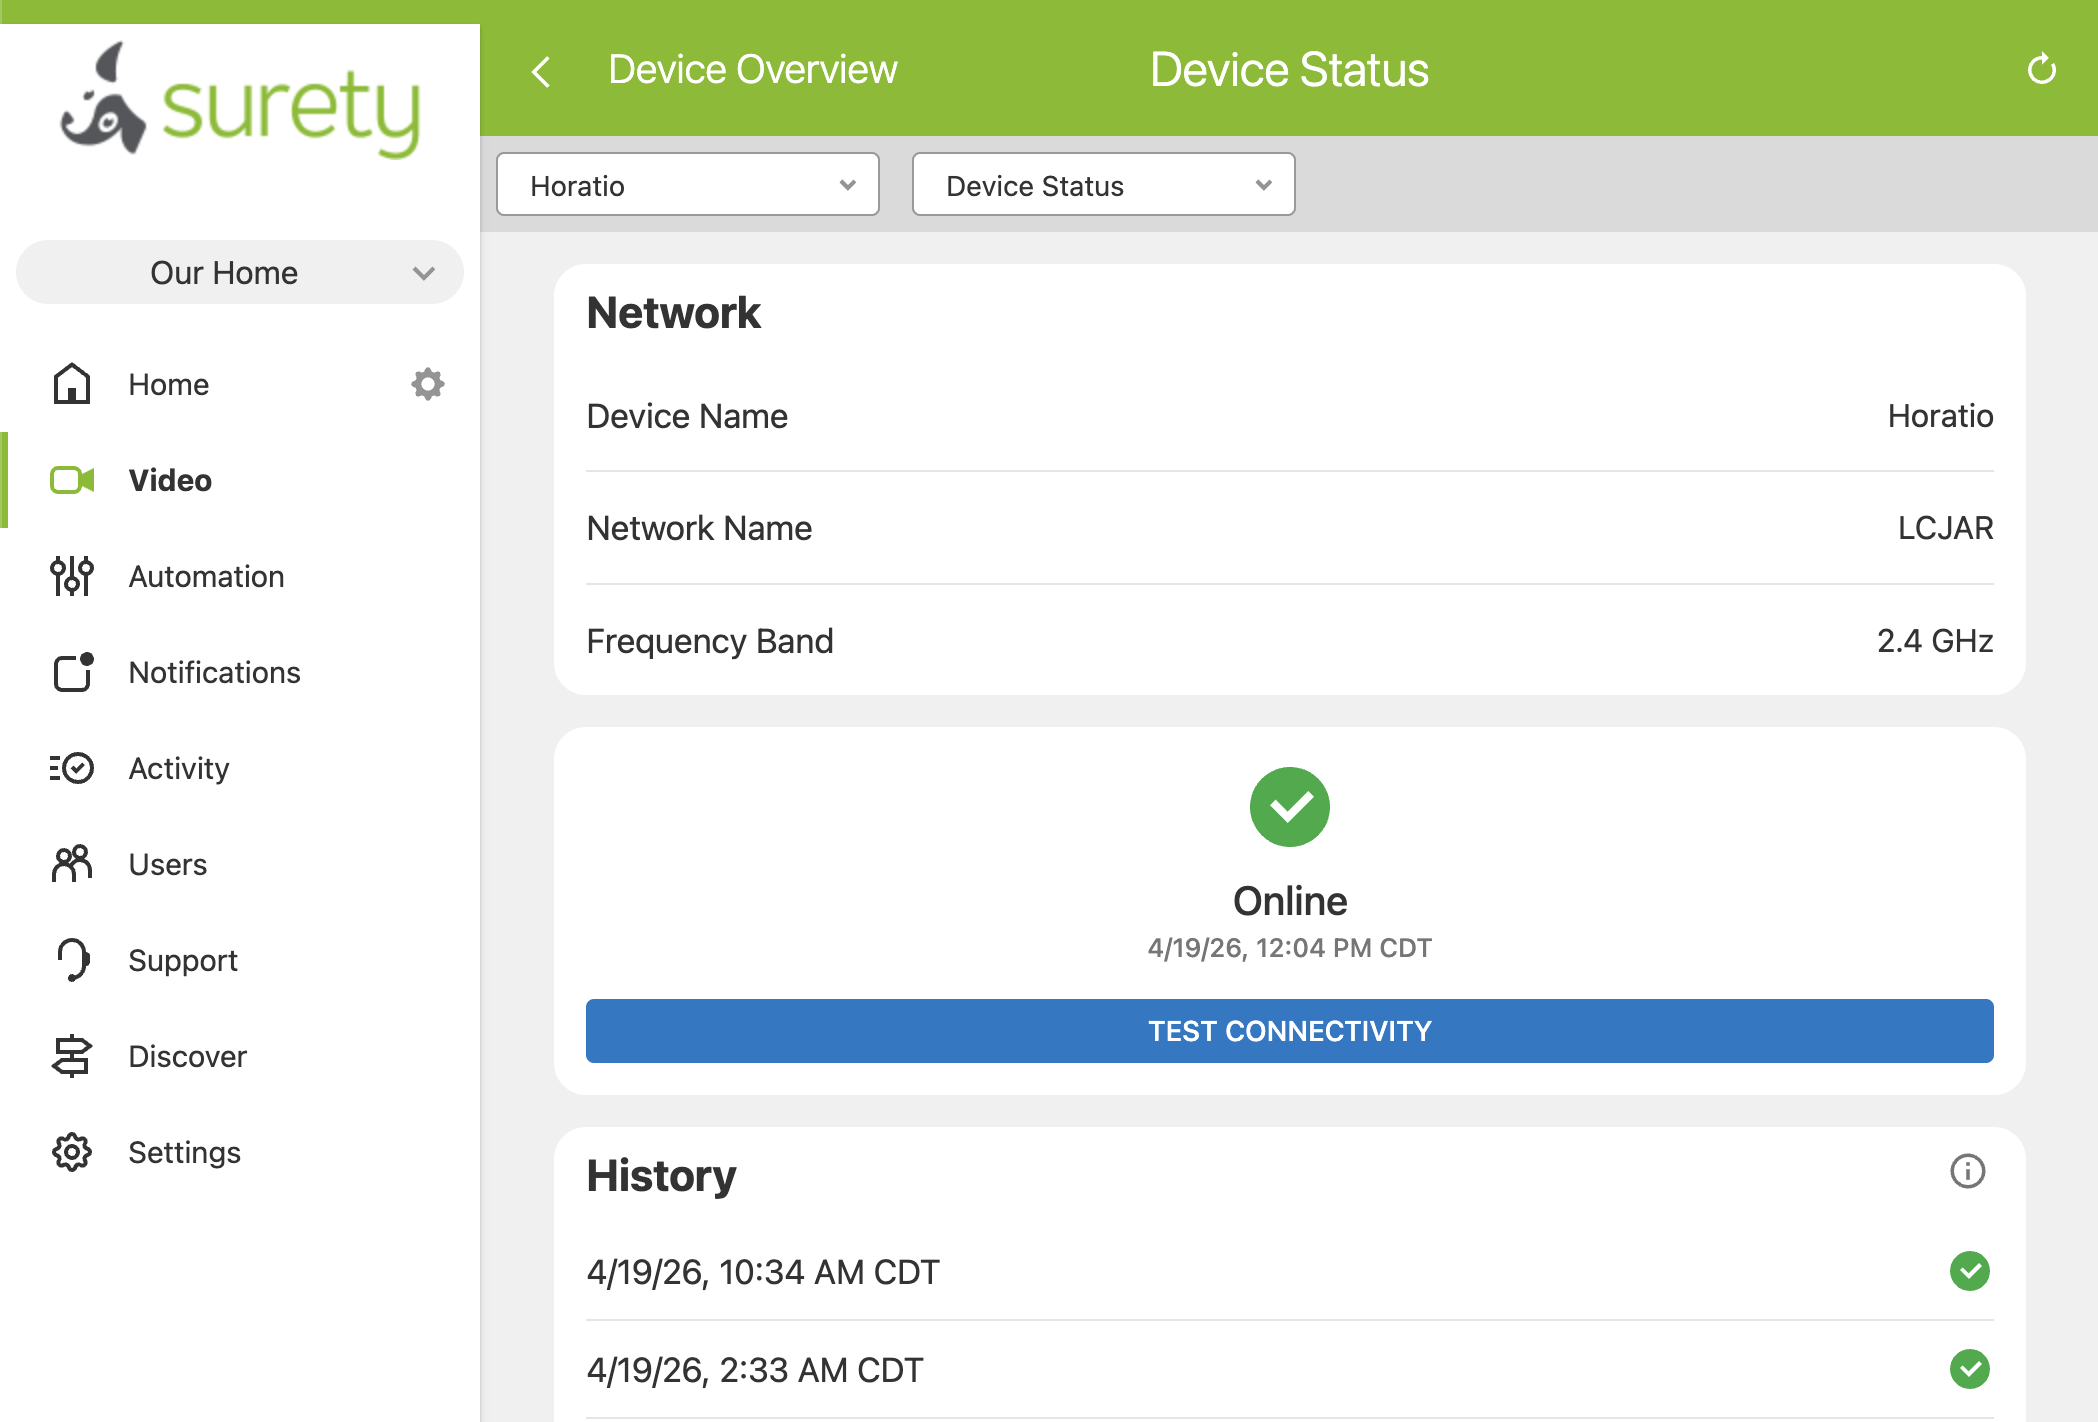
2. Check Device Status and Run Test Connectivity
In the camera’s network settings in the Alarm.com app or website, alongside Signal Strength, there is a Device Status section that shows whether the camera is currently online. It includes a Test Connectivity button. Test Connectivity is not a speed test; it pings the camera from the Alarm.com cloud to confirm it is reachable right now. Use it as a real-time “is it actually online?” check after any change (a reboot, a cable swap, a router restart) and to confirm that an apparent outage is either still happening or has cleared.
3. Check the Signal Strength Section
Open the camera’s settings in the Alarm.com app or website (Video > [camera name] > Settings > Signal Strength). The section has two views:
-
Current signal strength is shown as a percentage plus a plain-English rating of Excellent, Good, or Poor based on that percentage.
-
History is shown as 1 to 4 bars of signal strength over time, color-coded green for Excellent or Good and red for Poor. The history is sampled once per day, so it is a daily trend line, not an hour-by-hour record.
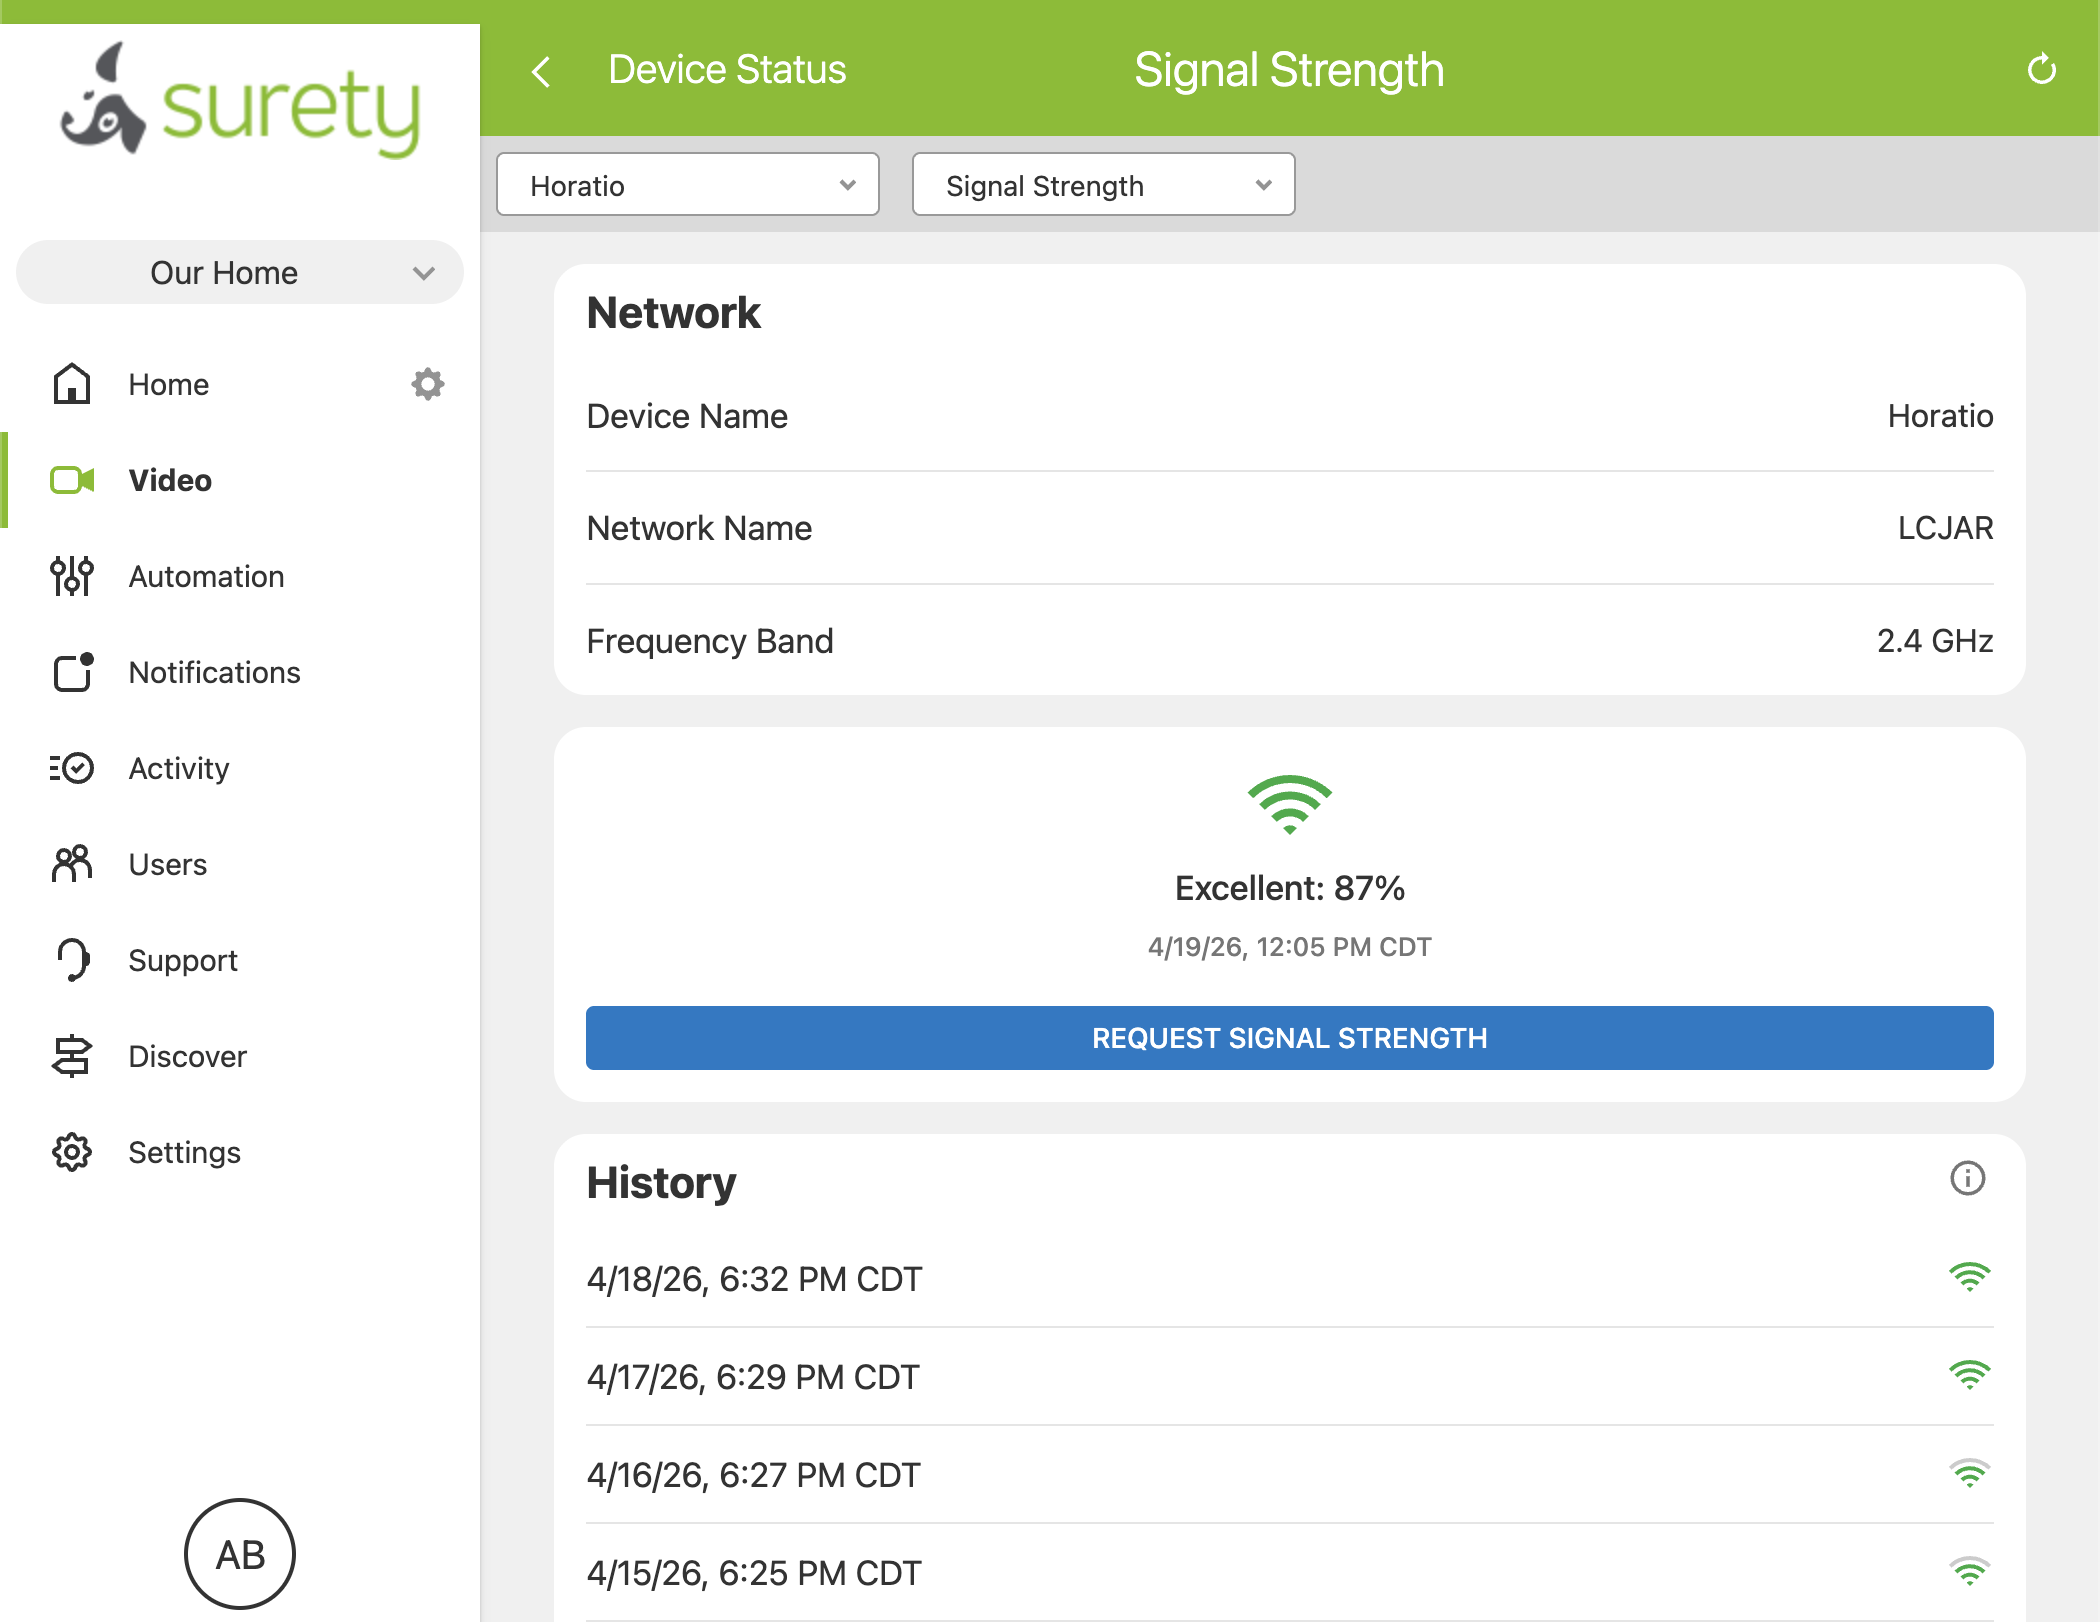
Alarm.com does not show customers dBm, signal-to-noise ratio, or raw transmit-rate numbers; it is a clean, easy-to-read current reading and a daily bars-and-color history.
The rule of thumb: you want every camera to read Excellent, or at minimum Good, and the daily history should be mostly green. Red bars mean Poor signal on that day, and any stretch of red is where offline problems originate.
Because the history is one sample per day, it is best used for trends over days and weeks: a camera whose signal has been slowly declining, a reading that jumped from red to green after you added a mesh node, a camera that was already trending down before it finally went offline. The history cannot resolve time-of-day patterns. If your camera drops at the same time every evening, you learn that from watching the camera’s online/offline behavior, not from the Signal Strength history.
4. Run a Speed Test at the Camera’s Location
Alarm.com does not run a speed test from inside the camera itself. Take a phone or laptop to the spot where the camera is mounted, connect it to the same Wi-Fi network, and run a standard speed test like fast.com or speedtest.net. Alarm.com recommends a minimum of roughly 2 Mbps upload per camera, more for higher-resolution streams. If measured upload at the camera’s location is below that, or signal is noticeably weaker than it is at the router, you have found the problem.

Most Common Causes
| Cause | Symptom | Fix |
|---|---|---|
| Weak Wi-Fi signal at the camera’s mounted location | Current reading shows Poor, or the daily history has red bars (1 to 2 bars, Poor) | Move the router, add a mesh node near the camera, or relocate the camera closer to the access point. Aim for Good or Excellent (green bars) after changes. Keep the camera within about 5 feet of the router during reconnection. |
| Upload bandwidth below Alarm.com’s requirements | Cameras drop during peak household usage; multiple cameras drop together | Upgrade your internet plan, or reduce the number of simultaneous Wi-Fi cameras. PoE cameras are also an option because they use wired Ethernet. |
| Router change, SSID change, or password change | Camera went offline right after an ISP swap, router swap, or password update and has not come back | Reconnect the camera from the Alarm.com website by editing its wireless network settings. |
| Router MAC filtering enabled | Camera will not connect at all, even near the router | Add the camera’s MAC address (on the device label) to the router’s allowed list. |
| Router firewall blocking UDP or VPN traffic | Camera connects briefly then drops; issue is consistent across locations | Loosen the firewall to allow the ports Alarm.com uses, or disable restrictive “high security” modes. |
| Old 802.11b/g only router | Camera never holds a stable connection even at close range | Alarm.com recommends 802.11n or newer. Upgrade the router. |
| D-Link encryption key edge case | Camera fails to accept the Wi-Fi password during setup on certain D-Link routers | Alarm.com supports a WPA/WPA2 passphrase of 8 to 63 printable characters or a 64 character hexadecimal key. Some D-Link models allow a 64-character printable key, which is not supported. Shorten it. |
| Bad or too-long Ethernet cable, or failed switch/PoE injector port (PoE cameras) | PoE camera offline; wiring run is long or recently touched | Swap the patch cable and try a different switch or PoE injector port as a quick test. |
| WPS pairing failure | LED ends in solid red after WPS, or solid blue means Privacy mode rather than WPS learn mode | Retry WPS with the router closer, or skip WPS and configure Wi-Fi through the Alarm.com app’s network settings. |
| Range extender placement | Camera inherits every blip of a poorly-placed extender | Place the mesh node or extender near the camera, not near the router. |
The Fix Sequence, Step by Step
Work through these in order. Stop at whichever step fixes it.
-
Check the Signal Strength section for that camera in the Alarm.com app (
Video > [camera name] > Settings > Signal Strength). Look at both the current reading (percentage plus Excellent, Good, or Poor rating) and the daily history (1 to 4 bars per day, green for Excellent/Good, red for Poor, one sample per day). You want every camera to read Excellent, or at minimum Good, and the history should be mostly green. A current reading of Poor, or red bars in the recent daily history, tells you this is a signal or interference issue before you touch anything else. If the current reading stays in Excellent or Good and the history is all green but the camera still keeps dropping, the problem is somewhere else on the list. -
Reboot (power cycle) the camera. The general method is to cut power for about 2 minutes and then restore it. For a Wi-Fi camera with a power adapter, unplug the adapter, wait 2 minutes, plug it back in. For a PoE camera, unplug the Ethernet cable at the switch or PoE injector (the same cable delivers both power and data), wait 2 minutes, plug it back in. Battery-powered cameras have a model-specific reboot procedure (usually a button-hold on the camera itself) rather than a cable-unplug. The exact procedure is in the Alarm.com app for that camera, and Surety support can walk you through it if you cannot find it.
-
Reboot the router. Unplug the router for about 2 minutes, plug it back in, and wait until all the lights are steady before testing the camera. If you have a separate modem, power cycle it as well. This clears any lease or state issue that built up over time on the network side.
-
Reconnect Wi-Fi credentials if the network has changed. If you switched ISPs, swapped the router, changed the Wi-Fi network name (SSID) or password, or introduced a new guest network, the camera still has the old credentials stored. On the Alarm.com website, open the camera’s settings, edit the Wi-Fi network configuration, and provide the current SSID and password. For the cleanest re-pair, keep the camera within about 5 feet of the router during this step.
-
Fix placement if signal is weak. If the current reading is Poor or recent daily history bars are red, move the router closer to the camera, add a mesh node or range extender near the camera (not near the router; that is the most common placement mistake), or relocate the camera closer to an existing access point. For an outdoor camera, a mesh node in the garage, on the interior side of the exterior wall, or in the soffit cavity is often the clean fix. Re-check the current Signal Strength after each change (the current reading updates right away; the daily history will reflect the change on the next day’s sample).
-
Swap the cable and port for PoE cameras. If the offline camera is the ADC-VC730P outdoor spotlight, the ADC-VC729P PoE++ floodlight, or the ADC-VDB755P PoE doorbell/intercom, swap the patch cable from the camera end back to the switch or PoE injector. Try a different port on the switch or a different PoE injector. Ethernet runs fail quietly and often, and this two-minute test rules out wiring before you escalate. The ADC-VC729P requires PoE++ (802.3bt), so if it will not power up, confirm the switch port or injector actually supports PoE++ and not just standard PoE. (Skip this step for Wi-Fi cameras; none of the current Wi-Fi Alarm.com models have an Ethernet option.)
-
Try Bluetooth (BLE) Recovery on compatible cameras. If your camera is the ADC-V730 or ADC-VDB775 (with the required hardware and firmware), and you have a Bluetooth-capable iOS or Android phone with the Alarm.com Customer app on iOS 5.13.3+ or Android 5.10.3+, open the camera in the app and use Troubleshoot / Reconnect Device. The entry points are the Video card stream, the Live View stream, the Device Overview, the Network settings, or the Video Device - Not Responding trouble condition (which takes 8 to 16 hours to appear, so the other four entry points are usually what you want). BLE Recovery is a non-destructive, customer-facing reconnection and is the right step to try before a factory reset.
-
Factory reset. This is the last self-serve step you can take. If you take this step you will lose the camera settings and recording rules for the camera. Delete the camera from your Alarm.com account, run the model’s factory reset procedure (each Alarm.com camera has its own button-hold sequence, which is documented in the Alarm.com app or available from Surety support), reconnect the camera to the network, and add it back to your account. A factory reset loses any local configuration on the device, which is why it is step 8 and not step 2.
-
Contact Surety support at any point. You do not have to reach this step before reaching out; support is available whenever you want help, whether you have tried none of the steps above, some of them, or all of them. Ask Surety Support. Send us your camera model and a list of anything you have already tried, and we will take it from there. Surety support can review account-level event and logs, see dealer-tool views that are not exposed on the customer side, and help diagnose edge cases or a hardware failure that needs a warranty replacement.
Special Case: Wi-Fi Video Doorbells
Wi-Fi video doorbells have it harder than every other camera on the list. They sit far from the router by definition, often on a metal-clad or masonry door frame, and are exposed to every environmental swing that affects Wi-Fi. If the offline camera is an ADC-VDB775 or ADC-VDB780B and the Signal Strength history shows regular dips, signal attenuation at the door is almost always the culprit. The fix is placement: a mesh node in the entry hall on the interior side of the front door, or a ceiling-mounted access point in the room closest to the doorbell. An extender in the basement or down the hallway will not help.
If Wi-Fi doorbell troubleshooting has become a recurring chore, the ADC-VDB755P PoE doorbell/intercom may be the answer. It uses wired Ethernet for both power and data, so it does not have the Wi-Fi dropout problem at all.
When a PoE Camera Is the Real Answer
If a Wi-Fi camera has been through every step above more than once and keeps dropping, the permanent fix is usually PoE. The current PoE models in the Surety lineup are:
-
ADC-VC730P: outdoor PoE spotlight camera.
-
ADC-VC729P: PoE++ floodlight camera. This is the recommended floodlight in the lineup precisely because it is Ethernet-powered and therefore does not suffer from Wi-Fi connectivity problems. Note that it requires PoE++ (802.3bt), not standard PoE, because floodlight LEDs draw more power than a typical camera.
-
ADC-VDB755P: PoE doorbell and intercom.
A quick note on the V729 family, because the naming is confusing: the ADC-V729AC is the AC-powered floodlight (the most common one), the ADC-V729 is the DC-powered variant, and the ADC-VC729P is the PoE++ variant. Only the VC729P is PoE, and it is the one to choose if you want to avoid Wi-Fi offline problems on a floodlight camera.
PoE cameras use wired Ethernet for both power and data, so they do not care about Wi-Fi signal, channel congestion, or neighbor interference. None of the current Wi-Fi Alarm.com cameras support Ethernet as an alternative to Wi-Fi, so going wired means switching models, not adding a cable. See the full Alarm.com camera lineup at Surety for options.
Reaching Surety Support
Reach out any time you want help. You are welcome to try the steps above first if you like, but there is no requirement to. Ask on the support site or email us when you want a second pair of eyes, when the Signal Strength and bandwidth both look healthy but the camera still drops, when a trouble condition keeps clearing and reposting, when you suspect a hardware failure or firmware issue, or simply when you would rather have someone walk it through with you. Surety support can review account-level events and logs, check dealer-tool views that are not visible on the customer side, and escalate to Alarm.com if needed. Find us at suretyhome.com/support, 7 days a week, and we are happy to help from any point in the process.