How to Setup and Install a LiftMaster MyQ Smart Garage Hub

821lm

821LM, 821LMB, 821LMC-S, MyQ-G0301, MyQ-G0401-ES

The LiftMaster MyQ Smart Garage Hub is a kit that allows you to integrate a wide range of Garage Door Openers with your Alarm.com account.

It supports two non-MyQ garage doors when coupled with a tilt sensor and up to 16 MyQ devices, such as an 888LM or MyQ-enabled motor. It has one wired connection: AC power. It connects wirelessly to your home network, and the connection is configured via smartphone or PC.

Additionally, it has a speaker and a strobe light/flasher to alert users when the door is closing both audibly and visually, as is required by modern building codes.

How to Determine Compatible Garage Openers

The LiftMaster MyQ Hub works with a wide variety of garage openers.

When checking for compatibility, the garage door opener must have safety reversing sensors which can be found at the bottom of the track of the door. These sensors prevent the door from closing when there is something blocking the path of the door.

Most garage door openers manufactured by the following brands are compatible:

  • Chamberlain : all garage door openers with the following program button colors on the monitor portion of the operator: yellow, purple, orange, green and red.
  • Craftsman : all garage door openers with the following program button colors on the monitor portion of the operator: yellow, purple, orange, green and red.
  • Genie : all garage door openers manufactured between 1996 and 2016. (Intellicode 1 and Intellicode 2)
    • In 2016, Genie began manufacturing their garage door opener radio receivers so that they no longer are able to be programmed/controlled with LiftMaster/Chamberlain universal remotes. This includes the universal remote built into the 821LM MyQ Garage Universal hub. The year of manufacture can be determined using the first two digits of the serial number on the garage door opener (e.g., serial number (SN) 1420955 would indicate that the garage door opener was manufactured in 2014 and should be compatible). The serial number may be printed in a variety of places on the GDO, depending on the model.
  • LiftMaster : all garage door openers with the following program button colors on the monitor portion of the operator: yellow, purple, orange, green and red.
  • Linear : all garage door openers Overhead Door: all garage door openers manufactured after 1996 (Intellicode 1 and Intellicode 2)
  • Overhead Door : nearly all models manufactured after 1996 and before 2016, using the CodeDodger radio remote receiver.
    • In 2016, Overhead Door began manufacturing their garage door opener radio receivers so that they no longer are able to be programmed/controlled with LiftMaster/Chamberlain universal remotes. This includes the universal remote built into the 821LM MyQ Garage Universal hub. The year of manufacture can be determined using the first two digits of the serial number on the garage door opener (e.g., serial number (SN) 132744210857OA would indicate that the garage door opener was manufactured in 2013 and should be compatible). The serial number may be printed in a variety of places on the GDO, depending on the model.
  • Raynor : all garage door openers with the following program button colors on the motor portion of the operator: yellow, purple, orange, green and red.
  • Stanley : all garage door openers with a program (remote transmitter learn) button on the motor portion of the operator.
  • Wayne Dalton : most models including Classic drive, DoorMaster, iDrive, ProDrive and Quantum.
  • Others that are also compatible if manufactured after 1993 : Access Master, AssureLink, BuildMark, Do-It, Garage Access, Master Mechanic and True Value

Getting started with Installation

Required equipment for installation

  • Ladder.
  • Wi-Fi network name and password.
  • LiftMaster MyQ Smart Garage Hub (821LM, 821LMB, or MyQ-G0301-D).
  • Door sensor (Each Hub supports two door sensors).
  • Compatible garage door opener.
  • Website access through a laptop, tablet, or mobile device.

1. Install door sensor

The MyQ Door Sensor communicates the state of the door (open or closed) to the Wi-Fi Hub. This device is a small tilt sensor that is installed on the top panel of the garage door on the inside of the garage. When it is in a vertical position, the sensor reads as Closed , and when it is in a horizontal position it reads as Open .

The MyQ Door Sensor uses a 3 volt CR2450 Lithium battery. Battery level is measured by the 821LM as the number of cycles (up and down) that the sensor has transmitted since it was first learned into a MyQ Smart Garage Hub. The MyQ Garage Door Sensor reports low battery at 7,000 cycles. It typically stops functioning due to battery depletion after about 10,000 cycles.

The sensor communicates with the hub via Bluetooth. This gives it an operating range of about 30 feet from the hub.

Important : The door sensor must be mounted prior to connecting the Wi-Fi Hub to Alarm.com.

There are two Door Sensor installation methods:

Install the door sensor using fastening strips:

  • Position the door sensor vertically and attach to a clean, dry location on the top panel of the garage door with fastening strips (provided).
    attachtilt1

Install the door sensor using screws:

  1. Press in the bottom of the door sensor and remove the front cover.
  2. Position the door sensor vertically and attach to the top panel of the garage door with screws (provided).
  3. Replace the front cover.
    attachtilt2

2. Mount the MyQ Smart Garage Hub

Note : Final positioning can wait until after setup is complete. If chosen to mount the Wi-Fi Hub first, write down the serial number on the back of the hub to be used later.

  1. Install the bracket for Wi-Fi Hub on the ceiling near the garage door opener.
    • Use the bracket as a template and mark holes for the bracket.
    • Drill 5/32” pilot holes and install the bracket using provided hardware. Be sure the Wi-Fi Hub is visible when standing in the doorway of the garage so that users can see the flashing light when the door is closing.
  2. Slide the Wi-Fi Hub on to the bracket.
  3. Connect to AC power.
  4. The LEDs blink momentarily to indicate a successful power up.

Note : MyQ technology has a range of 1,500 feet (open field).

Important : The Wi-Fi hub must be positioned so that the light on the hub is visible from the doorway of the garage.

myqhubwifiinstall

3. Setup Wi-Fi on the MyQ Garage MyQ Smart Garage Hub

Method 1: Using Internet Connected Device

  1. Make note of the Wi-Fi’s network name and its associated security key/password.
  2. Plug in the Wi-Fi Hub. The Blue LED blinks.
  3. Verify Wi-Fi is enabled on the laptop, tablet, or mobile device.
  4. Locate the list of available Wi-Fi networks and select MyQ-nnn network. The nnn is the last three digits of the Wi-Fi Hub’s serial number.
    • Android typically shows internet not available after selecting the MyQ-nnn network. This is expected, and if it gives the option to Ignore or Cancel , click Ignore .
    • Once the phone is connected to the MyQ-nnn network, the blue light on the 821LM goes from blinking blue to a solid blue LED.
  5. Launch the mobile device’s web browser and enter setup.myqdevice.com into the web browser’s address bar. If unable to load try using a different browser.
    • Alternatively, enter setup.myqhome.com or 192.168.0.1 in the URL bar to navigate to the same web page.
    • Always type in the full URL address, do not let it auto complete, and do not type www or Https before the web address.
  6. Follow the steps in the MyQ Wi-Fi Setup page to complete the setup. It is required to enter the Wi-Fi name and password for the home network.
  7. When prompted, do not install the MyQ Garage app. When the LED light is solid green, Wi-Fi connection has been established, afterwards you can close the internet browser.

Additional considerations

The following are some additional tips when enrolling the Wi-Fi Hub using an internet connected device:

  1. For Android devices, use the default browser for the phone, if available. If Chrome is used, launch a new browser and do not use an already open web page.
  2. Android devices have Smart Network Switch , and Apple devices have Wi-Fi Assist switch. These features take the device off a Wi-Fi network that the phone deems poor, and connect the device to their cellular data, which removes the device from the MyQ-nnn network. Verify that Smart Network or Wi-Fi Assist switch are disabled.
  3. If the phone keeps connecting to the home or another Wi-Fi network, select to Forget the Wi-Fi network so it stays connected to the MyQ-nnn network.

Important : Verify the SSID and password is known for the selected network to forget.

Method 2: Using WPS

  1. Put the Hub into WPS mode: With Hub powered and Blue LED blinking, press and release the Hub’s Settings Gear button. The Hub’s Blue LED turns on solid.
  2. Within one minute, press and release the WPS button on the router.
  3. Within a few minutes, the Hub connects to the network. The Green LED turns on solid to indicate successful connection.

Method 3: Using Bluetooth (iPhone users only)

  1. Plug in the Wi-Fi Hub. The Blue LED blinks.
  2. Connect the Apple mobile device to the Wi-Fi network.
  3. On the Apple mobile device, go to Settings > Bluetooth, and turn on Bluetooth.
  4. Find the Bluetooth MyQ-nnn device and select MyQ-nnn device to pair. The nnn is the last 3 digits of the Wi-Fi Hub’s serial number.

Note : If the phone believes the Hub is not connected to the internet, try forgetting the device before pairing. To do this, select the blue information icon to the right of the device name and select forget this device. The MyQ-nnn device reappears for pairing in few seconds.

  1. When prompted, allow phone to share Wi-Fi network settings with the Wi-Fi Hub (this may take a minute). When the LED light turns green the device has successfully connected to the Wi-Fi network.

Important : Do not choose to install the LiftMaster iPhone application.

4. Connect to Alarm.com

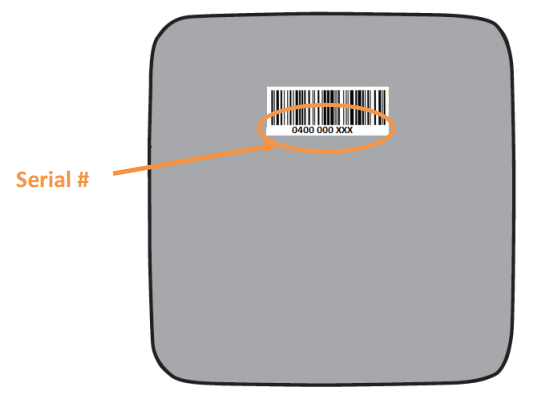
The following image illustrates the back of the Wi-Fi Hub for locating the serial number to connect to Alarm.com:

hubback

Using the Alarm.com Website

Note : A MyQ Garage cannot be registered through Alarm.com if it is already registered through MyQ/Liftmaster/Chamberlain or other similar apps. Remove it from the MyQ app completely, the actuate the garage openers wall control a couple of times before attempting to pair with Alarm.com.

  1. Verify the LED on the Hub is solid green before registering through the Alarm.com Website.
  2. Log into the Alarm.com Website.
  3. Click Settings.
  4. Click Manage Devices.
  5. Click Add Device.
  6. Click Garage Door.
  7. Click MyQ Smart Garage Hub.
  8. Click Next.
  9. Follow the on-screen instructions to complete the device installation.

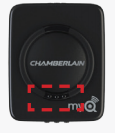
The following image outlines the test button to enroll the Door Sensor:
My_Q_test_button

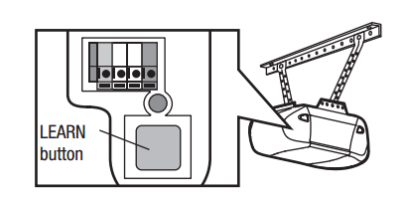
The following displays an example of a learn button on the garage door opener:
learn button'

Troubleshooting

This guide includes troubleshooting steps for situations that may occur with the LiftMaster MyQ 821LM, 821LMB, or MyQ-G0301-D.

LED indicators

When troubleshooting, take note of the various LEDs on the LiftMaster MyQ Smart Garage Hub.

LED color and state MyQ Smart Garage Hub status
Blue Flashing Wi-Fi needs to be set up
Blue and Green Flashing No router communication
Blue Solid Wi-Fi setup active
Green Flashing Communicating with router
Green and Yellow Flashing Programming mode
Green Solid Wi-Fi connected

The door sensor unable to program into the Wi-Fi Hub

  • Press the Test button on the door sensor. The Yellow LED on the door sensor blinks. If the door sensor is connected to the Wi-Fi Hub, the Wi-Fi Hub beeps once or twice to indicate the slot number the sensor is associated with .
    • If the Yellow LED on the door sensor does not blink, replace the 3 volt CR2450 Lithium battery.
      • If replacing the battery does not resolve the behavior, the door sensor may need to be replaced.
    • If the Yellow LED blinks on the door sensor but continues to be unable to program into the Wi-Fi Hub, verify the Wi-Fi Hub slot is available to enroll a door sensor.
      • To clear the door sensor slot on the Wi-Fi Hub, press and hold the 1 or 2 button on the Wi-Fi Hub that is connected to the door sensor until the Yellow LED turns off.

Note: If there is already a successful garage door sensor enrolled on the Wi-Fi Hub, verify that door sensor’s slot number by pressing its Test button before clearing the slots. Do not clear the successful door sensor’s slot number.

  • The G821LMB-2SENSOR and 821LMC-SENSOR (red LED) communicate using RF and can be programmed into the 821LMB or 821LMC-S natively or the 821LM and MyQ-G0301 with the latest firmware. Firmware updates are automatically sent when the hub communicates with the LiftMaster servers. The 821LM-SENSOR (yellow LED) uses a Bluetooth signal and should only be programmed into the 821LM or MyQ-G0301.

The Wi-Fi Hub is not connecting to the internet

  • Verify there is sufficient Wi-Fi signal in the garage.
    • The thickness and number of walls, doors or other barriers between the router and garage can affect signal strength.
    • The Wi-Fi Hub’s average range is about 50-100 feet from the Wi-Fi router.
    • To test if the Wi-Fi Hub should work, take a smartphone into the garage and turn on Wi-Fi to verify Wi-Fi signal is sufficient.
      • MyQ Garage performance is best if the smartphone shows two or more bars, however, the MyQ Garage should perform properly with one bar as well.
  • Try connecting the Wi-Fi Hub to the internet from the same room as the router. Then move the Wi-Fi Hub back to the garage to determine if the Wi-Fi Hub keeps a solid connection. The Green LED is solid to indicate it has an internet connection.
    • If a solid connection cannot be maintained, use a Wi-Fi range extender to boost signal strength in the garage. Wi-Fi range extenders are readily available at most consumer electronics stores.

The option for non-MyQ Garage Door is not present

This occurs when the MyQ Smart Garage Hub has information in both non-MyQ door slots. Since the MyQ Smart Garage Hub can only have up to two non-MyQ doors, the option to add a non-MyQ door is not present to prevent a new attempt. If there is only one or no doors actually enrolled, delete the hub from the account, power cycle it, and re-register the hub using its serial number to resolve the issue, as the door information is deleted when the hub is deleted from the account.

Alternatively, clearing the slots and power cycling may resolve as well. Press and hold the [1] button to produce a solid yellow LED. Continue to hold until the yellow LED turns off. The slot should now be clear. Repeat with [2] for the second slot.

Android device is not connecting to the Wi-Fi Hub

  • Some mobile devices like the Samsung Galaxy use a feature called auto-switching, which can cause the phone to switch away from the home Wi-Fi network. This prevents it from being able to share network settings with the Wi-Fi Hub. This feature can be turned off in advanced Wi-Fi options on the mobile device.
  • If using a newer Android phone or an Android phone running 4.x (Ice Cream Sandwich of Jelly Bean), the phone may be restricting access to the Wi-Fi signal. Verify the option for Check for internet service is not selected:

To verify the option using an Android phone:

  1. Tap Settings.
  2. Tap Connection.
  3. Tap Wi-Fi.
  4. Tap the Menu icon.
  5. Tap Advanced.
  6. Tap to uncheck Check for internet service.
  7. Try connecting to the Wi-Fi Hub again.

When trying to pair with the Gateway using Bluetooth on iOS, it shows as being already paired

It is required to “forget” the device before it can be paired again. With the blue light flashing on the gateway, pull up the iOS device’s Bluetooth menu, and press the arrow next to MyQ-XYZ to pull up the advanced options. From this page, choose to Forget the device. Once this has been done, it is possible to re-pair the Gateway with the device, and the Wi-Fi settings are able to be shared again.

The Wi-Fi Hub is not registering

Verify is the Wi-Fi Hub is associated with the Liftmaster’s MyQ® Garage app. Each Wi-Fi Hub can only be associated with one account. If the Wi-Fi Hub is connected to a LiftMaster account, delete the Wi-Fi Hub from the LiftMaster account.

To remove the Wi-Fi Hub from a LiftMaster account:

  1. Log into the LiftMaster MyQ website at Home.
  2. In the My Places & Devices section, click the Settings icon.
  3. Click to select the desired Place (Wi-Fi Hub) to remove.
  4. In Devices , click the trash can icon for the garage doors to remove from the LiftMaster account.
  5. In Places , click the trash can icon for the Wi-Fi Hub (gateway) to remove from the LiftMaster account.
  6. On the LiftMaster dashboard, confirm that the gateway no longer appears in My Places & Devices .
  7. Wait about ten minutes, then actuate the garage door wall control two times.
  8. Next, try re-registering the Wi-Fi Hub (gateway) on Alarm.com’s website.

All of the remotes are disconnecting from the garage door opener during enrollment

For many garage door openers, pressing and holding the program/learn button causes the opener to forget all the devices that it is linked to. If all remotes are disconnected from the garage door opener, each remote needs to be re-enrolled if the user wants to continue using it. Try to hold down the learn button for a shorter period of time to avoid this in the future.

The 821LM is not operating the garage door opener

Verify the garage door opener is compatible via the information above. If the garage door is compatible, try to manually program the 821LM with the garage door.

Important : The following troubleshooting steps only apply to the 821LM. The 821LMB cannot be manually programmed using these steps.

To program the door sensor to the 821LM:
  1. Press and release the [1] button for door sensor 1 or [2] button for door sensor 2 on the 821LM. The yellow LED turns solid to indicate it’s active.
  2. Press and release the Test button on the door sensor until the 821LM beeps and the light flashes.
  • The yellow LED on the 821LM turns off.
  • The hub beeps once if the door sensor was programmed into slot 1. The hub beeps twice if the door sensor was programmed into slot 2. This helps identify which slot a door sensor is programmed to determine if the 1 or 2 button needs to be pressed for programming the garage door opener to the 821LM.

Note : Once a sensor is enrolled to a slot, press the test button on the tilt sensor at any time to identify which slot it belongs to based on if it beeps once for slot 1 or twice for slot 2.

To program the garage door opener to the 821LM:

Important : Use the results from programming the door sensor to the 821LM to determine if the 1 or 2 button needs to be pressed to program the garage door opener.

  1. Press and release the Gear Button (Settings), the Blue LED turns on solid.
  2. Press and hold the Gear Button again until the Green and Yellow LEDs alternate blinking.
  3. Press and release theGear Button again, the Yellow LED turns on solid.
  4. Depending on which slot the garage door opener is being programmed into, press and release the [1] or [2] button the number of times indicated in the following chart. Then the Yellow LED turns on solid.
    Hub garage code
  5. Press and release the Gear Button. The Yellow and Green LEDs blink.
  6. Press and release the Learn button on the garage door opener.
  7. Depending on which slot the garage door opener is being programmed into, press and release the [1] or [ 2] button until the garage door opener clicks.
  8. Depending on which slot the garage door opener is being programmed into, press and release the [1] or [ 2] button again to activate the garage door opener.
    • If the garage door opener does not activate, press and release the Gear Button , then repeat steps 3-8.
  9. Once the garage door activates, exit programming mode. To exit programming mode, press and hold the Gear Button until either the Blue LED blinks if Wi-Fi is not set up, or the Green LED turns on if Wi-Fi has already been connected.

Door Sensor reports status Unknown or Malfunction

If the door sensor reports an Unknown or Malfunction status, try the following steps to restore communication.

Note : The default status of the door sensor when it’s first enrolled is Unknown .

Locally open and close the garage door

Open and close the garage door using the opener’s wall control. A manual update of the garage door’s status can clear the malfunction and restore communication.

Verify the garage door opener is within communication range

The Wi-Fi hub should be installed on the ceiling in the garage where the garage door opener is located. The Hub should also be within 30 feet open air of the door sensor that is installed on the garage door.

Test the door sensor battery

Test the door sensor to verify the device is receiving power by pressing the door sensor’s Test button. The Yellow LED on the door sensor blinks, and the Wi-Fi Hub beeps once or twice to indicate the slot number the sensor is associated with.

  • If the Yellow LED on the door sensor does not blink, replace the 3 volt CR2450 Lithium battery

    • Once new battery is put in the door sensor, the garage door sensor should come back online. The garage door may need to be opened/closed using the garage door opener’s wall control for a manual update of the garage door’s status to restore communication.
    • If Yellow LED still does not blink after replacing with good batteries, the door sensor may need to be replaced.
  • If the Yellow LED blinks on the door sensor but the Wi-Fi Hub does not beep once or twice, the door sensor is not connected to the Wi-Fi Hub. It is recommended to remove the door and relearn it into the Wi-Fi Hub.

Door sensor reports Low Battery trouble condition

If the door sensor reports a Low Battery trouble condition on the Partner Portal or MobileTech app, try the following steps.

Replace the battery

This trouble condition can be resolved by replacing the battery in the door sensor. The MyQ Garage Door Tilt Sensor uses a 3 volt CR2450 Lithium battery

The MyQ Garage Door Tilt Sensor uses a 3 volt CR2450 Lithium battery.

The 821LM is not able to measure the current battery voltage of battery life of the tilt sensor. Battery level is actually measured by the 821LM as the number of cycles (up and down) that the sensor has transmitted since it was first learned into a MyQ Universal hub.

  • The MyQ Garage Door Tilt Sensor will report low battery at 7,000 cycles.
  • The MyQ Garage Door Tilt Sensor will typically stop functioning due to battery depletion after about 10,000 cycles.
  • While not documented, LiftMaster support has stated that the sensor can become less reliable in temperatures below 20° F.

There are two LiftMaster Garage Door Openers with a hub, and both doors Open/Close during the learning process or remote open/close commands

When sending commands to one of two LiftMaster garage door openers with a hub, both doors may open or close if both motors were left plugged in when learning two non-MyQ garage doors to one hub. Even after trying multiple factory resets, it may be determined that the doors are using the same channel. Due to this, it is always important to only power up the motor being enrolled one at that time.

This behavior is caused by the motor’s remote control memory having both 821LM slots enrolled. As a result, the only way to resolve this behavior is to erase the motor’s remote control memory.

Caution: Clearing the garage door motor’s remote control memory requires any remotes or codes to be re-enrolled after completion. Check the motor’s manual for steps on erasing and re-learning remotes. To verify the remote memory is clear, test one of the customer’s remotes. If the door still opens, it was not done successfully.

To resolve this behavior:

  1. After the remote memory on the motor is clear, remove any existing door information from the Wi-Fi Hub.
  • To clear the Wi-Fi Hub information, press and hold the [1] button on the 821LM for 10 seconds, and then do the same for the [2] button. When pressing the button, a yellow light appears, and when it is off, the motor memory for that slot is clear. Release the button once the yellow LED turns off.
  1. Power off the motor that is not being enrolled, and go through the enrollment process for one of the garage door motors.
  2. Once the first motor is enrolled, power off that motor and power on the other motor.
  3. Go through the enrollment process for the garage door motor currently power on.
  4. Once the second motor is enrolled, power on the first motor. Test remote commands to verify the garage motors are functioning properly.

Garage Door Activates on Its Own

In rare cases where the garage door opener seems to activate on its own, the issue could be human error or aging opener components, including:

  • A neighbor’s remote was inadvertently programmed to the opener.
  • A stuck button on a remote control.
  • A shorted wall-mounted door control sending unwanted signals to the garage door opener or logic board.

Reset or change wireless information on a MyQ Smart Garage Hub

Factory reset a LiftMaster MyQ Smart Garage Hub