Broadband (Cable, DSL, or Fiber Optic) Internet connection with a router.
Computer or web-enabled device
Username and password for the Alarm.com account
A router with a Wi-Fi Protected Setup (WPS) button or an Ethernet cable
If the router does not have a WPS button, and the camera will be connected to a wireless network, you will need the case-sensitive SSID (wireless network name) and the network WEP or WPA key (if encryption is enabled at the router).
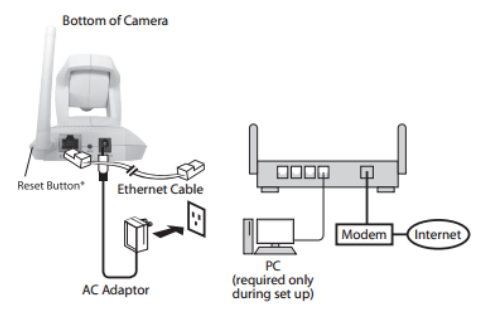
Connect the camera’s AC adapter and plug it into a non-switched outlet.
Press and hold the camera’s WPS button for 3 seconds and then press the corresponding WPS button on the router.
If the router does not have a WPS button or if you have trouble connecting, use a standard Ethernet cable to connect the camera to the network router.
Allow a few minutes for the camera and router to connect. When the LED is solid green, the wireless connection is complete.
Add the device to the account by using the Alarm.com app Video Installation Wizard, or by using a web browser and entering the following web address: www.alarm.com/addcamera
Follow the on-screen instructions to add and set up the video device
Note If using Ethernet for setup, the wireless network can be configured once the camera is added to the account. The ADC-V620PT can be permanently installed using either a wireless broadband connection or a wired Ethernet connection.
Once the camera is enrolled on the account, power down the camera and install it in its final location using the included hardware.
Solid Green: Connected to the internetLocal network and internet connection with Alarm.com IP.
Green Flashing: Local network connection. Local network connection with a local IP address, no internet.
Red Solid: Power on, or no network connection. Power on, system booting up typically 60-90 seconds. If solid red for longer than 60-90 seconds, then there is no local or Internet connection.
Note: If the LED is solid red with an intermittent green flash, the wireless network connection failed.
Red Flashing: Firmware update The camera firmware update is in progress.
Blue Flashing: WPS mode. WPS mode is active. To enter WPS mode, press and hold the WPS button for about three seconds.
Solid Blue: Privacy mode . Privacy mode is active. To toggle privacy mode on/off, press and release the WPS button.
-Red and Green Flashing: Factory reset. The camera is restoring to factory default settings.
Caution: If the camera is already installed, it may need to be removed from the Alarm.com account and re-added after a factory reset.
Resetting a device to its factory default settings removes all of its existing programming and memory. Most devices must be removed from the account and re-enrolled after a factory reset.
Wait at least 2 minutes for the device to power on fully before performing the following procedure. The factory reset might fail if the device is still powering on.
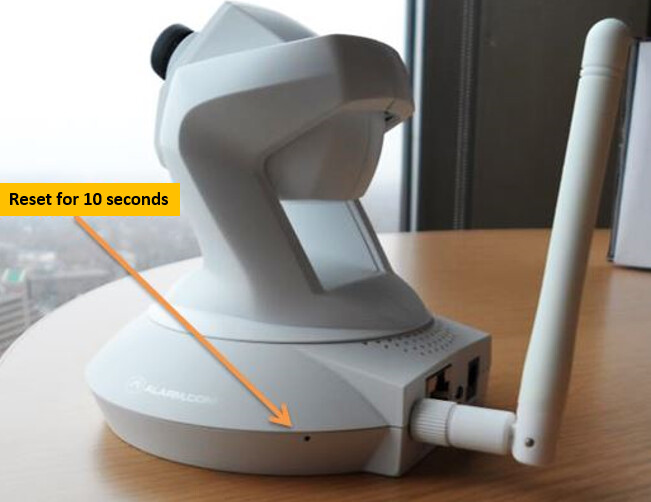
Hold the Reset button until LED rapidly flashes red and green, which happens at about 15 seconds. The Reset button can be found in the back pinhole, near the seam to the left of the antenna if facing the back of the camera.
Once the video device has been reset, it is normal for the LED to turn off momentarily. It is best to leave the video device plugged into power and undisturbed for 2 minutes after performing the factory reset.