What This Trouble Means
If your Honeywell/ADEMCO Vista panel is showing Check 103, Check 103 long range radio, or bF on the keypad, it means the panel’s communicator (the SEM module that connects your system to Alarm.com) is having trouble communicating with the monitoring station.
This can happen for several reasons. Work through the steps below in order — any single step may clear the trouble. Stop as soon as the error goes away.
How It Looks on Your Keypad
| Keypad Type | Display |
|---|---|
| Touchscreen (Tuxedo, 6280, 6270) | Check 103 long range radio |
| Alphanumeric keypad (6160, 6162) | Check 103 |
| Fixed English keypad (6150, 6148) | bF |
The Communication Device sends status messages to the control panel for network connectivity failures. Trouble messages are displayed on the keypad as “Check 103,” with status displayed as “LngRng Radio” followed by a 4-digit keypad display status code, defined below.
| Code | Description |
|---|---|
| 0000 | Control Panel lost communication with internal device |
| 000F | Communication device is not registered; account not activated |
| 0019 | Communicator shut down |
| 0400 | Communication device Power-on reset |
Troubleshooting Steps
Step 1 — Check Whether Your Panel Is a Vista 21iP (Start Here)
The Vista 21iP has a known jumper issue that directly causes the Check 103 error, so this is the first thing to rule out.
Identifying a 21iP: The 21iP is sometimes misidentified in the Alarm.com system. It may appear as a “Vista 20P v4.23” or a “Vista 10P” with an unusually low version number. Open the panel cabinet and look for a model label on the circuit board to confirm.
If you have a Vista 21iP:
- Power the panel down completely — unplug the transformer from the wall and disconnect the backup battery.
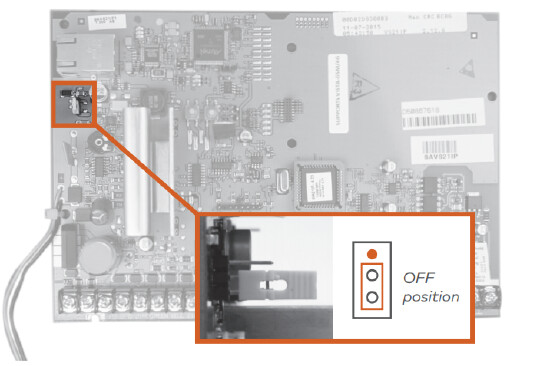
- Locate the jumper on the panel board and move it to the OFF position.
- Reconnect the battery, then plug the transformer back in.
- Allow the panel to fully restart and check the keypad.
If the trouble clears, you are done! If not, or if your panel is a 10P/15P/20P, continue to Step 2.
Step 2 — Power Cycle the communicator and panel at the same time
A clean reboot resolves many temporary communication errors.
- Power down the panel completely (unplug transformer, disconnect battery).
- Wait at least 30 seconds.
- Restore power by connecting the battery first followed by the and transformer. Allow both the panel and SEM to fully reboot before checking the keypad again.
Step 3 — Verify [*][29] Is Enabled
After a power cycle or zone scan, the communicator enable setting can sometimes get turned off. Check and re-enable it in panel programming.
- Enter your installer code on the keypad.
- Press [8][0][0] to enter programming mode.
- Press [*][2][9].
- Verify the value is set to 1 (enabled). If it shows 0, press 1 to change it.
- Exit programming by pressing [*][9][9].
Step 4 — Send a Real Signal to the Monitoring Station
The Check 103 error can persist if the panel has not yet successfully transmitted a signal to the central station. A communication test is not sufficient — it must be a real, panel-generated event.
To trigger a qualifying signal, you can:
- Arm and then disarm your system from the keypad or the Alarm.com app.
- Trigger a test alarm (contact Surety first to put your account on test mode so it does not dispatch).
After the signal is sent, check whether the trouble clears. If not, continue to Step 5.
Step 5 — Inspect Wiring and Verify Power
Loose or incorrect wiring between the panel and the SEM communicator is a common cause of this error.
- Open the panel and visually inspect all wiring connections at the terminal strips.
- Give each wire a gentle tug to confirm nothing is loose (sometimes called a “snug test”).
- Verify the wire connecting the SEM to the panel is the correct gauge and not excessively long.
- Check that the panel is receiving consistent, correct voltage. If you have a multimeter, you can verify the DC output from the transformer.
- Use the alarm.com power budget tool to make sure you are within the power limit
Step 6 — Check for AUI Device Conflicts
If you have a Tuxedo Touch or Honeywell 6280 touchscreen keypad, or if the panel erroneously thinks one is installed, it can cause communication errors.
To check the current AUI device setting:
- On your keypad, press [#][1][8][9].
- The display should read 00 00 00 00. If it shows anything other than all zeros, clear it using the steps below.
To reset the AUI device setting in programming:
- Enter your installer code.
- Press [8][0][0] to enter programming mode.
- Press [*][1][8][9].
- Enter 00 00 00 00 to clear all AUI device entries.
- Exit programming by pressing [*][9][9].
Still Not Resolved?
If you have worked through all of the steps above and the trouble is still showing, open a support topic or send us a private message and let us know which steps you have already completed. We are happy to help you work through it.