1080p Indoor Wi-Fi Camera (ADC-V523/523X)

Pre-installation checklist
- ADC-V523/523X camera (included).
- AC power adapter (included).
- Wireless (2.4 or 5 GHz) connection to broadband (Cable, DSL, or Fiber Optic) internet.
- A computer, tablet, or smartphone with Wi-Fi is required if the router does not have the Wi-Fi Protected Setup (WPS) feature.
There are three options for connecting the ADC-V523/523X to the Internet:
- Access Point (AP) mode,
- Wi-Fi Protected Setup (WPS) mode, and
- Ethernet mode.
Use WPS mode if you have easy access to the router and the router has the WPS feature enabled.
- Some Internet Service Providers disable the WPS feature on provided routers. AP mode is the most reliable wireless method for installing this device.
In the box
- ADC-V523/523X camera
- Mounting plate
- Power supply (10 feet)
- User guide
- Wall anchors & screws (x2)
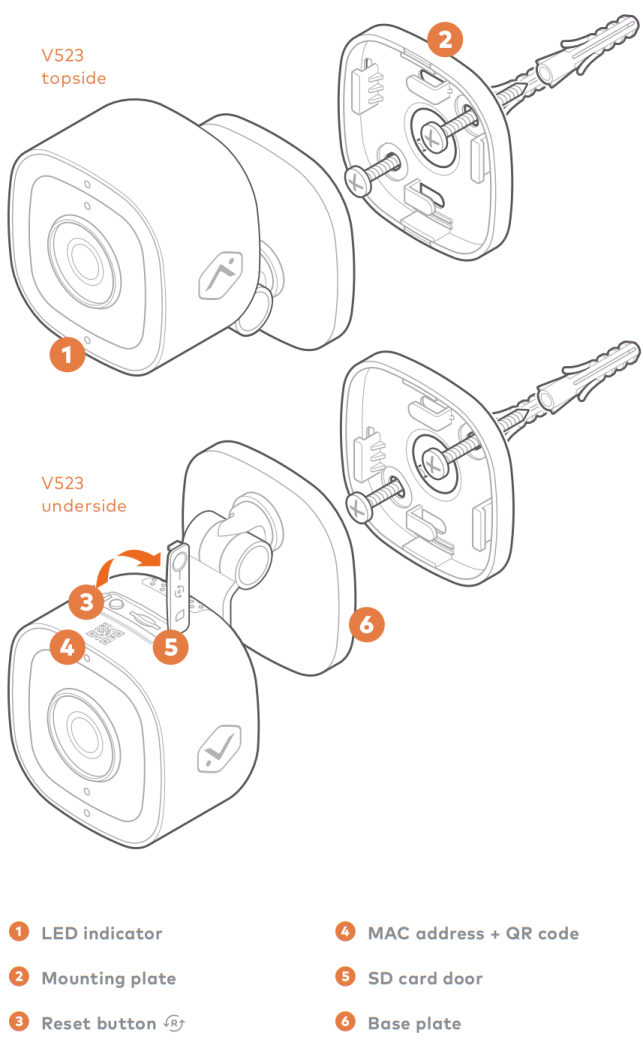
Overview
Connect the camera to the Wi-Fi network
AP mode
To ensure sufficient Wi-Fi signal, complete these steps with the camera near its final location but prior to mounting.
- Connect the camera’s AC power adapter and plug it into a non-switched outlet.
- The camera’s LED will begin to flash white. If the LED is not white after two minutes, hold down the Reset button and release when the LED begins to flash white at 6 seconds.
- On a Wi-Fi enabled device, connect to the wireless network ADC-V523/523X (XX:XX:XX) where XX:XX:XX is the last six characters of the ADC-V523/523X’s MAC address, which is located on the bottom of the camera or on the packaging.
- On the same device, open a web browser and enter http://v523install in the web address field. Follow the on-screen instructions to add the ADC-V523/523X to the Wi-Fi network. The LED will be solid green when the connection is complete.
- Add the device to the account by using the Alarm.com app Video Installation Wizard, or by using a web browser and entering the following web address: www.alarm.com/addcamera .
- Select the camera from the video device list or type in its MAC address to begin adding the camera. The camera’s MAC address is located on the bottom of the camera or on the packaging.
- Follow the on-screen instructions to finish adding the camera.
You may configure camera settings from the ADC Website. You can now power down the camera and install it in its final location using the included hardware.
WPS mode
To ensure sufficient Wi-Fi signal, complete these steps with the camera near its final location but prior to mounting.
- Connect the camera’s AC power adapter and plug it into a non-switched outlet.
- Hold down the Reset button on the bottom of the camera and release when the LED begins to flash blue at 3 seconds.
- Activate the WPS mode on the router. The camera will begin to connect to the wireless network. The LED will be solid green when the connection is complete.
- Add the device to the account byusing the Alarm.com app Video Installation Wizard, or by using a web browser and entering the following web address: www.alarm.com/addcamera .
- Select the camera from the video device list or type in its MAC address to begin adding the camera. The camera’s MAC address is located on the bottom of the camera or on the packaging.
- Follow the on-screen instructions to finish adding the camera.
You may configure camera settings from the ADC Website. You can now power down the camera and install it in its final location using the included hardware.
Ethernet mode
Complete these steps prior to installing the camera in its final location.
- Using an Ethernet cable, connect the camera to the network.
- Connect the camera’s AC power adapter and plug it into a non-switched outlet.
- Wait a few minutes for the camera to connect to the Internet. When the LED is solid green, the connection is complete. If the LED is not solid green after a few minutes:
- Power cycle the camera.
- Try a different Ethernet port on the router.
- Try to connect using a different mode (AP or WPS mode).
- Add the device to the account by using the Alarm.com app Video Installation Wizard, or by using a web browser and entering the following web address: www.alarm.com/addcamera .
- Select the camera from the video device list or type in its MAC address to begin adding the camera. The camera’s MAC address is located on the bottom of the camera or on the packaging.
- Follow the on-screen instructions to finish adding the camera.
- If the video device will be connected to the Wi-Fi network after this initial installation, be sure to configure the Wi-Fi network after the camera is added to the account.
You may configure camera settings from the ADC Website. You can now power down the camera and install it in its final location using the included hardware.