How to Get Started with Alarm.com Flex-IO

What is the Alarm.com Flex-IO (ADC-FLEX-100)

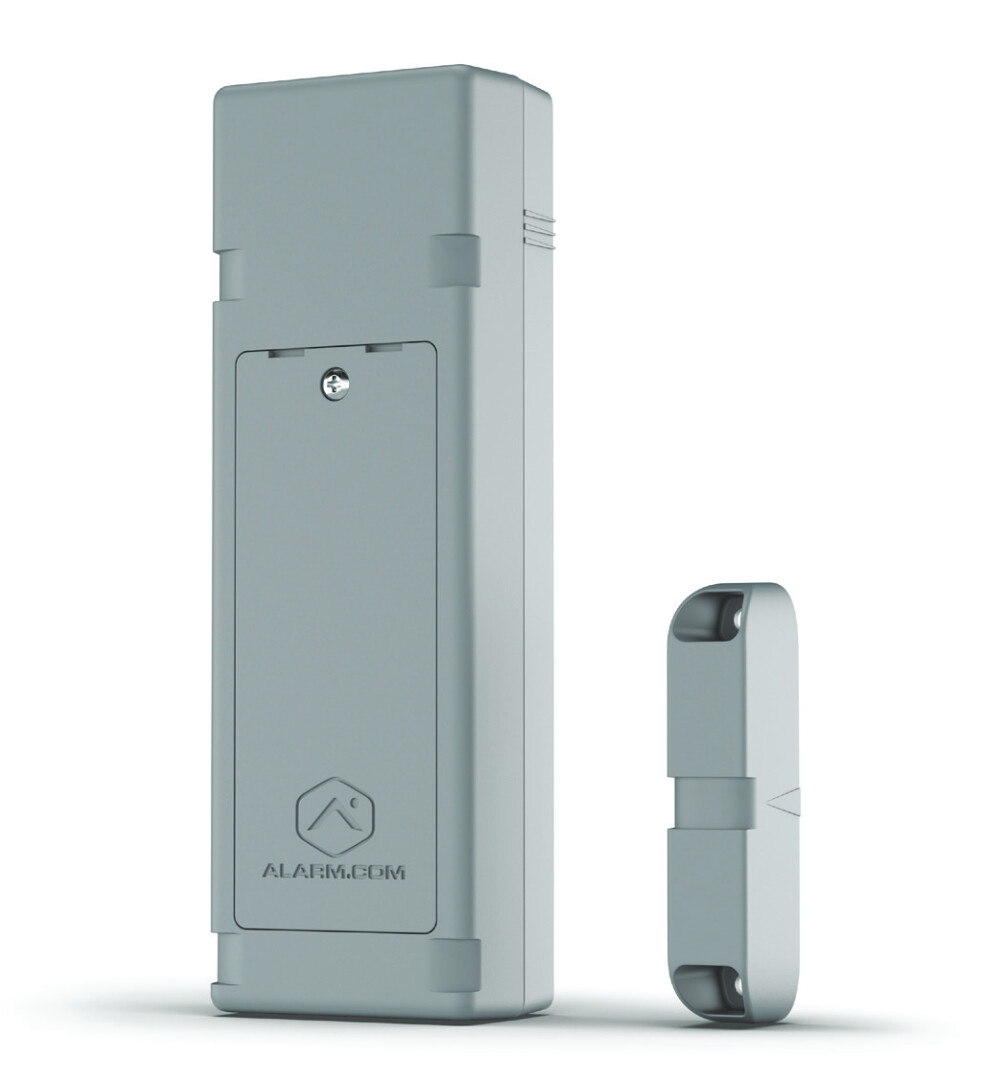
The Flex IO is a 4G LTE capable contact with 3 unique reed switch locations. It enables new levels of flexibility for monitoring valuable property and assets anywhere that LTE connectivity is available. Whether used with a backyard gate or a remote storage unit, the Flex IO empowers users to keep an eye on what matters most. It can be used with the included magnet to monitor doors, gates, and other entryways. It also comes equipped with input and output options for integrating compatible devices that lack long-range connectivity.

Features

  • Detect open/close using magnetic reed switch
  • Detect state change for third-party device using Loop Input
  • Change state of third-party and device using Relay Output (requires DC power to support always-on cellular connection)

Notifications
Flex IO supports Sensor Activity and Sensor Left Open notifications. At this time, notifications can only be sent when an open event occurs for a Flex IO device.

Note: The Flex IO is designed for property awareness only and cannot forward signals to a monitoring station.

Use Cases

Contact Sensor using built in reed switch. Allows you to use the Flex and built-in reed switch to monitor if something is opened or closed, such as:

  • Shed Doors
  • Storage Units
  • Chicken Coop
  • Fences
  • Delivery Boxes
  • RV Doors

Wired Contact Sensor using wired loop input. Wired Contact Sensor allows you to wire a contact sensor to the Flex using the loop input terminal

  • Install the Flex in a discrete and convenient location and wire the sensor to your door, window or entry point

Pull-Apart Sensor using pull-apart or Magnapull sensor. Wired Contact Sensor allows you to use the Flex with a pull-apart or Magnapull sensor. This could be used to determine if something is moved from its location. Great for:

  • Lawn Mowers
  • Yard Decorations
  • Jet Skis
  • Boat Lifts
  • Motorcycles Machinery

In the box

  • Optional EOL (end of line) resistor to detect cut wires. EOL resistor can be 300 kΩ or higher. Normally Open configuration is preferred for low power usage.
  • Optional mount tamper and battery door tamper alerts• Multiple mounting options, including screws or zip ties.
  • Multiple carrier options, including AT&T and Verizon (US only).

Specifications

Ingress Protection: IP56

Temperature: Battery life will be optimal between temperatures of 32°F to 140°F (0°C to 60°C), though the device can operate from -40°F to 140°F (-40°C to 60°C).

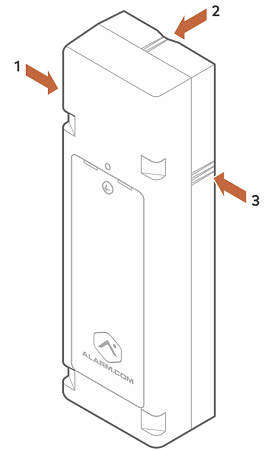
Reed Switches: 3 unique reed switch locations to choose from that can be activated with included magnet.

Loop Input: Flex IO can be powered by battery or external power. Dry Contact, Normally Open (NO), or Normally Closed (NC). Optional EOL resistor can be 300 kΩ or higher.

Relay Output If used, Flex IO must be externally powered (not compatible with battery power). Up to 24 V (AC or DC), 40 mA max current. Can be used only for control lines/dry contact. Can never be connected directly to control electrical loads. This will damage the device.

Dimensions: Main unit: 6.8 x 2.2 x 1.3" (17.3 x 5.6 x 3.3 cm). Magnet: 3.1 x 0.68 x 0.87" (7.9 x 1.7 x 2.2 cm).

Power: Works with DC-wired power or battery power (battery backup recommended for wired installations). 6 to 15 VDC supply. Minimum 1 A.

Battery Power: Four 1.5 V AA lithium batteries (iron disulfide). 2+ years of battery life, depending on battery chemistry and operating temperature.|

1 Like

How to get started with Flex-IO and Surety

Currently, the Flex-IO can be obtained as an add-on to an existing service account through Surety. The Flex-IO add-on is $3.00 /mo per Flex-IO sensor in use.

Add on pricing is for service only, the Flex-IO sensors are sold separately (and not available through Surety at this time.)

If interested in adding this feature to your existing account, please reach out to support@suretyhome.com or send us a Private Message. Be sure to include the following

1. Serial Number (Device IMEI) of each Flex-IO sensor to be included. This is found in the battery compartment.

2. Device Name (I.E Barn Door)

3. How will this Flex IO be used? Choose one type for each Flex IO in use. Answer all questions for each type (see below for additional details):

  • Contact Sensor with Reed Switch

    • Reed Switch (None, Left, Right, Top)
    • Enable Battery Tamper: Yes/No
    • Enable Mounting Tamper: Yes/No
  • Wired Contact Sensor with Wired Loop Output

    • Enable Loop Input: Yes/No
    • EOL Resistor Installed: Yes/No
    • Invert Activation State : Yes/No
    • Enable Battery Tamper: Yes/No
    • Enable Mounting Tamper: Yes/No
  • Pull-Apart Sensor*

    • Enable Loop Input: Yes/No
    • EOL Resistor Installed: Yes/No
    • Invert Activation State : Yes/No
    • Enable Battery Tamper: Yes/No
    • Enable Mounting Tamper: Yes/No
  • Gate Control & Contact Sensor

    • Reed Switch (None, Left, Right, Top)
    • Programmable Output (Relay): Enable/Disable
    • Enable Battery Tamper: Yes/No
    • Enable Mounting Tamper: Yes/No
  • Gate Control & Wired Contact

    • Invert Activation State : Yes/No
    • Enable Battery Tamper: Yes/No
    • Enable Mounting Tamper: Yes/No

How will this Flex be used?

  • Contact Sensor (using built-in reed switch)
    • Selecting Contact Sensor allows you to use the Flex and built-in reed switch to monitor if something is opened or closed.
  • Wired Contact Sensor (using wired loop input)
    • Selecting Wired Contact Sensor allows you to wire a contact sensor to the Flex using the loop input terminal.
  • Pull-Apart Sensor
    • Selecting Wired Contact Sensor allows you to use the Flex with a pull-apart or Magnapull sensor. This could be used to determine if something is moved from its location.
  • Gate Control & Contact Sensor
    • Selecting Gate Control & Contact Sensor or Gate Control & Wired Contact allows you to use the Flex with a compatible gate controller.
  • Gate Control & Wired Contact
    • Selecting Gate Control & Contact Sensor or Gate Control & Wired Contact allows you to use the Flex with a compatible gate controller

Contact Sensor (using built-in reed switch)

  • Reed Switch:
    CatMSensorDiagram

    • No Reed Switch
    • Left Position (1)
    • Top Position (2)
    • Right Position (3)
  • Device Tamper

    • Enable Battery Tamper: Yes/No
    • Enable Mounting Tamper: Yes/No

Wired Contact Sensor (using wired loop input)

Loop Input

  • Enable Loop Input: Yes/No

    • Hardwired device loop input for external, dry contact sensor input
  • EOL Resistor Installed: Yes/No

    • Install the EOL resistor to trigger notifications when sensors wired to the input loop are tampered with.
  • Invert Activation State : Yes/No

    • If sensor status is showing in the opposite state or notifications are opposite from what is expected, Invert Activation State can be used to correct it. For example, if a sensor is currently showing as closed when it is open, enabling this setting will show the sensor as open. Additionally, any Alarm.com Notifications will be sent with this corrected sensor state.
  • Device Tamper

    • Enable Battery Tamper: Yes/No
    • Enable Mounting Tamper: Yes/No

Pull-Apart Sensor

Loop Input

  • Enable Loop Input: Yes/No

    • Hardwired device loop input for external, dry contact sensor input
  • EOL Resistor Installed: Yes/No

    • Install the EOL resistor to trigger notifications when sensors wired to the input loop are tampered with.
  • Invert Activation State : Yes/No

    • If sensor status is showing in the opposite state or notifications are opposite from what is expected, Invert Activation State can be used to correct it. For example, if a sensor is currently showing as closed when it is open, enabling this setting will show the sensor as open. Additionally, any Alarm.com Notifications will be sent with this corrected sensor state.
  • Device Tamper

    • Enable Battery Tamper: Yes/No
    • Enable Mounting Tamper: Yes/No

Gate Control & Contact Sensor

  • Reed Switch:
    CatMSensorDiagram

    • No Reed Switch
    • Left Position (1)
    • Top Position (2)
    • Right Position (3)
  • Programmable Output (Relay)

    • Enable/Disable Note: Programmable outputs will require external power to the device.
  • Device Tamper

    • Enable Battery Tamper: Yes/No
    • Enable Mounting Tamper: Yes/No

Gate Control & Wired Contact

Loop Input

  • Enable Loop Input: Yes/No

    • Hardwired device loop input for external, dry contact sensor input
  • EOL Resistor Installed: Yes/No

    • Install the EOL resistor to trigger notifications when sensors wired to the input loop are tampered with.
  • Invert Activation State : Yes/No

    • If sensor status is showing in the opposite state or notifications are opposite from what is expected, Invert Activation State can be used to correct it. For example, if a sensor is currently showing as closed when it is open, enabling this setting will show the sensor as open. Additionally, any Alarm.com Notifications will be sent with this corrected sensor state.
  • Programmable Output (Relay)

    • Enable/Disable Note: Programmable outputs will require external power to the device.
  • Device Tamper

    • Enable Battery Tamper: Yes/No
    • Enable Mounting Tamper: Yes/No
  • Reed Switch:
    CatMSensorDiagram

    • No Reed Switch
    • Left Position (1)
    • Top Position (2)
    • Right Position (3)